Sheet Pan Meals for Beginners: The 4-2-1 Formula Guide

What’s in this guide
- What Is a Sheet Pan Meal?
- Why Sheet Pan Cooking Works for Beginners
- The Foolproof 4-Step Formula (The 4-2-1 Method)
- The Sheet Pan Timing Matrix
- 5 Beginner Sheet Pan Dinner Templates
- Sheet Pan Meals for Special Situations
- Make-Ahead & Meal Prep Strategies
- Popular Sheet Pan Styles & Flavor Profiles
- Troubleshooting Sheet Pan Mistakes
- Frequently Asked Questions
- Your Next Sheet Pan Dinner Starts Tonight
Sheet pan meals are single-pan dinners where protein, vegetables, oil, and seasoning roast together in one oven. This guide teaches beginner home cooks the repeatable formula behind every great sheet pan dinner — including a printable Timing Matrix, 5 customizable templates, and a troubleshooting section for the most common mistakes.
Table of Contents
- What Is a Sheet Pan Meal?
- Why Sheet Pan Cooking Works for Beginners
- The Foolproof 4-Step Formula (The 4-2-1 Method)
- The Sheet Pan Timing Matrix
- 5 Beginner Sheet Pan Dinner Templates
- Sheet Pan Meals for Special Situations
- Make-Ahead & Meal Prep Strategies
- Popular Sheet Pan Styles & Flavor Profiles
- Troubleshooting Sheet Pan Mistakes
- Frequently Asked Questions
- Your Next Sheet Pan Dinner Starts Tonight
It’s 6pm on a Tuesday. You’re staring into the fridge, tired, and still have no idea what’s for dinner. Sound familiar? Most weeknight cooks feel exactly this way — and then spend 45 minutes using four pots, only to end up with dry chicken and a sink full of dishes.
Sheet pan meals for beginners solve all of that. You choose your protein, pile on some vegetables, add oil and seasoning, and let the oven do the heavy lifting. No stirring. No babysitting. No mountain of dishes.
“The easiest sheet pan dinners when life gets busy! Pick a recipe, toss it on a pan, and let the oven do the heavy lifting!”
By the end of this guide, you’ll have a repeatable formula for sheet pan meals for beginners so you can cook a full dinner with one pan and five minutes of prep. You’ll also get a Timing Matrix covering 20+ ingredients, 5 customizable dinner templates, and a full troubleshooting section for the most common mistakes.
What Is a Sheet Pan Meal?
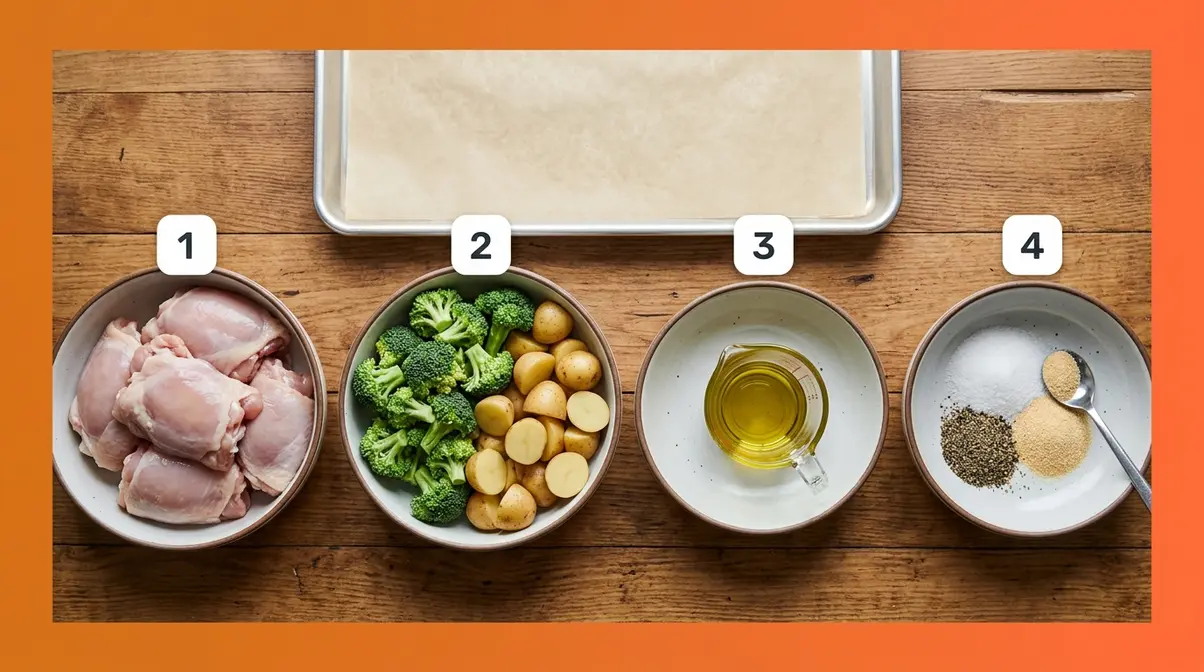
A sheet pan meal combines protein, vegetables, oil, and seasoning on a single rimmed baking sheet, roasting together at high heat to produce a complete dinner with one pan to clean. The entire meal — chicken, broccoli, potatoes, and all — goes into the oven at the same time and comes out ready to eat. No stovetop juggling, no multiple pots, no complicated timing across four burners.
You may also see this called a “sheet tray dinner,” a “baking sheet dinner,” or a “one sheet pan meal” — these all refer to exactly the same thing. The key is dry oven heat at high temperature, which is what separates this method from a casserole (moist heat, trapped steam) or a stir-fry (stovetop, constant stirring). Think of it like this: a casserole traps steam inside a covered dish; a sheet pan meal lets steam escape, which is exactly how you get crispy edges and deep flavor.
That flavor comes from a process called the Maillard reaction — the chemical process that turns food brown and creates deep, complex flavor when exposed to dry heat above 300°F. It’s the same reason a toasted piece of bread tastes better than a steamed one. A sheet pan at 400–425°F triggers this reaction beautifully. Boiling or steaming never reaches the temperatures needed to make it happen.
This method is ideal for beginners because it requires minimal equipment, tolerates slight timing errors, and works with nearly any combination of protein and vegetables. You’ll learn the exact system — called The 4-2-1 Formula — in detail in the section below. For a broader look at one-dish cooking approaches, understanding one-dish meal concepts provides helpful foundational context.
What Counts as a Sheet Pan Meal?
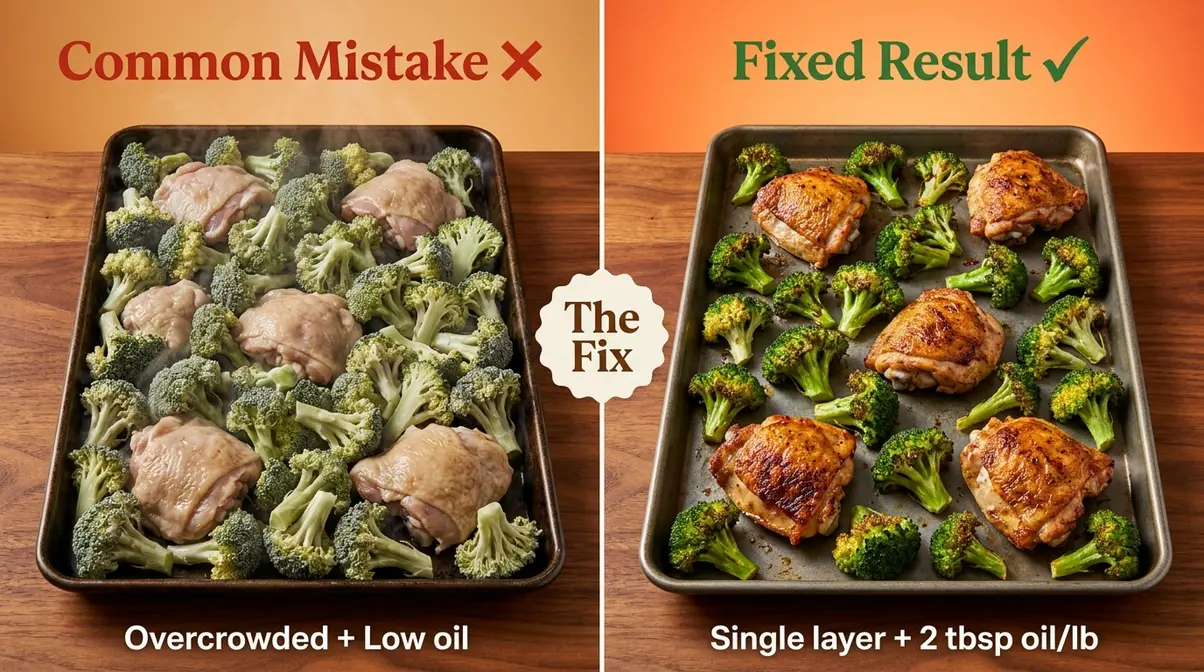
Sheet pan meals for beginners are oven-roasted dinners built on one rimmed baking sheet with protein, vegetables, oil, and seasoning. The rim on the pan is non-negotiable — it keeps cooking juices inside the oven where they belong, not dripping onto the oven floor.
“Sheet pan,” “sheet tray,” “baking sheet dinner,” and “one sheet pan meals” all refer to the same cooking method. What does NOT qualify: casseroles (which use moist heat in a covered dish), stir-fries (stovetop, not oven), and foil-packet meals (steam cooking, not roasting). The distinction matters because the science is different. Roasting uses dry heat and open air circulation. That’s what creates the browning, the crispy edges, and the rich flavor you’re after.
Key Concepts & Terminology
Before you start cooking, here are the five terms that will come up throughout this guide:
- Half-sheet pan: An 18×13-inch rimmed aluminum baking sheet — the standard size for sheet pan cooking. A quarter-sheet pan (9×13 inches) works for two servings.
- Parchment paper: A heat-safe paper liner that prevents food from sticking and reduces cleanup to about 10 seconds.
- Roasting: Cooking with dry oven heat at 400°F or higher, which caramelizes food and creates flavor. This is different from steaming, which uses trapped moisture at lower heat.
- Single layer: All ingredients spread in one flat layer on the pan, not piled or stacked on top of each other. This is the most critical rule in sheet pan cooking.
- The 4-2-1 Formula: The repeatable system this guide is built on — 4 ingredients, 2 rules, 1 pan. Full breakdown in the next section.
With the vocabulary in place, here’s the science that makes sheet pan cooking so reliable — even for first-timers.
Why Sheet Pan Cooking Works for Beginners
Sheet pan cooking works for beginners because it trades active stovetop attention for passive oven time. You prep for 5–10 minutes, slide the pan in, and the oven does the rest — including developing the caramelized, roasted flavors that make the meal taste far more complex than the effort involved. Easy sheet pan recipes are popular for good reason: the method is genuinely forgiving in a way that stovetop cooking simply isn’t.
Think of your oven as a hands-free chef. Once the pan goes in, you’re free to set the table, help with homework, or just sit down. A few extra minutes in the oven rarely ruins a meal — unlike stovetop garlic, which burns in 30 seconds. That built-in buffer is the biggest beginner advantage that almost no cooking guide mentions. The 4-2-1 Formula you’ll learn in the next section makes all of this even more automatic.
The 5 Real Benefits of One-Pan Cooking
Here’s why busy weeknight cooks keep coming back to this method:
- Time: 5–10 minutes of active prep plus 20–35 minutes of hands-off oven time, compared to stovetop meals that demand constant attention.
- Cleanup: One pan lined with parchment paper means under 5 minutes of cleanup — versus the 4–6 pots and pans a typical dinner requires.
- Flexibility: Works with nearly any protein and vegetable combination (the 4-2-1 Formula makes this systematic, not guesswork).
- Forgiveness: The oven’s even, surrounding heat means a few extra minutes rarely ruins the meal.
- Nutrition: Roasting preserves nutrients better than boiling — more on this below.
On a busy Tuesday, this means dinner is ready before the dishwasher finishes its cycle. For more ways to build on this foundation, mastering sheet pan meal basics covers the next level of technique. Multiple published studies show that boiling causes the largest losses of total phenolics and antioxidant capacity in many vegetables, largely because water-soluble antioxidants leach directly into the cooking water (study on roasting and antioxidant retention, PubMed, 2014). Sheet pan roasting avoids that entirely.
Sheet pan cooking is one of the most time-efficient dinner methods available — delivering a complete, nutritious meal in under 40 minutes with one pan to wash.
Transition: Beyond convenience, there’s a nutritional reason to reach for your sheet pan over your stovetop.
Does Roasting Destroy Nutrients?
Roasting is one of the better cooking methods for preserving nutrients — and the science backs this up clearly. Research published on PubMed found that boiling had the highest negative effect on total polyphenols and flavonoid content across multiple vegetables, with losses up to 70.3% for total phenolics compared to raw (Buratti et al., 2023, PMC). In contrast, baking and grilling — the oven equivalents of sheet pan roasting — consistently showed smaller reductions in antioxidant activity.
Maximizing nutrient retention when roasting is supported by Ohio State University Extension research, which recommends slightly lower, controlled temperatures to preserve more nutrients when roasting vegetables. The practical takeaway: 400°F is a reliable default that balances flavor development with nutrient preservation.
For example, broccoli roasted at 400°F for 15–20 minutes retains most of its antioxidants and vitamin C — and tastes far better than boiled broccoli. The key is not to overcook: remove vegetables when the edges are golden and slightly crisp, not dark brown or blackened. That’s the visual cue that tells you the Maillard reaction has done its work without crossing into nutrient-damaging territory.
Now that you know why sheet pan cooking works, here is the exact system that makes it foolproof — even on your very first try.
The Foolproof 4-Step Formula (The 4-2-1 Method)
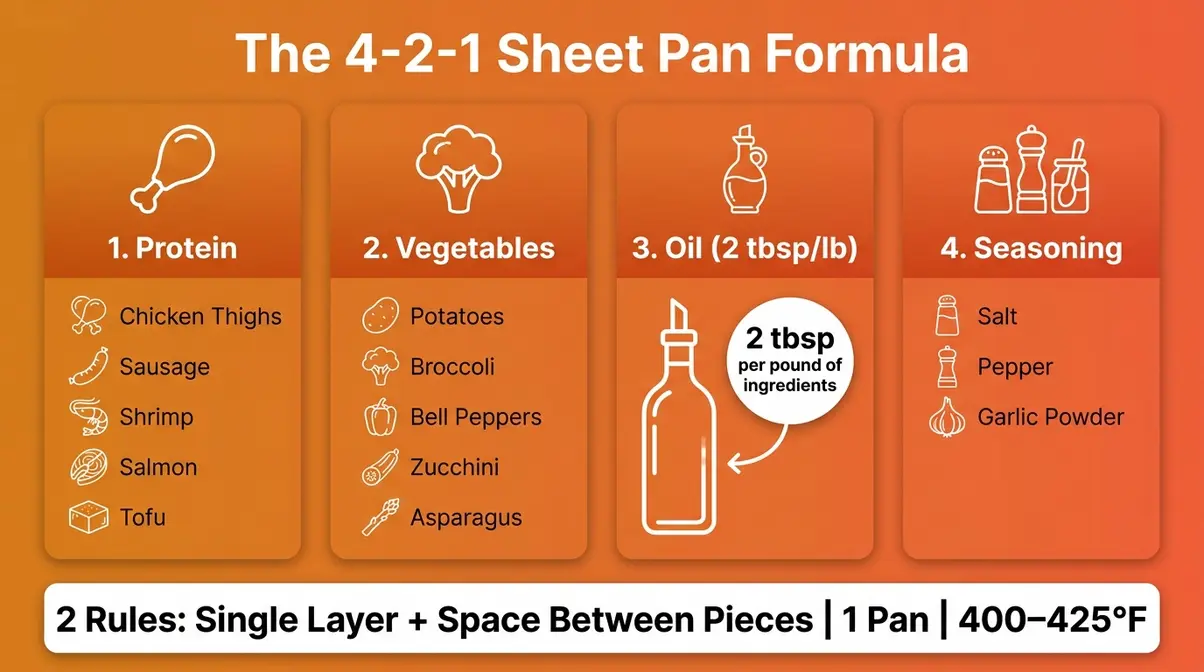
Every successful sheet pan meal — from a simple weeknight chicken dinner to a flavor-packed sausage and pepper dinner — follows the same system. The 4-2-1 Formula reduces one sheet pan meals to their core: 4 ingredients, 2 rules, 1 pan. Master this, and you’ll never need to follow a recipe exactly again.
“The easiest sheet pan dinners when life gets busy! Pick a recipe, toss it on a pan, and let the oven do the heavy lifting!”
The 4-2-1 Formula — 4 ingredients, 2 rules, 1 pan — is the repeatable system behind every successful sheet pan meal for beginners.
For a step-by-step visual walkthrough of The 4-2-1 Formula in action, watch our beginner tutorial:
Equipment & Pantry Basics
Before you build your first sheet pan dinner, gather these items:
- Equipment:
- Half-sheet pan (18×13-inch rimmed aluminum baking sheet) — the rim keeps juices in the oven, not on the oven floor. Light-colored aluminum is preferred; dark pans absorb more heat and can burn the bottom of your food before the top is cooked.
- Parchment paper or aluminum foil — for lining the pan
- Large mixing bowl — for tossing ingredients in oil before they go on the pan
- Instant-read meat thermometer — optional but strongly recommended for beginners checking chicken doneness
- Pantry basics (these four cover 80% of beginner sheet pan recipes):
- Olive oil or avocado oil
- Salt and black pepper
- Garlic powder
What NOT to buy: Dark non-stick pans cause burning on the bottom before the food is cooked through. Glass baking dishes retain moisture and cause steaming rather than roasting — the opposite of what you want.
A $15 heavy-duty aluminum half-sheet pan from any kitchen store is genuinely all you need to start. For easy one-pan dinner recipes to cook alongside this guide, that resource covers a wide range of combinations.
With your pan ready and pantry stocked, here’s how to build any sheet pan meal from scratch.
Step-by-Step: The 4 Ingredients
Here are the four ingredient decisions that make up The 4-2-1 Formula:
1. Choose Your Protein
Pick one: chicken thighs (the most forgiving — they stay moist even if slightly overcooked), sausage (pre-cooked varieties are the fastest option), shrimp (fastest-cooking protein, always add last), salmon (rich flavor, pairs with almost anything), or firm tofu (press it dry before roasting for best results). Even a “struggle meal” night with just chicken and whatever vegetables are in the fridge works perfectly with this formula. According to Harvard’s recommendations for healthy cooking oils, healthy vegetable oils like olive and avocado oil are the best choices for cooking.
2. Choose Your Vegetables
Cut everything into similar-sized pieces — this is the single most important prep step for even cooking. Dense vegetables (carrots, potatoes, sweet potatoes, parsnips) need the longest roasting time. Cruciferous vegetables (broccoli, cauliflower) need medium time. Quick-cooking vegetables (zucchini, cherry tomatoes, asparagus, bell peppers) go on the pan later in the cooking process.
3. Add Oil — 2 Tablespoons Per Pound of Ingredients
Toss everything in a large bowl first, not directly on the pan. Coat every piece. Without enough oil, food dries out and steams instead of roasting — you’ll end up with gray, limp vegetables instead of golden, caramelized ones. Two tablespoons per pound is a reliable starting ratio.
4. Season Generously
Salt, pepper, and garlic powder form the base formula. Add paprika, Italian seasoning, or cumin to change the flavor profile entirely. Season more than you think you need — the oven mellows flavors as food roasts.
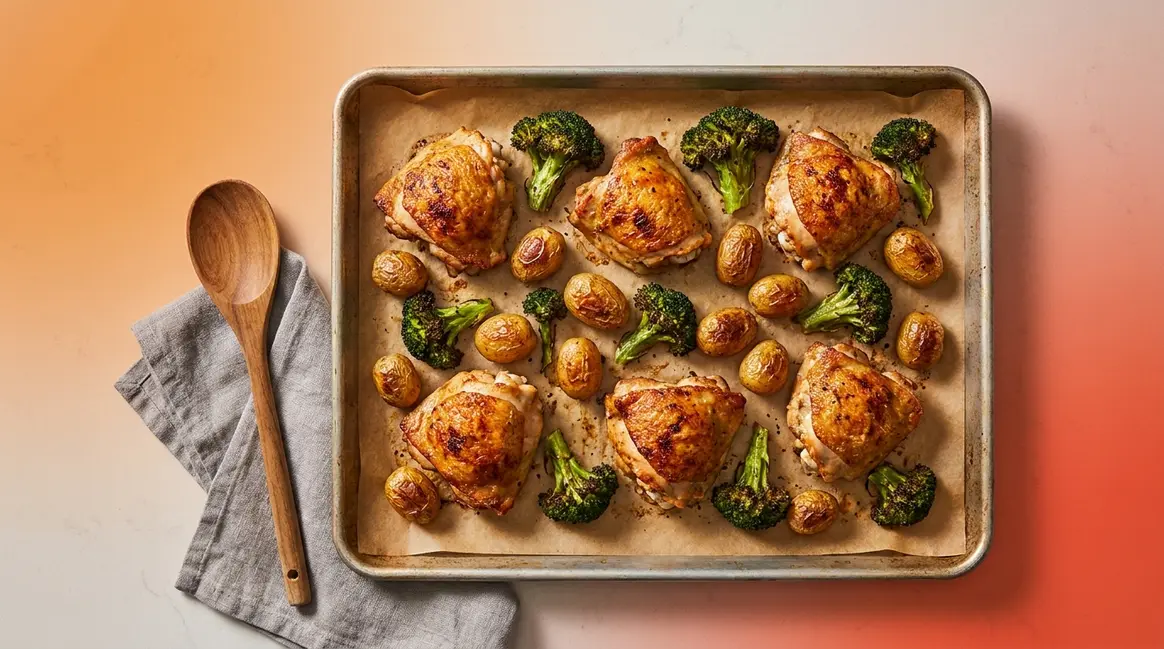
A simple example: Chicken thighs (Step 1) + broccoli florets and baby potatoes (Step 2) + 2 tbsp olive oil (Step 3) + salt, pepper, garlic powder (Step 4) = dinner in 35 minutes.
The ingredients are only half the formula. The two rules that follow are what separate a perfectly roasted dinner from a steamed, soggy one.
The 2 Rules That Guarantee Results
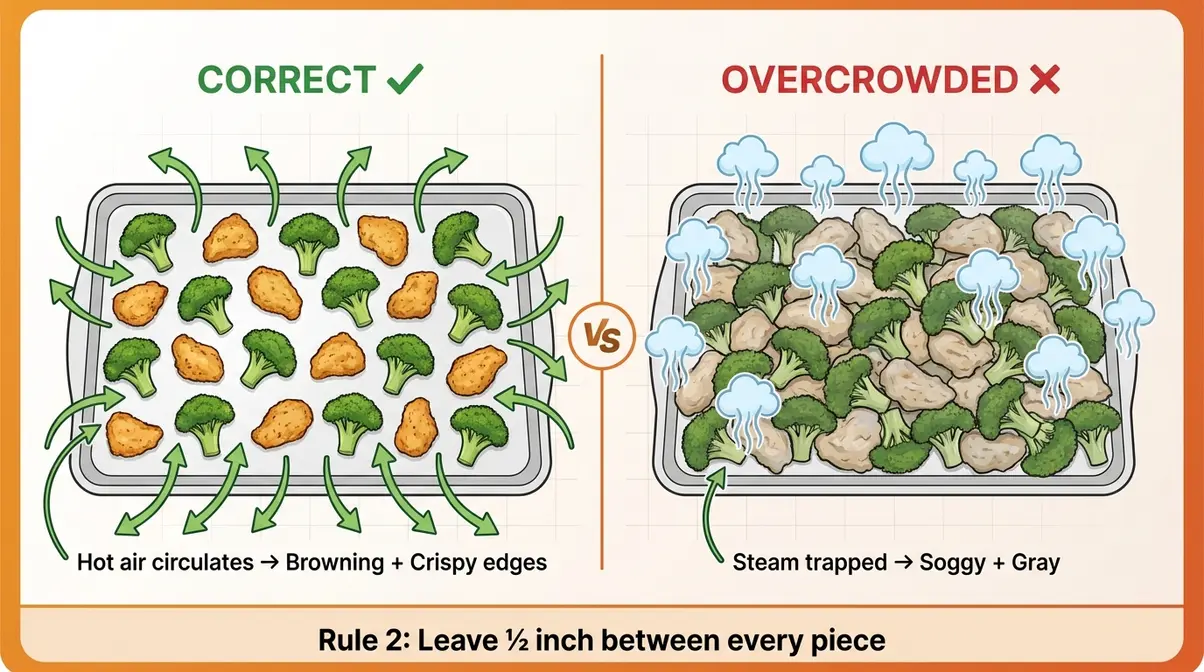
The 4-2-1 Formula has two non-negotiable rules. Both come down to one principle: hot oven air needs to circulate around every piece of food to trigger the Maillard reaction and create browning.
Rule 1 — Single Layer
All ingredients must lie in one flat layer on the pan, not stacked or piled. Stacked food traps steam from the layer below, which prevents browning entirely. Analogy: stacking ingredients on a sheet pan is like covering a grill — you get steamed food, not grilled food. One flat layer, always.
Rule 2 — Space Between Pieces
Leave at least ½ inch between each piece of food. Crowded pieces trap moisture and steam each other. The hot oven air needs to circulate around every surface to trigger browning. Practical test: if pieces are touching, they’re too close. Spread them across two pans if needed.
The Two Pan Rule: If your ingredients don’t fit in a single layer with proper spacing, use a second pan. Never crowd everything onto one pan just to avoid washing an extra sheet. A full pound of broccoli florets fills a half-sheet pan in a single layer with correct spacing. If you’re cooking for four, plan on two pans.
Now that you know the formula, the next question every beginner asks is: how long does everything actually take to cook? That’s where the Timing Matrix comes in.
The Sheet Pan Timing Matrix
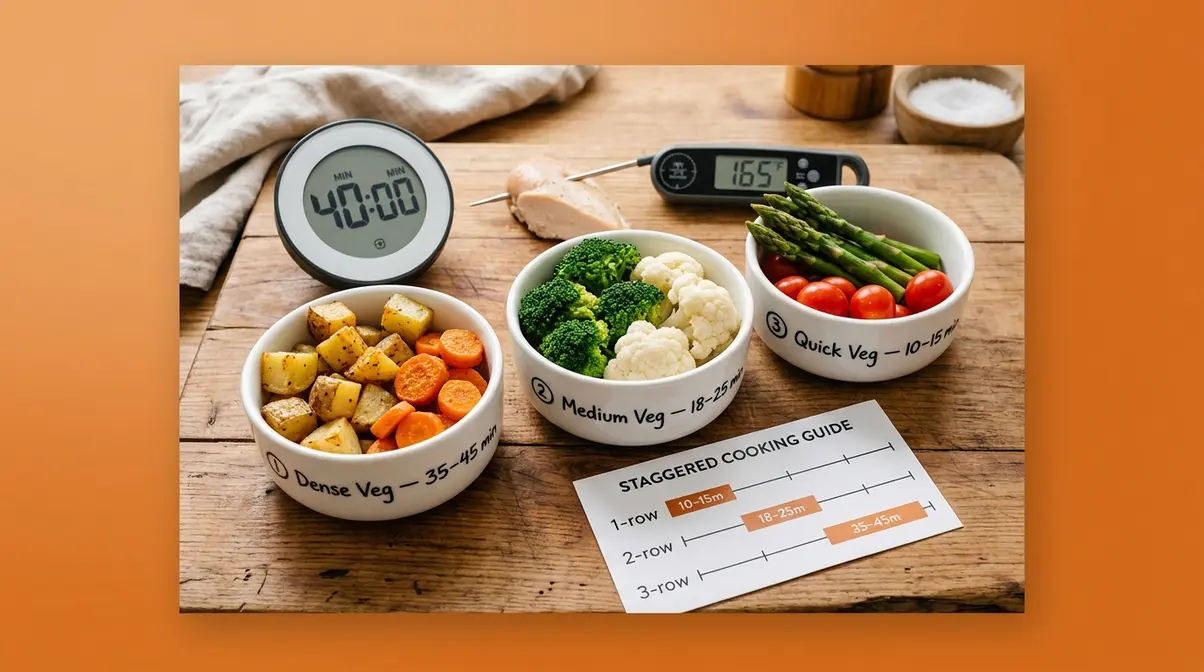
The Timing Matrix is the most practical tool in this guide — and the one thing no competitor offers in a structured, printable format. Use it alongside The 4-2-1 Formula: once you’ve built your ingredient combination (Steps 1–4), use the matrix to stagger your cooking times so everything finishes together. The key beginner insight: not everything goes on the pan at the same time.
Temperature guide: 400°F (200°C) is the standard default for most sheet pan dinners. Use 425°F (220°C) for crispier results, especially with potatoes and root vegetables. Drop to 375°F (190°C) for delicate proteins like salmon to avoid drying them out.
Beginner’s Rule of Thumb: When in doubt, check with an instant-read meat thermometer rather than guessing by color. Color can be misleading; internal temperature is the only reliable indicator of doneness.
Protein Roasting Times
All times assume a 400–425°F oven. Always verify with an instant-read thermometer. According to the USDA Safe Minimum Internal Temperature Chart, safe minimum internal temperatures are 165°F for all poultry, 145°F (with a 3-minute rest) for fish and whole cuts of pork, and 145°F for salmon.
| Protein | Temp | Time | Safe Internal Temp | Notes |
|---|---|---|---|---|
| Chicken thighs (bone-in) | 425°F | 35–40 min | 165°F | Most forgiving; stays moist |
| Chicken thighs (boneless) | 425°F | 20–25 min | 165°F | Fastest chicken option |
| Chicken breast (boneless) | 400°F | 22–28 min | 165°F | Check early to avoid drying |
| Sausage (pre-cooked) | 400°F | 15–20 min | 160°F | Just needs browning |
| Salmon fillet | 375°F | 12–15 min | 145°F | Lower temp prevents drying |
| Shrimp (peeled) | 400°F | 6–10 min | Opaque + pink | Add in final 8–10 min |
| Firm tofu (pressed, cubed) | 425°F | 25–30 min | N/A — golden exterior | Press dry before oiling |
| Pork chops (boneless) | 400°F | 20–25 min | 145°F + 3-min rest | Let rest before cutting |
Vegetable Roasting Times
Cut vegetables into similar-sized pieces for even cooking. Dense vegetables always go on the pan first.
| Vegetable | Temp | Time | Notes |
|---|---|---|---|
| Potatoes (cubed, 1-inch) | 425°F | 35–45 min | Start with protein |
| Sweet potatoes (cubed) | 425°F | 30–40 min | Start with protein |
| Carrots (thick coins) | 425°F | 25–30 min | Start with protein |
| Parsnips (cubed) | 400°F | 25–30 min | Start with protein |
| Cauliflower florets | 425°F | 20–25 min | Add 10–15 min after protein |
| Broccoli florets | 425°F | 18–22 min | Add 15 min after protein |
| Bell peppers (sliced) | 400°F | 20–25 min | Add 10–15 min after protein |
| Green beans | 400°F | 15–20 min | Add 15–20 min after protein |
| Asparagus | 425°F | 10–15 min | Add in final 12–15 min |
| Zucchini (sliced) | 400°F | 12–15 min | Add in final 12–15 min |
| Cherry tomatoes | 400°F | 10–12 min | Add in final 10 min |
Stagger Your Ingredients
The “stagger timing” concept is what separates a perfectly cooked sheet pan meal from an uneven one. The idea is simple: dense, slow-cooking ingredients start first; quick-cooking ingredients join partway through.
Practical example — Chicken thighs with broccoli and potatoes at 425°F:
- 0 minutes: Place chicken thighs and cubed potatoes on the pan. Slide into the oven.
- 20 minutes: Add broccoli florets to the pan. Everything continues roasting together.
- 35–40 minutes: Chicken reaches 165°F internal. Potatoes are golden. Broccoli is crisp-edged. Dinner is done.
If you added the broccoli at the start, it would be burnt and bitter by the time the chicken was cooked through. Staggering solves this entirely. The matrix tells you exactly when each ingredient joins the pan — no guesswork needed.
Sheet pan cooking at 400–425°F takes 35–45 minutes for a complete dinner, with 5–10 minutes of active prep — one of the most time-efficient cooking methods for busy weeknight meals.
5 Beginner Sheet Pan Dinner Templates
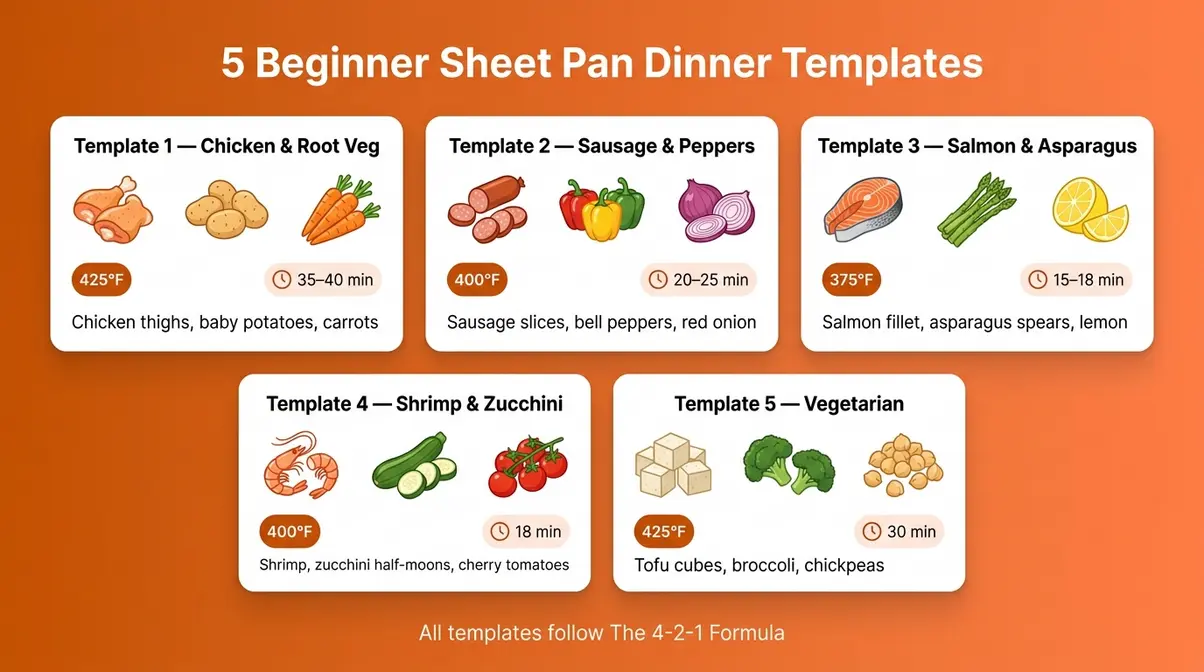
These five templates are not rigid recipes — they are customizable formulas built on The 4-2-1 Formula. Swap any ingredient for what you have on hand and the method stays exactly the same.
Template 1: Chicken & Root Veg
Ingredients: 4 bone-in chicken thighs · 2 cups baby potatoes (halved) · 2 large carrots (sliced into coins) · 2 tbsp olive oil · salt, pepper, garlic powder, paprika
Timing: Potatoes and carrots go on the pan with the chicken at the start (425°F). Total roasting time: 35–40 minutes.
- Method:
- Preheat oven to 425°F. Line your half-sheet pan with parchment paper.
- Toss chicken, potatoes, and carrots in a bowl with olive oil and seasoning.
- Spread in a single layer with at least ½ inch between pieces.
- Roast 35–40 minutes until chicken reaches 165°F internal temperature.
Customization: Swap paprika for Italian seasoning. Add a handful of green beans in the last 15 minutes. Replace potatoes with sweet potatoes for a slightly sweeter profile.
Beginner Tip: Pat the chicken skin dry with a paper towel before oiling — dry skin crisps up far better than wet skin.
Why it works: Bone-in chicken thighs and root vegetables share almost identical roasting times at 425°F, making this the most forgiving combination for beginners. Everything finishes together without staggering.
Template 2: Sausage & Peppers
Ingredients: 4 pre-cooked sausage links (sliced into rounds) · 2 bell peppers (sliced) · 1 red onion (sliced into wedges) · 2 tbsp olive oil · salt, pepper, Italian seasoning
Timing: Everything goes on at the same time (400°F). Total roasting time: 20–25 minutes.
- Method:
- Preheat oven to 400°F. Line pan with parchment.
- Toss sausage, peppers, and onion with olive oil and Italian seasoning.
- Spread in a single layer.
- Roast 20–25 minutes until sausage is browned and peppers are slightly charred at the edges.
Customization: Add cherry tomatoes in the last 10 minutes. Use chicken sausage, turkey sausage, or plant-based sausage interchangeably. Serve over rice or in a hoagie roll.
Beginner Tip: This is the fastest template in the guide — ideal for nights when you have 25 minutes total. Pre-cooked sausage only needs browning, not cooking through.
Why it works: Because sausage is pre-cooked, there’s no food safety timing pressure. This is the most beginner-friendly template for building confidence.
Template 3: Salmon & Asparagus
Ingredients: 2 salmon fillets (6 oz each) · 1 bunch asparagus (tough ends snapped off) · 1 lemon (sliced) · 2 tbsp olive oil · salt, pepper, garlic powder, dried dill
Timing: Asparagus goes on at the start (375°F). Salmon joins at the 5-minute mark. Total roasting time: 15–18 minutes.
- Method:
- Preheat oven to 375°F. Line pan with parchment.
- Toss asparagus with 1 tbsp olive oil, salt, and pepper. Spread on pan.
- After 5 minutes, add salmon fillets. Brush with remaining oil, season, top with lemon slices.
- Roast 12–15 minutes until salmon reaches 145°F internal and flakes easily.
Customization: Swap asparagus for green beans or broccolini. Add a drizzle of honey and Dijon mustard to the salmon before roasting for a sweet-savory glaze.
Beginner Tip: Salmon at 375°F (lower than the standard 425°F) stays moist and tender. Higher temperatures dry it out quickly. Use your thermometer — 145°F internal is the USDA-recommended safe temperature for fish.
Why it works: This is the fastest protein template in the guide. The whole dinner is on the table in under 20 minutes, making it ideal for sheet pan dinner for two situations.
Template 4: Shrimp & Zucchini
Ingredients: 1 lb large shrimp (peeled and deveined) · 2 medium zucchini (sliced into half-moons) · 1 cup cherry tomatoes · 2 tbsp olive oil · salt, pepper, garlic powder, red pepper flakes
Timing: Zucchini goes on first (400°F) for 10 minutes. Shrimp and cherry tomatoes join for the final 8 minutes.
- Method:
- Preheat oven to 400°F. Line pan with parchment.
- Toss zucchini with 1 tbsp oil, salt, and pepper. Spread on pan.
- Roast 10 minutes.
- Add shrimp and tomatoes, toss with remaining oil and seasoning.
- Roast 8 more minutes until shrimp are opaque, pink, and slightly curled.
Customization: Add a squeeze of lemon at serving. Replace zucchini with bell peppers or snap peas. Works beautifully over pasta or rice.
Beginner Tip: Shrimp cook extremely fast — 6–10 minutes at 400°F. Overcooked shrimp become rubbery. Watch for the color change from gray to pink and the shape change from straight to a gentle C-curve.
Why it works: This template teaches the staggered timing technique in its clearest form. Zucchini and shrimp have very different cooking times — staggering prevents both from being overcooked or undercooked.
Template 5: Vegetarian Sheet Pan Dinner
Ingredients: 1 block firm tofu (pressed and cubed) · 1 head broccoli (cut into florets) · 1 cup chickpeas (canned, drained and dried) · 2 tbsp olive oil · salt, pepper, garlic powder, cumin, smoked paprika
Timing: Tofu and chickpeas go on at the start (425°F). Broccoli joins at the 15-minute mark. Total roasting time: 30 minutes.
- Method:
- Preheat oven to 425°F. Line pan with parchment.
- Press tofu with paper towels for at least 10 minutes to remove moisture — this step is essential for browning.
- Toss tofu and chickpeas with oil and half the seasoning. Spread on pan.
- Roast 15 minutes. Add broccoli tossed with remaining oil and seasoning.
- Roast another 15 minutes until tofu is golden, chickpeas are crispy, and broccoli edges are charred.
Customization: Add sliced bell peppers with the broccoli. Swap chickpeas for white beans. Serve with tahini drizzled on top for a complete protein-rich meal.
Beginner Tip: Pressing tofu dry is the single most important step for this template. Wet tofu steams instead of roasting — it turns gray and soft instead of golden and crispy. Ten minutes of pressing makes all the difference.
Why it works: Crispy chickpeas add a satisfying crunch that makes this vegetarian dinner feel substantial. The cumin and smoked paprika combination gives it a depth of flavor that surprises most beginners.
Sheet Pan Meals for Special Situations
The 4-2-1 Formula adapts to almost any situation — whether you’re cooking for two, working with a tight budget, or navigating dietary restrictions. Here’s how to apply it.
Cooking Sheet Pan Dinner for Two
Cooking for two with sheet pan dinners is straightforward — and actually easier than cooking for four, because you’re less likely to overcrowd the pan.
For two servings, use a quarter-sheet pan (9×13 inches) or simply use half of a half-sheet pan. Scale the 4-2-1 Formula down: use 2 portions of protein, 1–2 cups of vegetables, 1 tablespoon of oil, and seasoning to taste. The roasting times stay identical — the oven doesn’t care how much food is on the pan, only how thick the pieces are.
- Practical tips for cooking for two:
- A half-sheet pan for two servings gives you extra spacing, which actually improves browning.
- Leftover portions reheat well the next day (see the meal prep section below).
- Two salmon fillets and a bunch of asparagus (Template 3) is the fastest two-person dinner in this guide — on the table in 18 minutes.
Sheet pan cooking for two is one of the most efficient dinner methods available — minimal waste, no oversized portions, and the same 5-minute cleanup.
Budget-Friendly Sheet Pan Meals
Sheet pan cooking is naturally budget-friendly because it works with the least expensive cuts of meat and seasonal vegetables. Chicken thighs cost significantly less per pound than chicken breasts and produce better flavor on a sheet pan. Bone-in cuts cost less than boneless and stay juicier during roasting.
Budget-friendly protein choices: Chicken thighs (bone-in), chicken drumsticks, canned chickpeas, firm tofu, eggs (yes, you can crack eggs onto a sheet pan in the last 10 minutes), and bulk sausage.
Budget vegetable strategy: Buy whatever is on sale or in season. Root vegetables (potatoes, carrots, sweet potatoes) are consistently affordable year-round. Frozen broccoli and frozen cauliflower roast well — thaw and pat dry before using, and add a few extra minutes to the roasting time.
The budget formula: Chicken thighs + seasonal root vegetables + olive oil + salt, pepper, garlic powder = a complete dinner for four people for under $12 in most markets.
Adapting for Dietary Needs
The 4-2-1 Formula works across most common dietary restrictions with minimal adjustment:
Gluten-free: Sheet pan cooking is naturally gluten-free. Check seasoning blends for hidden gluten (some spice mixes include flour as an anti-caking agent) and verify that any sausage is gluten-free labeled.
Dairy-free: The formula contains no dairy. Add dairy-free cheese or a tahini drizzle at serving if desired.
Low-carb / keto: Replace starchy vegetables (potatoes, sweet potatoes, corn) with low-carb options: broccoli, cauliflower, zucchini, asparagus, bell peppers, and green beans all roast beautifully and stay within keto macros.
Vegetarian/vegan: Template 5 (tofu and chickpeas) is fully vegan. Eggs also roast well on a sheet pan — crack them over a bed of roasted vegetables in the last 8–10 minutes for a vegetarian sheet pan shakshuka-style dinner.
Make-Ahead & Meal Prep Strategies
Make-ahead sheet pan meals are one of the easiest ways to get weeknight dinners on the table in under 10 minutes. The strategy is simple: prep the components in advance, store them correctly, and roast or reheat when needed. According to Harvard’s Healthy Eating Plate, planning meals ahead of time supports consistently healthier eating — and sheet pan cooking makes that planning genuinely practical.
What You Can Prep Ahead
Most of the work in a sheet pan dinner is the prep — chopping vegetables, seasoning protein, lining the pan. Do this in advance and weeknight cooking becomes almost effortless.
- Components you can prep 1–3 days ahead:
- Vegetables: Wash, chop, and store in airtight containers in the refrigerator.
- Protein: Season chicken, salmon, or tofu and store covered in the fridge. Marinated chicken thighs actually improve in flavor after 24 hours.
- “Dump bags”: Combine chopped vegetables, protein, oil, and seasoning in a zip-lock bag or container. On cooking night, open the bag, pour onto the pan, and roast. Zero additional prep required.
For meal prep specifically: Slightly undercook your vegetables on prep day — roast them to about 80% done. When you reheat, they’ll finish cooking and stay firm rather than turning mushy.
Storage & Reheating
Roasted sheet pan meals store and reheat well when handled correctly.
Refrigerator storage: Cool leftovers to room temperature within 2 hours of cooking, then transfer to airtight containers. According to USDA food safety guidance, cooked leftovers last 3–4 days in the refrigerator at or below 40°F (4°C) — with many cooking guides extending that to 5 days for dense root vegetables like potatoes and carrots, which have lower moisture content.
Reheating for best texture: The oven or air fryer is the best reheating method for sheet pan meals. A 375–400°F oven for 8–12 minutes re-crisps edges and avoids the sogginess that microwave reheating causes. Reheat leftovers to an internal temperature of 165°F before eating (USDA leftover safety guidance). Only reheat the portion you plan to eat — repeated heating and cooling cycles degrade both quality and safety.
Freezing: Roasted proteins freeze well for up to 3 months. Most roasted vegetables do not freeze well — they turn mushy upon thawing due to their high water content. Roasted root vegetables (potatoes, carrots, sweet potatoes) are the exception and hold up reasonably well.
Weekly Meal Planning with Sheet Pans
A practical weekly sheet pan strategy takes about 30 minutes of Sunday prep and delivers 4–5 weeknight dinners with almost no active cooking.
- A simple weekly plan:
- Sunday prep: Chop all vegetables for the week. Season and portion proteins into individual bags. Store everything in the refrigerator.
- Monday–Thursday: On each cooking night, grab one pre-prepped bag, pour onto a lined pan, and roast according to the Timing Matrix. Active time: under 5 minutes.
- Rotate proteins: Chicken thighs Monday, salmon Wednesday, sausage Thursday — different flavor profiles, same 5-minute active prep each night.
The key insight for weekly meal prep: The 4-2-1 Formula stays identical every night. Only the ingredients change. Once you’ve internalized the formula, weekly meal prep becomes a system, not a chore.
Popular Sheet Pan Styles & Flavor Profiles
Once you’re comfortable with The 4-2-1 Formula, the next step is learning to vary the flavor profile without changing the method. The same technique — protein + vegetables + oil + seasoning, single layer, 400–425°F — produces entirely different results depending on your seasoning choices.
Crowd-Pleasing Sheet Pan Styles
These are the most popular flavor directions for beginner sheet pan dinners, each working with the same core formula:
Mediterranean: Olive oil + lemon zest + oregano + garlic. Pairs well with chicken, salmon, shrimp, zucchini, bell peppers, and cherry tomatoes. Finish with crumbled feta at serving.
American BBQ-style: Olive oil + smoked paprika + garlic powder + brown sugar + a pinch of cayenne. Works beautifully with chicken thighs, sausage, sweet potatoes, and red onion.
Asian-inspired: Sesame oil (use half the amount — it’s stronger) + soy sauce + ginger powder + garlic. Excellent with tofu, shrimp, broccoli, snap peas, and bell peppers. Add a drizzle of honey for caramelization.
Mexican-style: Olive oil + cumin + chili powder + garlic powder + lime zest. Works with chicken, shrimp, black beans, bell peppers, and corn. Serve with warm tortillas.
Italian: Olive oil + Italian seasoning + garlic powder + red pepper flakes. Classic with sausage, bell peppers, zucchini, and cherry tomatoes.
Flavor Profile Quick Guide
Use this reference to mix and match seasoning profiles with proteins and vegetables:
| Flavor Profile | Key Seasonings | Best Proteins | Best Vegetables |
|---|---|---|---|
| Mediterranean | Oregano, lemon, garlic | Chicken, salmon, shrimp | Zucchini, peppers, tomatoes |
| BBQ-style | Smoked paprika, brown sugar, cayenne | Chicken thighs, sausage | Sweet potatoes, onion |
| Asian-inspired | Sesame oil, soy, ginger | Tofu, shrimp, salmon | Broccoli, snap peas, peppers |
| Mexican | Cumin, chili powder, lime | Chicken, shrimp | Peppers, corn, black beans |
| Italian | Italian seasoning, red pepper | Sausage, chicken | Zucchini, tomatoes, peppers |
The key insight here: You don’t need a new recipe for each flavor profile. You need The 4-2-1 Formula plus a different seasoning combination. The method never changes — only the spices do.
Troubleshooting Sheet Pan Mistakes
Even with The 4-2-1 Formula in hand, beginners run into predictable problems. Here’s a scenario-by-scenario breakdown of what goes wrong and exactly how to fix it.
Common Pitfalls (And How to Avoid Them)
Problem 1: Soggy, gray vegetables that won’t brown
What happens: You pull the pan out of the oven and the broccoli is limp and pale instead of golden and crispy.
Why it happens: The pan was overcrowded (pieces touching = steam trap), not enough oil was used, or the vegetables were wet when they went on the pan.
How to fix it: Follow Rule 2 — leave ½ inch of space between every piece. Use the full 2 tablespoons of oil per pound. Pat vegetables completely dry before oiling (especially frozen vegetables that have been thawed). If you’re mid-cook and notice steaming, immediately spread ingredients across two pans and increase oven temperature by 25°F.
Problem 2: Chicken that’s brown outside but raw inside
What happens: The skin looks done but the thermometer reads below 165°F.
Why it happens: The oven temperature is too high (burning the outside before heat penetrates), or the chicken pieces are too thick and uneven.
How to fix it: Reduce oven temperature to 400°F for thicker pieces. If skin is browning too fast, tent the pan loosely with foil for the remaining cooking time. Always verify with an instant-read thermometer — never judge chicken doneness by color alone.
Problem 3: Unevenly cooked vegetables — some burnt, some raw
What happens: Cherry tomatoes are shriveled and black while potatoes are still hard.
Why it happens: Different vegetables were added at the same time despite having very different cooking times.
How to fix it: Use the Timing Matrix to stagger additions. Dense vegetables (potatoes, carrots) go in with the protein at the start. Quick-cooking vegetables (cherry tomatoes, zucchini, asparagus) join in the final 10–15 minutes. Cut all pieces to similar sizes — a 1-inch cube of potato and a 1-inch cube of carrot cook at roughly the same rate.
Problem 4: Food sticking to the pan
What happens: Dinner is ready but half of it is welded to the pan.
Why it happens: No parchment paper was used, or insufficient oil was applied.
How to fix it: Always line the pan with parchment paper. Make sure every piece of food is coated in oil before it goes on the pan — dry spots stick. If food does stick, let the pan cool slightly, then pour a small amount of hot water onto it to loosen stuck bits.
Problem 5: Dry, rubbery protein
What happens: Chicken breasts or shrimp are tough and dry.
Why it happens: Overcooking. Lean proteins cook faster than you think, especially at 425°F.
How to fix it: Use a thermometer and pull protein at the minimum safe temperature — 165°F for chicken, 145°F for fish and pork. Chicken thighs are more forgiving than chicken breasts; switch to thighs if overcooking is a recurring problem. For shrimp, watch for the color and shape change (pink and C-shaped = done; straight = still cooking; O-shaped = overcooked).
When to Choose Alternatives
Sheet pan cooking is versatile, but it’s not always the right tool:
When you need a sauce: Sheet pans produce dry, roasted food. If you want a creamy pasta or a braised dish, a Dutch oven or skillet is the better choice. You can add a quick pan sauce after roasting by deglazing the pan on the stovetop with broth or wine, but this adds complexity.
When cooking for more than 6 people: Scaling up sheet pan meals requires multiple pans and careful oven management. For large gatherings, a slow cooker, Dutch oven, or stock pot may be more practical.
When ingredients need liquid to cook properly: Dried beans, grains, and pasta need boiling water — they don’t roast. Sheet pan cooking is for vegetables and proteins, not starches that require liquid absorption.
When to Seek Expert Help
If you’re adapting sheet pan recipes for serious food allergies (particularly tree nuts, shellfish, or celiac disease), consult a registered dietitian to ensure cross-contamination risks are managed. For USDA food safety questions about specific proteins or storage situations not covered here, the USDA’s food safety hotline (1-888-MPHotline) provides free, expert guidance.
Frequently Asked Questions
Best Temperature for Sheet Pan Meals?
400–425°F (200–220°C) is the ideal temperature range for most sheet pan meals. At 400°F, food cooks evenly without burning — this is the standard default for chicken, sausage, and most vegetables. Use 425°F for crispier results, especially with potatoes and root vegetables. Drop to 375°F for delicate proteins like salmon to prevent drying out. The higher the temperature, the more browning you get, but the narrower your margin for error.
How to Prevent Soggy Vegetables?
Soggy vegetables are caused by overcrowding the pan, insufficient oil, or wet ingredients. Leave at least ½ inch of space between every piece — crowded pieces trap steam and prevent browning. Use 2 tablespoons of oil per pound of ingredients and coat every surface. Pat vegetables completely dry before oiling. According to culinary testing consensus, these three steps eliminate soggy vegetables in nearly every case. If you’re mid-cook and see steaming, spread the contents across two pans immediately.
Can I Use Frozen Vegetables?
Yes — frozen vegetables work well for sheet pan cooking with one important preparation step. Thaw them completely and pat dry with paper towels before oiling and seasoning. Frozen vegetables contain excess moisture from the freezing process; if you skip drying, that moisture steams the vegetables instead of allowing them to roast. Add a few extra minutes to the roasting time compared to fresh. Broccoli, cauliflower, and green beans are among the best frozen options for sheet pan cooking.
How Long Do Leftovers Last?
Sheet pan meal leftovers last 3–4 days in the refrigerator, per USDA food safety guidelines for cooked leftovers. Cool food to room temperature within 2 hours of cooking, then store in airtight containers at or below 40°F (4°C). Dense root vegetables like potatoes and carrots hold up to 5 days. Delicate proteins like shrimp are best eaten within 2 days. Always reheat leftovers to 165°F internal temperature (USDA FSIS, 2026). For best texture, reheat in a 375–400°F oven or air fryer rather than the microwave.
Do I Need to Flip the Food?
Flipping is optional but improves browning on both sides for some ingredients. Chicken thighs with the skin side up don’t need flipping — the skin crisps better when left undisturbed. Dense vegetables like potatoes and carrots benefit from a stir or flip at the halfway point to ensure even browning on all sides. Thin, quick-cooking items like asparagus, shrimp, and cherry tomatoes don’t need flipping. A general rule: the denser and thicker the ingredient, the more it benefits from a halfway flip.
Your Next Sheet Pan Dinner Starts Tonight
For busy home cooks, sheet pan meals for beginners deliver a complete, nutritious dinner in under 40 minutes with one pan to wash. Research consistently shows that oven roasting preserves antioxidants better than boiling (Jiménez-Monreal et al., 2009, PubMed), and the 5-minute active prep requirement makes this one of the most practical cooking methods for weeknight cooking. The best approach combines the right temperature (400–425°F), proper spacing, and staggered timing from the Timing Matrix.
The 4-2-1 Formula is what turns this method from a collection of recipes into a system you actually own. Four ingredients. Two rules. One pan. Once that framework is in your head, you don’t need to look up a recipe — you just cook. Beginners who internalize the two rules (single layer, space between pieces) and the stagger-timing concept from the Timing Matrix will produce consistent, restaurant-quality results from their very first attempt.
Your next step is simple: pick Template 1 (chicken thighs and root vegetables) and cook it tonight. It requires no special ingredients, takes 40 minutes total, and teaches all four steps of the formula in one dinner. After that, try a different flavor profile from the guide. Within a week, you’ll have a reliable rotation of easy sheet pan recipes that require zero recipe-checking — just the formula, the matrix, and your own pantry.

quickdishcook
Recipe developer and writer at Quick Dish Cookbook.