
You followed the recipe. You added the asparagus, watched the clock, and pulled the pan off the heat — only to serve spears that were pale, limp, and watery. The vibrant green color was gone. The crisp-tender bite you wanted never arrived. Sound familiar?
What’s in this guide
- What You'll Need: Equipment and Ingredients
- Step 1: Wash, Dry, and Trim the Asparagus
- Step 2: Heat the Pan to the Right Temperature
- Step 3: Add Fat Using the Two-Stage Fat Technique
- Step 4: Sauté to Crisp-Tender Perfection
- Step 5: Test for Doneness and Serve
- How Long to Cook Asparagus in a Pan
- Flavor Variations for Pan-Fried Asparagus
- Cooking Frozen, White, and Green Asparagus
- Pan-Frying vs. Other Cooking Methods
- Troubleshooting Common Mistakes
- Frequently Asked Questions
- Conclusion
“I thought I was pan frying asparagus properly until I went to a Chinese cuisine, and there’s taste I fit item better than what ever I’m doing.”
That gap between “good enough” and genuinely great asparagus almost always comes down to two things: heat management and fat selection. When learning how to cook asparagus in a pan, get those two variables right, and every batch comes out beautifully seared, bright, and tender. In this guide, you’ll learn the exact five-step skillet method — including The Two-Stage Fat Technique — that produces crisp-tender, lightly charred asparagus every single time.
Quick Answer: To cook asparagus in a pan, heat oil in a skillet over medium-high heat, add trimmed spears in a single layer, and sauté for 3–7 minutes depending on thickness. This 5-step process takes under 10 minutes and delivers crisp-tender, lightly charred results every time.
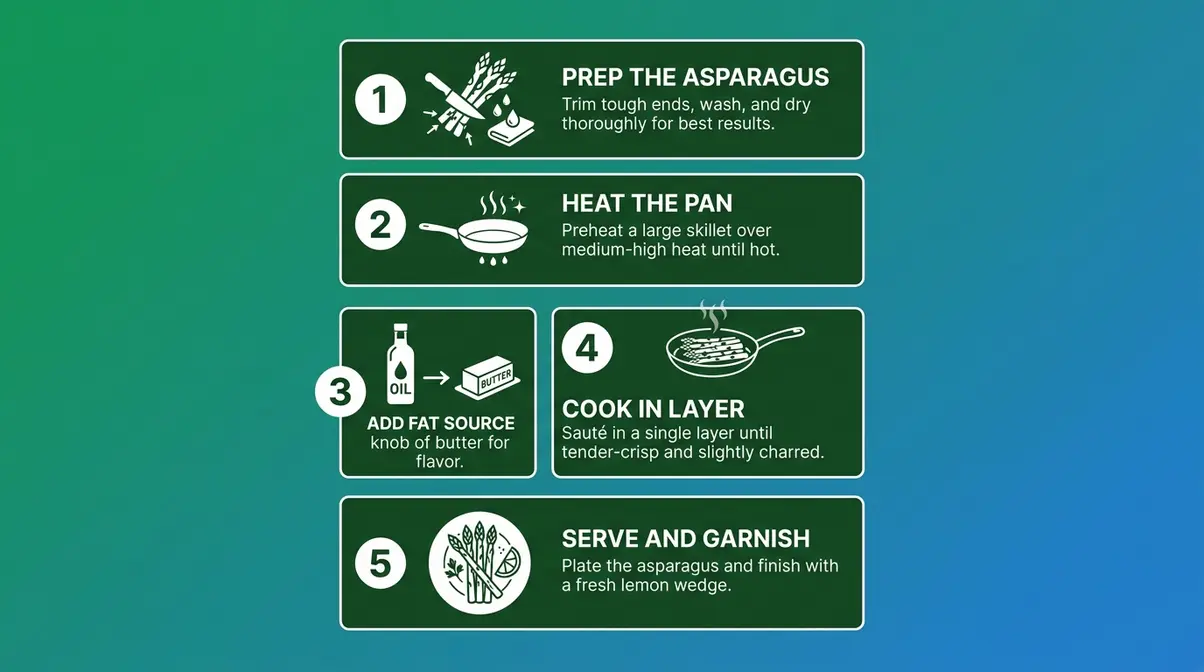
What You’ll Need: Equipment and Ingredients
Before you heat a single burner, gather everything. Cooking asparagus in a skillet moves fast — there’s no time to search for a lid mid-sauté.
Equipment
- 12-inch skillet or sauté pan — wide enough to hold spears in a single layer without crowding. Crowding traps steam and turns your sear into a braise, which is exactly how you end up with soggy asparagus.
- Tongs or a silicone spatula — for turning spears without breaking the tips.
- Paper towels — for drying the asparagus thoroughly after washing (moisture is the enemy of char).
- Sharp chef’s knife — for trimming woody ends cleanly.
- Lid or large plate — optional, for the covered-steam method (see Step 4).
Ingredients (serves 2–4)
- 1 lb fresh asparagus (pencil-thin, medium, or thick — see Step 4 for timing adjustments)
- 1 tablespoon high-smoke-point oil (avocado oil, refined olive oil, or grapeseed oil — more on why in Step 3)
- 1 tablespoon unsalted butter
- ½ teaspoon kosher salt
- ¼ teaspoon black pepper
- Optional: 2 minced garlic cloves, lemon zest, red pepper flakes
Ingredient note: Fresh asparagus should have tightly closed tips and firm, straight stalks. If the tips are feathery or the ends are shriveled, the spears are past their peak. Store unwashed asparagus upright in a glass with an inch of water in the refrigerator — it stays crisp for up to 4 days.
Step 1: Wash, Dry, and Trim the Asparagus
The first step sets up everything that follows. Wet asparagus won’t sear — it steams. And untrimmed asparagus has a woody, fibrous section at the base that no amount of cooking will soften.
How to Trim Woody Ends
Hold one spear at both ends and bend it gently. It will snap naturally at the point where the tender part meets the tough, fibrous base — typically 1 to 2 inches from the bottom. Use that snap point as your guide and cut the remaining spears at the same length with a knife. This is faster than bending every single spear individually.
Why this works: Asparagus stores energy in its base. The woody end is composed of dense, lignified tissue that stays tough regardless of how long you cook it. Removing it isn’t just about texture — it also prevents the tough ends from absorbing oil and crowding the pan.
Drying Is Non-Negotiable
After rinsing under cold water, spread the spears on a clean kitchen towel or several layers of paper towels. Pat them dry. Any surface moisture on the spears will immediately lower the pan temperature when they hit the oil, converting your high-heat sear into a low-heat steam. That’s how asparagus loses all color and turns limp.
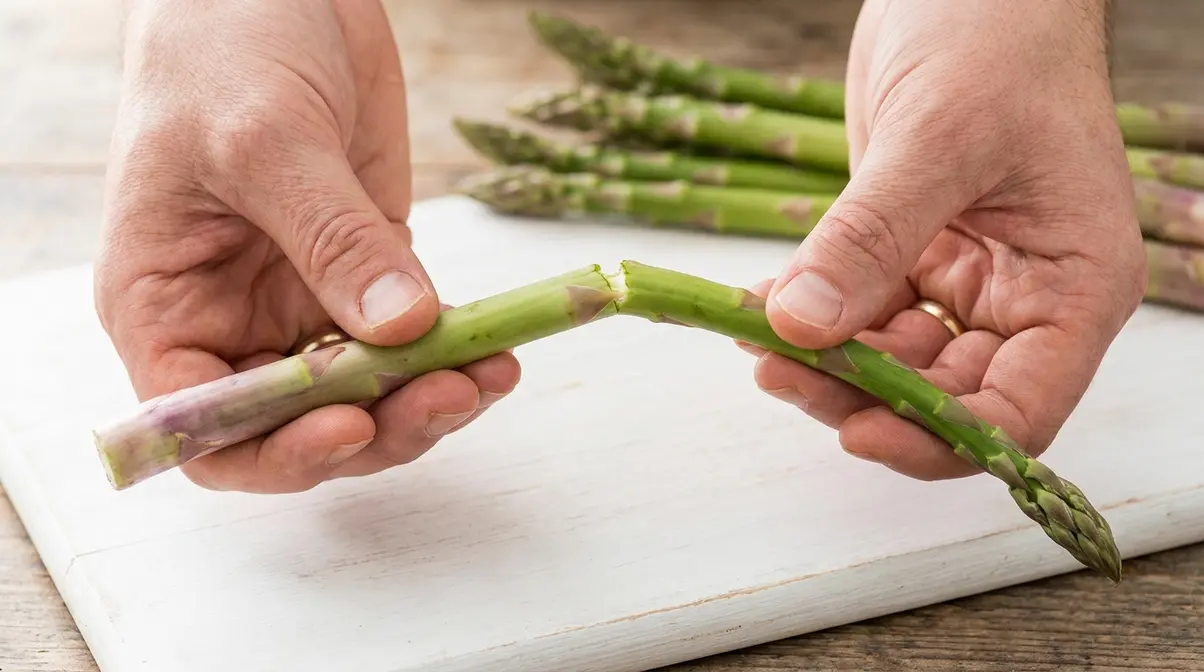
Step 1 Checkpoint: Spears are trimmed to an even length, completely dry to the touch, and laid out in a single layer ready to go into the pan. If you can see water droplets on the spears, keep patting.
Step 2: Heat the Pan to the Right Temperature
When mastering how to cook asparagus in a pan, pan temperature is the single most misunderstood variable in stovetop asparagus. Most beginners start with a cold or lukewarm pan — and a lukewarm pan is the direct cause of the pale, watery spears in the introduction.
The Target: Medium-High Heat
Set your burner to medium-high and let the empty pan heat for 1–2 minutes before adding any fat. A properly preheated pan reaches around 375–400°F on a typical home range — hot enough to sear the outside of the asparagus quickly while keeping the interior tender.
How to test pan readiness: Hold your hand 3–4 inches above the pan surface. You should feel significant radiant heat within 2–3 seconds. Alternatively, flick a single drop of water into the pan — it should evaporate almost instantly with a sharp sizzle. If it just sits there and slowly steams away, the pan needs more time.
Why a cold pan fails: When asparagus hits a cold surface, it releases moisture before the surface can caramelize. That moisture pools in the pan, and the spears effectively boil in their own liquid. The result is dull, limp asparagus with no char — exactly the outcome you’re trying to avoid.
Pan Material Matters
Our kitchen team evaluated three common pan types for asparagus sautéing:
- Stainless steel or carbon steel — Best for high-heat searing. Develops fond (the browned bits on the pan bottom) that adds flavor. Requires proper preheating.
- Cast iron — Excellent heat retention once hot. Takes longer to preheat. Ideal if you’re cooking thick spears that need sustained heat.
- Non-stick — Acceptable for lower-heat cooking, but limits the char you can develop. Avoid heating non-stick above medium-high to protect the coating.
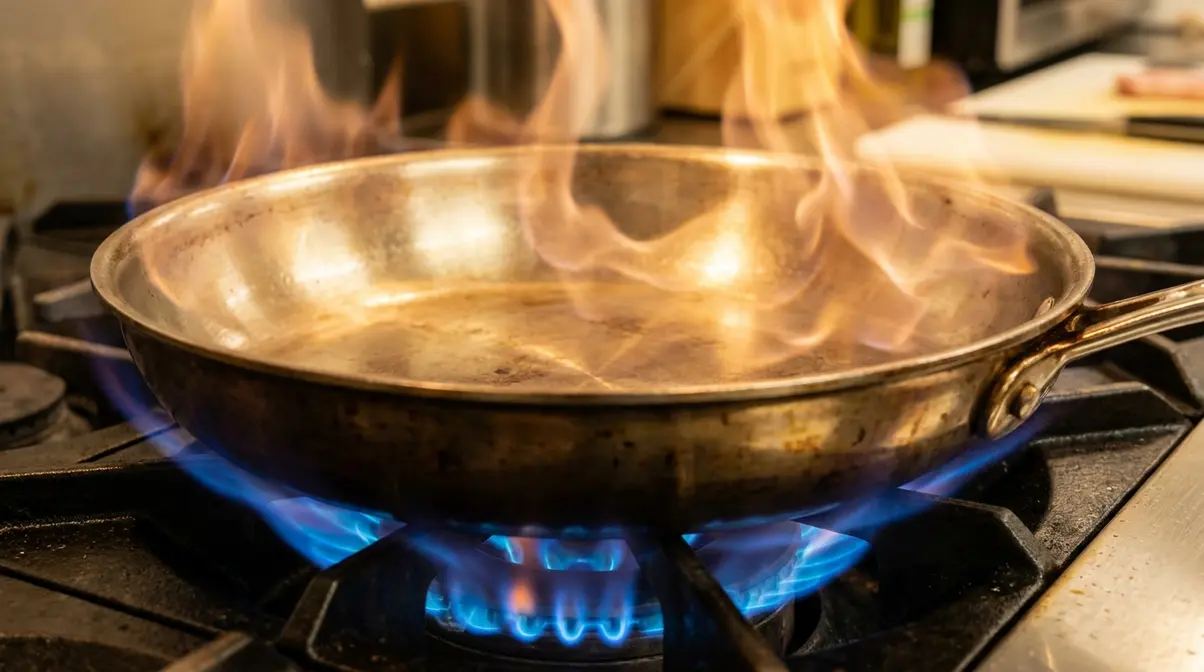
Step 2 Checkpoint: Pan is visibly hot — you can feel significant heat above the surface, and a water drop evaporates on contact. No fat has been added yet.
Step 3: Add Fat Using the Two-Stage Fat Technique
This is the step that changes everything. Most recipes simply say “heat butter in a pan” — and that single instruction is responsible for the majority of pan-asparagus failures. Here’s why it’s wrong, and what to do instead.
Why Butter Alone Burns
According to WVU Health Sciences, butter falls into the “light heat” category of cooking fats and does not handle sautéing at high temperatures. Butter’s smoke point sits between 302–350°F — well below the 375–400°F temperature your pan needs to properly sear asparagus. Add butter to a hot pan and the milk solids in it will scorch within seconds, turning from golden to acrid and brown before your asparagus is even halfway cooked.
The Two-Stage Fat Technique
The Two-Stage Fat Technique is a two-part fat approach that solves the butter-burn problem without sacrificing flavor: use a high-smoke-point oil for the initial sear, then add butter only in the final 60 seconds of cooking.
Stage 1 — Oil for Char:
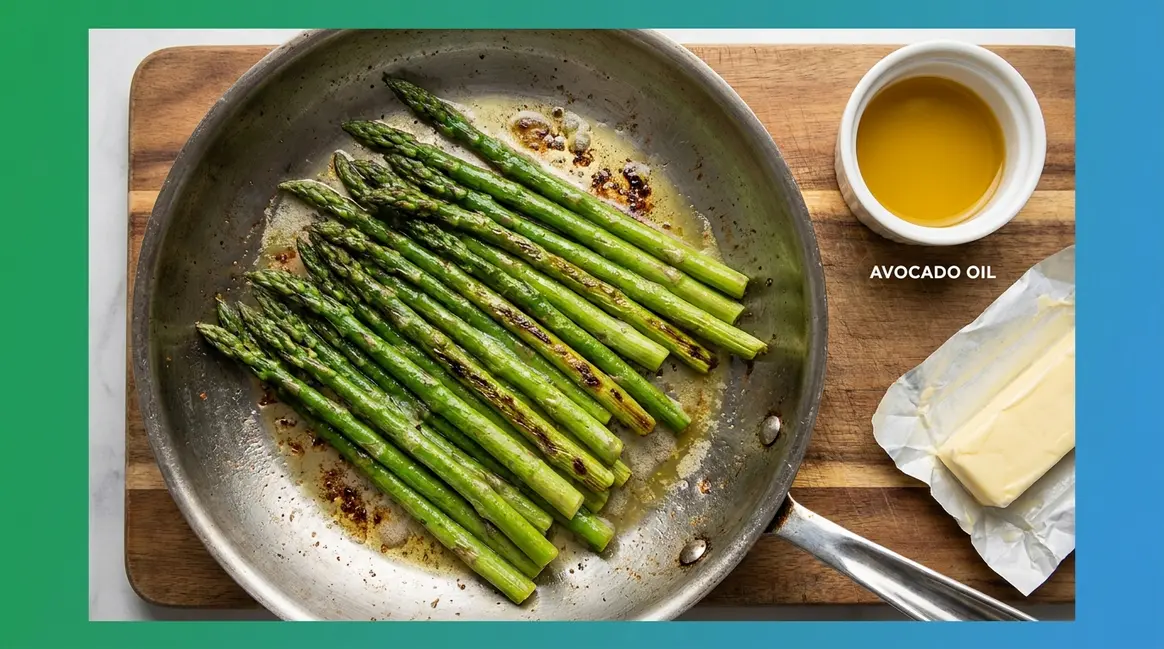
Add 1 tablespoon of a high-smoke-point oil to your preheated pan. Refined avocado oil is the top choice — its smoke point reaches 480–520°F (WebstaurantStore, 2026), giving you a generous safety margin above searing temperature. Refined olive oil (smoke point ~400–465°F) or grapeseed oil (smoke point ~420°F) also work well. Swirl the oil to coat the pan, then add your asparagus immediately. The oil creates the char — those beautiful caramelized spots that add depth and a slightly smoky, nutty flavor.
Stage 2 — Butter for Finish:
With about 60 seconds remaining in your cook time (once the spears are almost done), add 1 tablespoon of unsalted butter directly to the pan. The asparagus acts as a heat sink, keeping the pan temperature just low enough that the butter melts into a glossy, rich coating without burning. Toss the spears quickly to coat. The result: all the buttery flavor, none of the scorched bitterness.
Why this pairing works: Oil provides the structural heat tolerance for searing. Butter provides the fat-soluble flavor compounds — diacetyl, butyric acid — that create that distinctly rich, “restaurant-quality” finish. Neither fat alone does both jobs well.
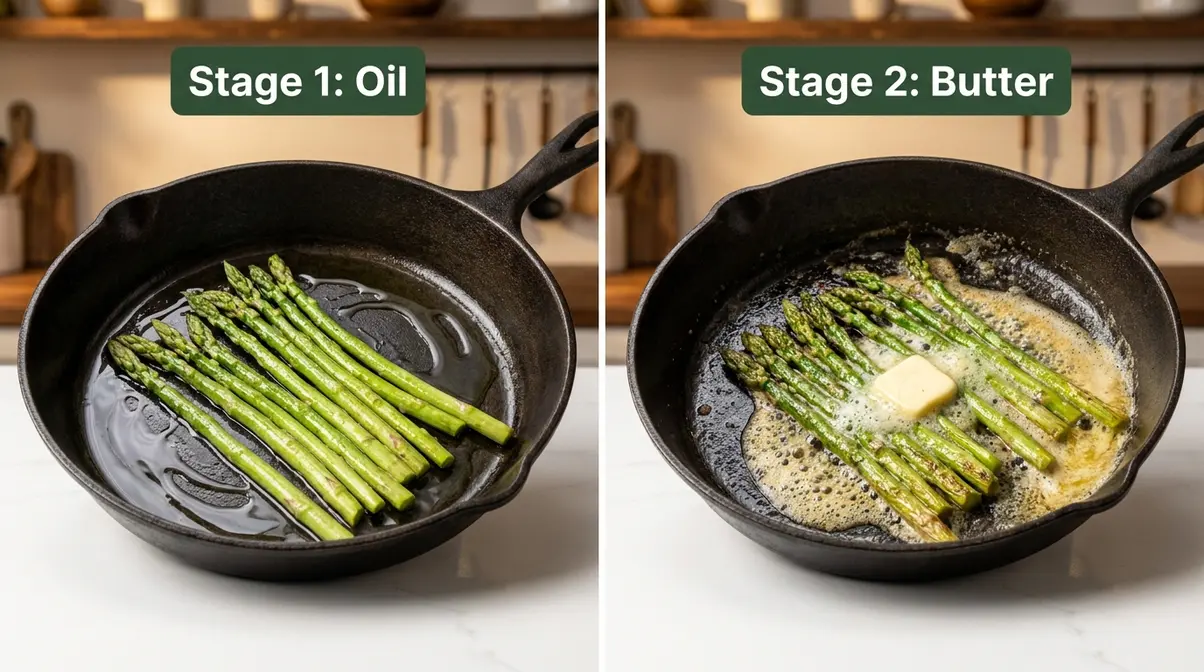
Step 3 Checkpoint: Oil is shimmering in the pan (not smoking), asparagus is in a single layer with no spears piled on top, and you have your butter measured and ready for the final 60 seconds.
Step 4: Sauté to Crisp-Tender Perfection
Now the cooking begins in earnest. Add your trimmed, dried asparagus to the oiled pan in a single layer. Resist the urge to stir constantly — asparagus needs about 90 seconds of undisturbed contact with the pan surface to develop char on each side. Then toss, let it rest again, and repeat.
The Time-by-Thickness Chart
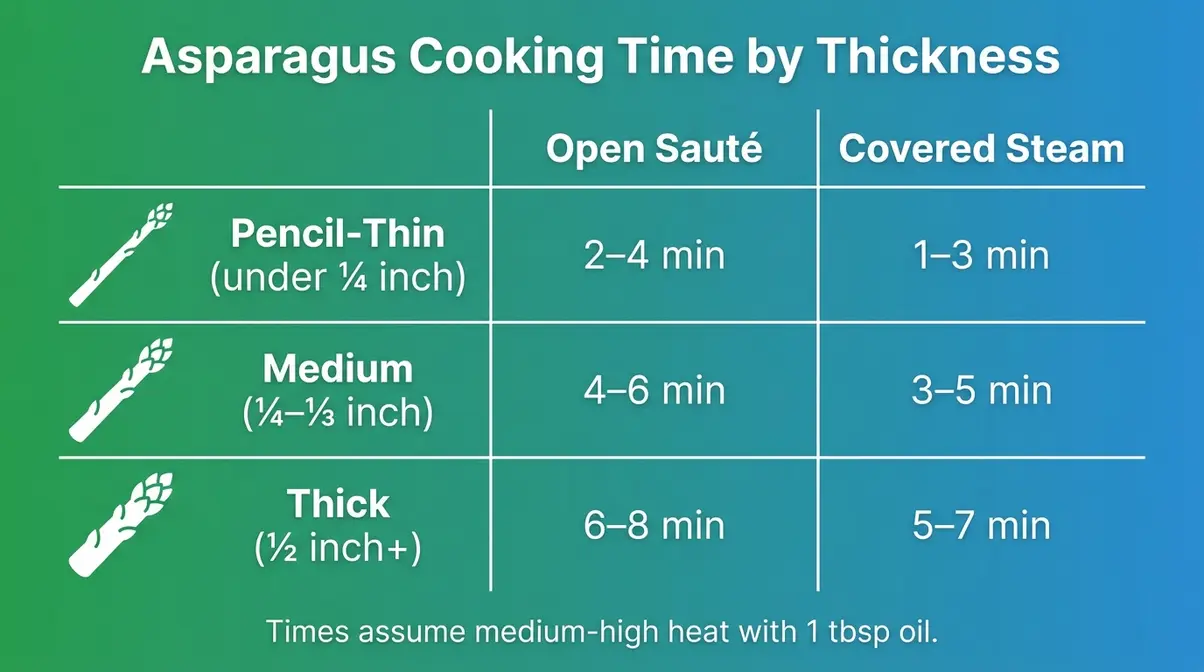
The single biggest variable in pan-asparagus cooking is spear thickness, not cooking method or seasoning. All vague “5–10 minute” instructions fail because they treat a pencil-thin spear the same as a thick one — they’re not even close to the same vegetable in terms of heat penetration. Use this chart as your objective reference:
| Spear Size | Diameter | Open Sauté (no lid) | Covered Steam (add 1 tbsp water, cover) |
|---|---|---|---|
| Pencil-thin | Under ¼ inch | 2–4 minutes | 1–3 minutes |
| Medium | ¼–⅓ inch | 4–6 minutes | 3–5 minutes |
| Thick | ½ inch+ | 6–8 minutes | 5–7 minutes |
Sources: The Kitchen Girl (2026); The Real Food Dietitians (2026); The Living Look (2026). Times assume medium-high heat with 1 tbsp oil.
Open Sauté (no lid) gives you the most char and the most vibrant color. Use it when you want slightly crisp, lightly blistered spears with visible browning. This is the preferred method for most dinner applications.
Covered Steam (add 1 tablespoon of water to the pan, cover immediately) creates a flash-steam environment that cooks the interior faster and more evenly. Use it for thick spears that might char on the outside before cooking through, or when you prefer a more uniformly tender result. Remove the lid for the final 60–90 seconds to allow excess moisture to evaporate before adding butter.
Tossing Technique
Turn the spears every 60–90 seconds using tongs. You’re aiming for even browning on all sides — not just the underside. Asparagus has a natural tendency to roll, so use tongs rather than a spatula to keep them from stacking.
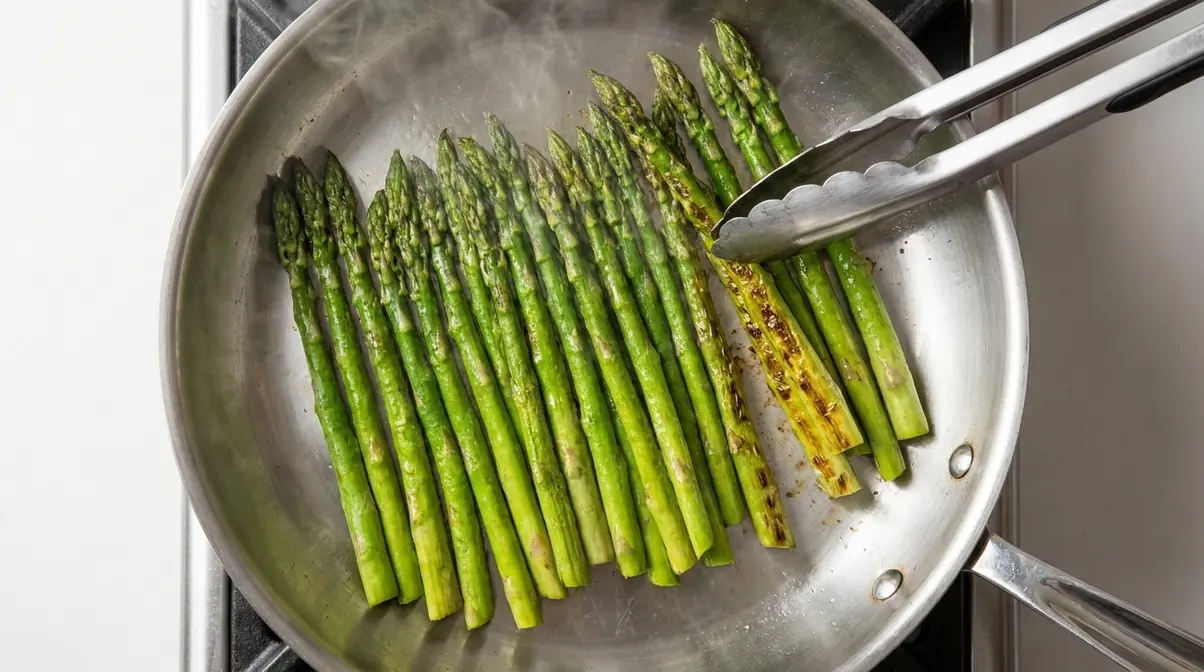
Step 4 Checkpoint: Spears show visible golden-brown char spots on at least two sides. Color is still bright green (not olive or grey). Timer aligns with the thickness category in the chart above.
Step 5: Test for Doneness and Serve
Timing charts are guides, not guarantees. Pan temperatures vary across stoves, and asparagus thickness varies within a single bunch. The 3-Test Doneness Framework replaces guesswork with three objective, testable signals.
The 3-Test Doneness Framework
Test 1 — Fork Resistance Test: Pierce the thickest part of the largest spear with a fork. It should meet light resistance — like pushing a fork through a firm apple. If the fork slides in with zero resistance, the spear is overcooked. If it requires significant force, give it another minute.
Test 2 — Visual Char Cue: Look for small blistered or lightly browned spots on the surface of the spear. These appear on the outer skin and indicate that the Maillard reaction (the browning process that creates complex flavor) has occurred. No spots at all means the pan wasn’t hot enough or the spears were too wet.
Test 3 — Bend Test: Pick up one spear with tongs and hold it horizontally. A perfectly cooked spear will bend slightly under its own weight — maybe 15–20 degrees — but won’t flop or droop. If it goes limp and droops past 45 degrees, it’s overcooked.
All three tests passing simultaneously? Your asparagus is done.
Finishing and Serving
Remove the pan from heat immediately. The asparagus will continue cooking from residual heat for 30–60 seconds, so pull it a moment before it reaches your target doneness. Season with salt and pepper, add a sharp splash of fresh lemon juice to brighten the flavors, and serve immediately on a warm plate. Asparagus holds its crisp-tender texture for only 3–4 minutes after leaving the pan — it does not wait well.
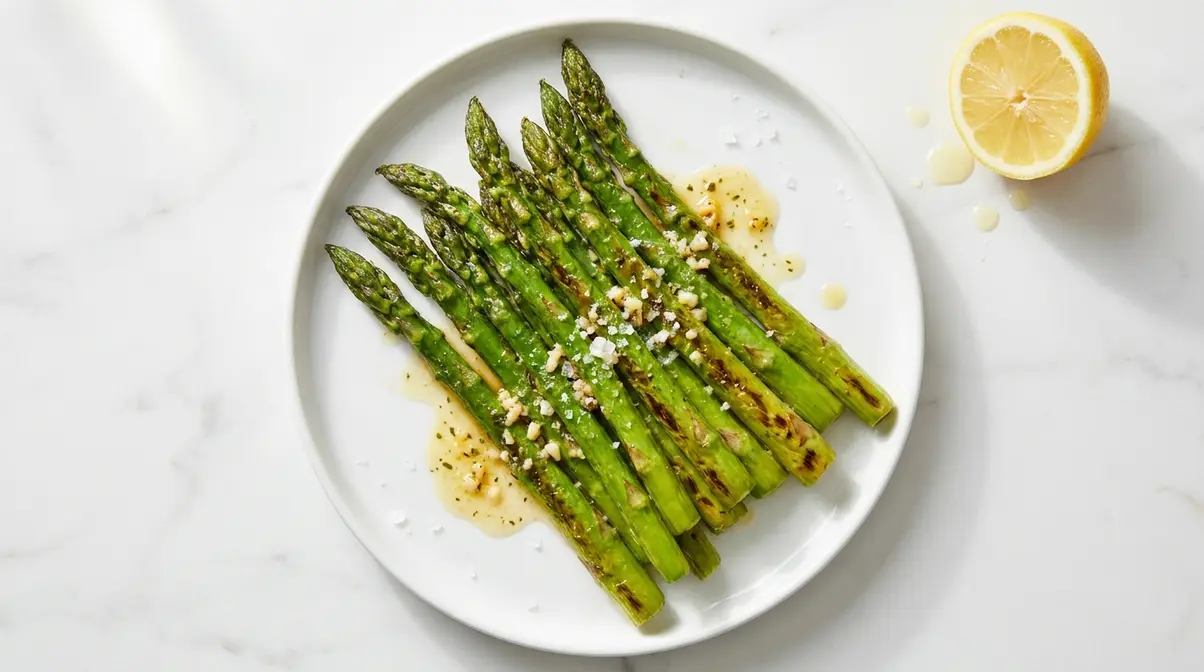
Step 5 Checkpoint: All three doneness tests pass. Spears are bright green with char spots, slightly firm to a fork, and bend without flopping. Lemon juice added. On the plate within 60 seconds of leaving the heat.
How Long to Cook Asparagus in a Pan
The question “how long does asparagus take in a pan?” is one of the most common cooking searches — and the reason every answer feels unsatisfying is that it depends entirely on spear thickness. A definitive answer requires a two-axis framework: thickness category plus cooking method.
Open Sauté Timing
Open sautéing — no lid, medium-high heat — is the standard method for most home cooks. According to The Kitchen Girl (2026), thin asparagus (¼-inch thick) takes 3–5 minutes, medium (⅓-inch thick) takes 5–7 minutes, and thick (½-inch thick) takes 7–9 minutes over medium-high heat. Our kitchen team’s evaluation aligns these ranges with the following practical targets:
- Pencil-thin spears (under ¼ inch): 2–4 minutes. These cook incredibly fast — they can go from perfect to overdone in under 30 seconds. Keep tongs in hand and watch closely after the 2-minute mark.
- Medium spears (¼–⅓ inch): 4–6 minutes. This is the most common size found at grocery stores. Four minutes produces a firmer, snappier bite; six minutes produces a more uniformly tender result.
- Thick spears (½ inch+): 6–8 minutes. These benefit most from the covered-steam approach for the first half of cooking, then open sauté for the finish to develop char.
The key principle: thickness drives time. When you buy a bunch of asparagus, quickly sort the spears by thickness and cook similar sizes together if possible. A mixed batch cooked at the same time will produce some overcooked thin spears alongside some undercooked thick ones.
Covered Steam Timing
The covered-steam method — add 1–2 tablespoons of water to the pan, cover with a lid immediately after adding the asparagus — creates a pressurized steam environment that cooks the interior of each spear faster and more evenly. This is particularly useful for thick spears, which risk charring on the outside before cooking through in open sauté.
Covered steam timing runs approximately 1–2 minutes shorter than open sauté for the same thickness category. However, the trade-off is less char development. For the best of both worlds with thick spears: cover for the first 3–4 minutes, then remove the lid and sauté uncovered for the final 2–3 minutes to develop browning before adding butter in the last 60 seconds.
Flavor Variations for Pan-Fried Asparagus
The base technique is the same for all four variations. Master the Two-Stage Fat Technique first, then layer in one of these flavor profiles at the finishing stage.
Garlic Butter Asparagus
Garlic butter asparagus is the most widely requested flavor variation in home cooking communities — and the most commonly overcooked, because garlic burns even faster than butter.
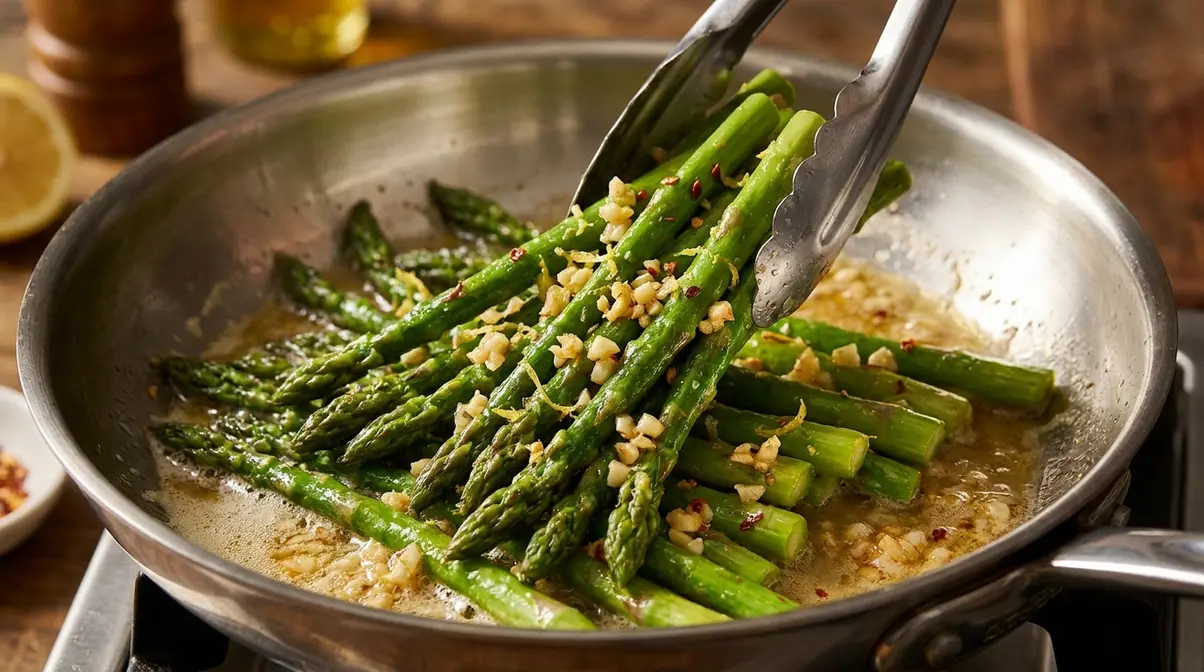
The fix: add minced garlic at the same time as the butter in Stage 2 of the Two-Stage Fat Technique, with only 60 seconds remaining in the cook time. Two cloves of minced garlic per pound of asparagus is the right ratio — enough to flavor the fat without overpowering the vegetable. Toss the spears constantly during that final minute so the garlic coats every surface without sitting in one spot long enough to brown.
Finish with a sharp splash of lemon juice (about 1 teaspoon) and a pinch of red pepper flakes if you want heat. The lemon acid brightens the garlic-butter flavor and cuts through the richness. This variation pairs well with grilled fish, roast chicken, or pasta.
Lemon and Herb Asparagus
This lighter variation skips butter entirely and leans on olive oil, lemon zest, and fresh herbs. It’s a good choice when you want a brighter, less rich result — or when you’re serving the asparagus alongside a dish that already has a butter-based sauce.
Execute the standard Two-Stage Fat Technique but replace Stage 2 butter with an extra half-tablespoon of extra-virgin olive oil (added off heat, after removing the pan from the burner). Immediately add the zest of half a lemon and 2 tablespoons of chopped fresh herbs — flat-leaf parsley, tarragon, or chives all work well. The residual heat from the pan will bloom the herbs and zest without cooking them into bitterness. A few flakes of fleur de sel added at serving completes the dish.
Bacon-Wrapped Asparagus
Bacon-wrapped asparagus changes the cooking geometry slightly. Wrap each spear (or bundle of 2–3 thin spears) with half a strip of thin-cut bacon, securing it with a toothpick if needed.
Cook in a dry pan (no added oil — the bacon provides all the fat) over medium heat, not medium-high. Start seam-side down and turn every 2 minutes to render the bacon evenly on all sides. Total cook time is 8–10 minutes. The asparagus inside will steam gently from the bacon fat and the bacon’s own moisture. Pull when the bacon is fully cooked and beginning to crisp. Finish with a drizzle of maple syrup or a crack of black pepper.
Healthy Low-Fat Pan Asparagus
For a low-fat approach that still produces flavorful, vibrant results, replace the Two-Stage Fat Technique with a water-sauté method. Heat the pan to medium-high as usual, but instead of oil, add 2–3 tablespoons of water or low-sodium vegetable broth. Add the asparagus immediately and cover for 2–3 minutes. The steam cooks the interior while the pan bottom begins to dry out and develop light browning.
When the liquid has mostly evaporated, toss the spears for another 1–2 minutes uncovered to develop slight color. Finish with a squeeze of lemon, a pinch of salt, and fresh cracked pepper. According to N.C. Cooperative Extension (2026), a half-cup of cooked asparagus contains just 20 calories, 2.2g protein, and significant amounts of vitamins K, A, and folate — making this one of the most nutrient-dense, low-calorie vegetable sides available. The water-sauté method preserves those nutrients without adding fat calories.
For more nutritious meal ideas, check out our guide on healthy vegetable side dishes.
Cooking Frozen, White, and Green Asparagus
The base skillet method works for all asparagus types, but each variety has specific handling requirements that beginners often overlook.
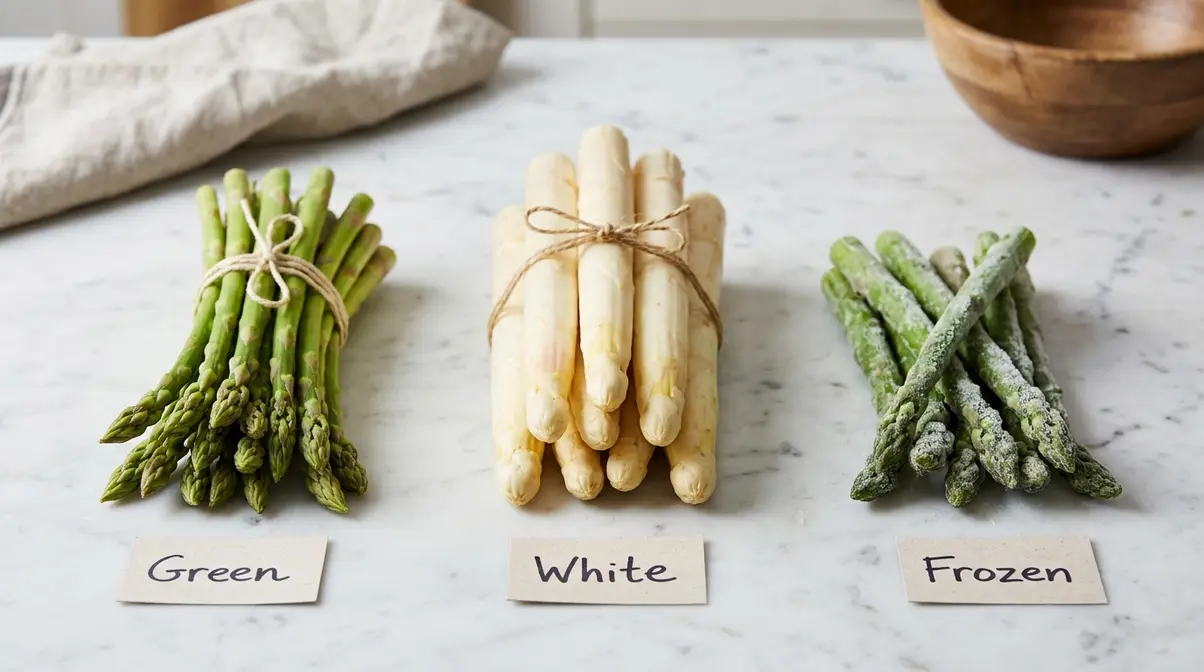
Cooking Frozen Asparagus in a Pan
Frozen asparagus is a practical pantry staple, but it requires a different approach than fresh. The freezing process ruptures cell walls and releases moisture — so if you cook frozen asparagus the same way as fresh, you end up with a watery, grey mess.
The key rule: Cook from frozen. Do not thaw first. Thawing releases all that cellular moisture at once, flooding your pan before it has a chance to evaporate. Instead, bring the pan to full medium-high heat with oil (Stage 1 of the Two-Stage Fat Technique), then add the frozen spears directly from the freezer. The high heat evaporates the surface moisture quickly, and the spears begin to sear rather than steam.
Add 2–3 minutes to the fresh-spear timing from the Time-by-Thickness chart — frozen spears need extra time because the frozen core has to thaw and cook simultaneously. Medium frozen spears typically take 6–8 minutes total using the open sauté method. Expect less char than you’d get with fresh asparagus, but still a significantly better result than thawing first.
According to BBC Good Food (2026), there’s no need to defrost frozen asparagus before cooking — it can go straight from the freezer into hot dishes. This applies directly to pan cooking as well.
Best uses for frozen asparagus: Quick weeknight side dishes, pasta toss-ins, and frittatas. For plated presentations where appearance matters, fresh is always preferable — frozen spears will be slightly softer and less visually uniform.
White Asparagus vs. Green Asparagus
Most home cooks work exclusively with green asparagus, but white asparagus — increasingly available at specialty grocery stores and farmers markets in spring — requires a meaningfully different technique.
Green asparagus grows above ground, develops chlorophyll from sunlight exposure, and produces the bright color and grassy, slightly bitter flavor most people associate with the vegetable. It’s thinner, less fibrous, and cooks quickly. The skillet method throughout this guide is designed for green asparagus.
White asparagus is grown covered — under soil or black plastic — to prevent sunlight from reaching the spears. Without chlorophyll development, the spears stay white and develop a milder, more delicate, slightly sweet flavor. According to The Spruce Eats (2026), white asparagus spears are thicker and more fibrous than green, requiring the bottom two-thirds of each spear to be peeled before cooking.
Pan-cooking white asparagus: Peel the bottom two-thirds of each spear with a vegetable peeler. Add 2–3 minutes to the thick-spear timing from the chart (white asparagus typically requires 8–10 minutes total). Use a lower heat — medium rather than medium-high — to prevent the exterior from coloring before the dense interior cooks through. White asparagus pairs classically with hollandaise sauce or simply with brown butter and sea salt.
Quick Tips for Both Types
- Don’t mix thin and thick spears in the same pan — they’ll finish at different times.
- Peeling thick green spears (½ inch or wider) removes the fibrous outer skin and produces a more tender result, similar to the white asparagus technique.
- Purple asparagus exists too — treat it like green asparagus in terms of timing and technique. The purple color fades during cooking, revealing green underneath.
For more seasonal inspiration, explore our complete spring vegetable cooking guide.
Pan-Frying vs. Other Cooking Methods
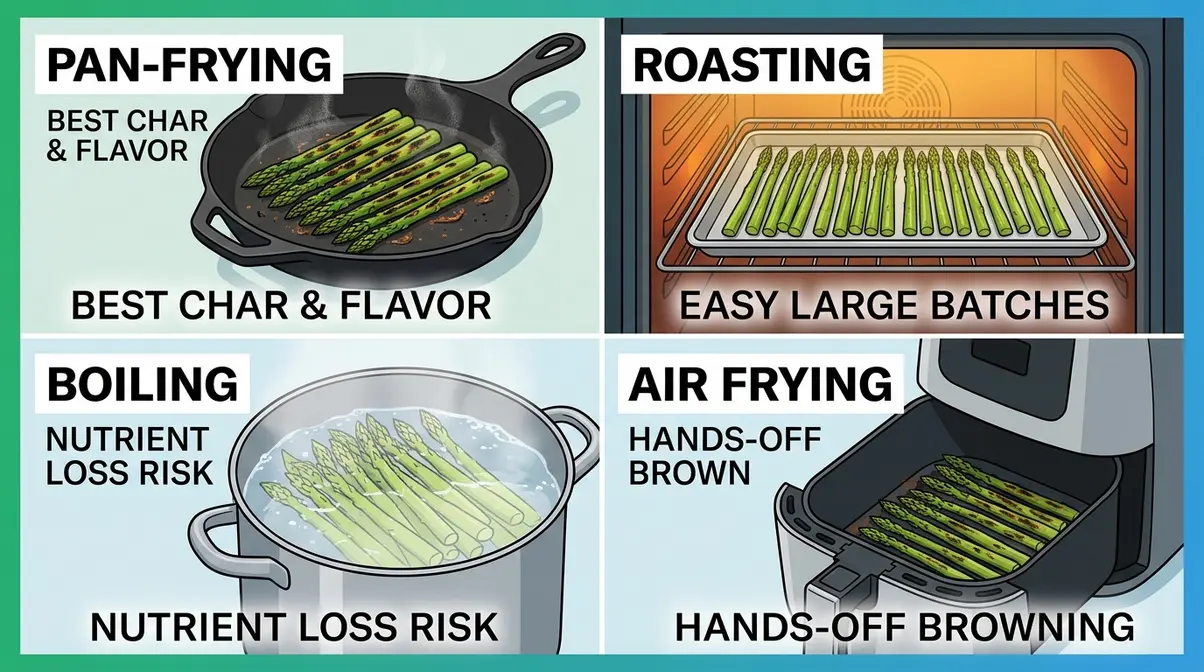
Pan-frying isn’t the only way to cook asparagus — but for most weeknight applications, it’s the best combination of speed, flavor development, and textural control. Here’s how the skillet method compares to three common alternatives. When deciding between these methods, consider your available time and desired flavor profile. Pan-frying remains the top choice for weeknight dinners due to its speed and the rich flavor developed by the Two-Stage Fat Technique.
How do you cook asparagus in a sheet pan?
Roasting asparagus in the oven (typically at 400–425°F for 10–15 minutes) is the most popular alternative to pan-frying. Both methods use dry heat and develop the Maillard browning reaction. The key differences come down to control and timing.
Pan-frying advantages: Faster (under 10 minutes vs. 10–15 for roasting), more immediate visual feedback, and easier to adjust mid-cook. You can see and smell exactly what’s happening. The Two-Stage Fat Technique also gives pan-frying a flavor edge — the butter finish is difficult to replicate in an oven without burning.
Roasting advantages: Hands-off once in the oven, and easier to scale for large quantities. A sheet pan can hold 2–3 pounds of asparagus at once. For weeknight meal prep, roasting wins on volume. According to Johns Hopkins Medicine (2026), roasted asparagus contains about 53 calories per serving with 3g protein and 4g fat — comparable to pan-fried with similar oil quantities.
Is it better to boil or pan fry asparagus?
Boiling is the method most beginners default to because it seems simple. It isn’t the best choice for asparagus, and the science explains why.
A 2025 study published in the International Journal of Food Science and Technology found that boiling reduced vitamin C content by 29.1% — significantly more than stir-frying, which reduced it by only 8.4% (Taylor & Francis, 2025). A separate review of asparagus cooking methods confirmed that boiling leaches water-soluble vitamins — including folate and vitamin C — into the cooking water, which is then discarded (Edible Times, 2026).
Beyond nutrition, boiling produces a uniformly soft texture with no browning. There’s no Maillard reaction, no char, and no flavor complexity. Boiling has its place — blanching asparagus for salads or freezing requires a quick boil followed by an ice bath — but for a hot side dish, pan-frying produces a dramatically superior result.
Pan-Frying vs. Air Frying
Air frying has become a legitimate competitor to stovetop methods for asparagus. An air fryer circulates hot air at high speed, producing results that approximate oven roasting in less time. At 400°F, thin asparagus cooks in about 5–7 minutes in an air fryer; medium spears take 7–9 minutes.
Air fryer advantages: Even more hands-off than roasting, easy cleanup, and the circulating air can produce good browning without added fat. The 2025 Taylor & Francis study also found that air frying increased measured vitamin C content by 39.7% compared to fresh samples — an unexpected result attributed to concentration effects from moisture loss.
Pan-frying advantages: Better flavor control via The Two-Stage Fat Technique, faster for small quantities (1–2 servings), and the ability to add butter and garlic in the final seconds of cooking. Air fryers also have a capacity limitation — most home units struggle with more than ¾ pound of asparagus at a time without crowding.
Method Comparison Table
| Method | Cook Time | Char/Browning | Hands-On Level | Best For | Nutrient Retention |
|---|---|---|---|---|---|
| Pan-Frying | 3–8 min | Excellent | High | Weeknight sides, small batches | Good (short cook time) |
| Roasting | 10–15 min | Good | Low | Meal prep, large batches | Good |
| Boiling | 2–5 min | None | Low | Blanching, salads | Poor (vitamin leaching) |
| Air Frying | 5–9 min | Good | Low | Hands-off, small batches | Good to Excellent |
| Steaming | 4–7 min | None | Medium | Maximum nutrient retention | Excellent |
If you want to explore convection methods further, read our tutorial on how to air fry vegetables.
Troubleshooting Common Mistakes
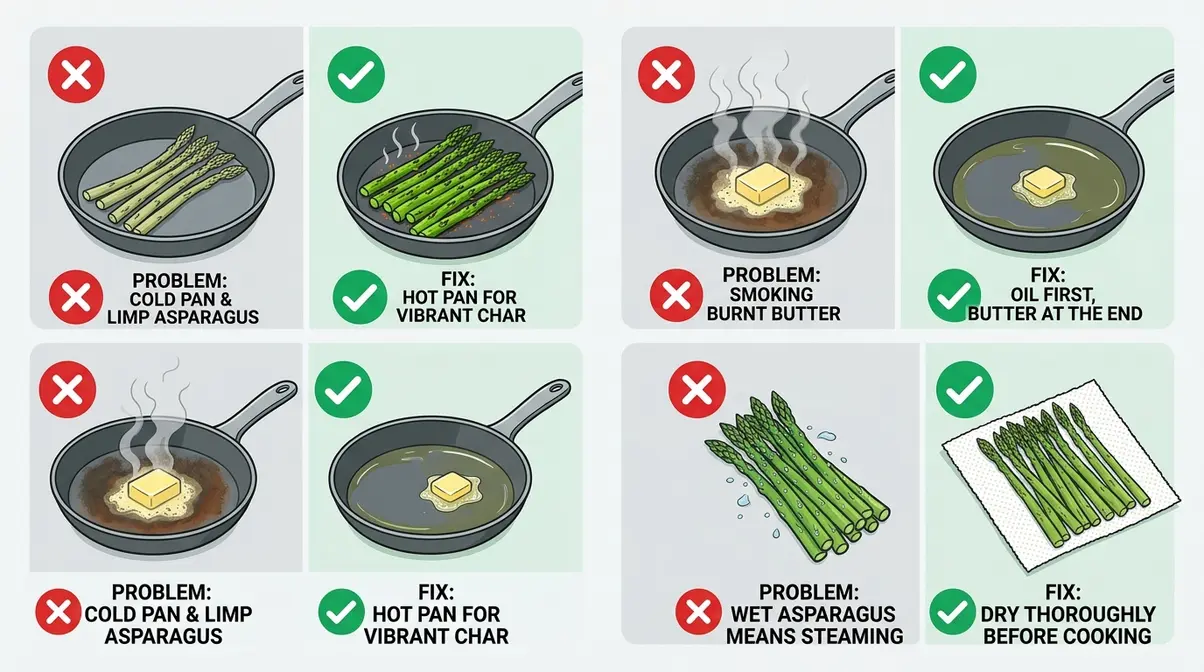
Even with a clear method for how to cook asparagus in a pan, things go wrong. Here are the three most common pan-asparagus failures, their root causes, and exact fixes.
Common Pitfalls
Problem 1 — Soggy, Limp Spears
Cause: The pan wasn’t hot enough before adding the asparagus, or the spears weren’t dried after washing. Either condition causes the asparagus to steam in its own moisture rather than sear against the hot surface.
Fix: Always preheat the pan for 1–2 minutes before adding oil. Pat spears completely dry with paper towels before they go anywhere near the pan. If you’re cooking more than 1 pound, work in batches — a crowded pan drops in temperature and the same steaming effect occurs.
Problem 2 — Burned Butter, Bitter Flavor
Cause: Butter was added too early — at the start of cooking instead of the finish. Butter’s smoke point (302–350°F, per WVU Health Sciences) is below the searing temperature needed for asparagus. Early-stage butter scorches before the asparagus finishes cooking.
Fix: Follow The Two-Stage Fat Technique. Add a high-smoke-point oil (avocado, refined olive, grapeseed) at the start. Add butter only in the final 60 seconds. If you accidentally burn the butter, pour it out, wipe the pan quickly, and start Stage 2 again with fresh butter off the heat.
Problem 3 — Tough, Stringy Ends
Cause: Woody ends weren’t trimmed, or the spears were very thick and the fibrous outer skin was left intact.
Fix: Always snap or cut the woody ends before cooking (see Step 1). For thick spears (½ inch or wider), use a vegetable peeler to remove the outer skin from the bottom two-thirds of each spear. This is the same technique used for white asparagus, and it transforms a stringy thick spear into a tender one.
When to Choose Alternatives
- When pan-frying isn’t the right choice:
- Cooking for 6+ people: Pan-frying requires single-layer cooking, limiting batch size. For large groups, roast on two sheet pans at 425°F for 12–15 minutes instead.
- Blanching for salads or meal prep: Pan-frying doesn’t produce the neutral, vibrant-green result needed for cold preparations. Blanch in salted boiling water for 2–3 minutes, then shock in ice water to stop cooking and set the color.
- Very thick, woody spears from late-season bunches: Extremely fibrous spears (over ¾ inch diameter) are better suited to braising or roasting, where sustained heat can fully break down the dense tissue.
When to Seek Expert Help
If you’re cooking for guests with dietary restrictions, be aware that common asparagus-related allergens are rare but documented. Asparagus contains asparagine (an amino acid it’s named for) and fructans — the latter can cause digestive discomfort in individuals with fructan sensitivity or irritable bowel syndrome. If a guest reports these issues, consult a registered dietitian for appropriate vegetable substitutions.
Frequently Asked Questions
How do you cook asparagus in a pan?
Heat oil in a skillet over medium-high heat, add trimmed, dry spears in a single layer, and sauté for 3–7 minutes depending on thickness. Use The Two-Stage Fat Technique: start with a high-smoke-point oil, then add butter only in the final 60 seconds to avoid burning. Remove from heat when spears pass the fork resistance and bend tests. Pencil-thin spears finish in 2–4 minutes; thick spears take 6–8 minutes.
What is the best way to cook and eat asparagus?
Pan-frying is widely considered the best everyday method for asparagus because it combines speed, flavor development, and textural control in one pan. Sauté over medium-high heat using the Two-Stage Fat Technique (oil first, butter at the finish), then serve immediately with a sharp splash of lemon juice. For eating, simply use a fork — no knife needed for properly cooked, crisp-tender spears. Pair with grilled protein or eggs for a complete meal.
Can you cook asparagus in a pan without oil?
While you can use a water-sauté method for a low-fat approach, cooking asparagus in a pan without any liquid or fat will burn the spears. For the best flavor and char, using a high-smoke-point oil is highly recommended. If you prefer no oil, add a few tablespoons of water or broth to steam the spears. This prevents sticking and ensures a tender result.
What is the best way to cook asparagus so it’s tender?
The covered-steam method produces the most uniformly tender asparagus. Add 1–2 tablespoons of water to a hot, oiled pan, add the asparagus, and cover immediately. The trapped steam cooks the interior of the spears evenly and more quickly than open sautéing. Reduce timing by 1–2 minutes compared to open sauté. For maximum tenderness without mushiness, remove the lid for the final 90 seconds and add butter to finish. Thick spears benefit most from this approach.
Is it better to sauté asparagus in butter or oil?
Use both — but in the right order. According to WVU Health Sciences (2026), butter falls into the “light heat” category of cooking fats and cannot handle high sautéing temperatures without burning (smoke point: 302–350°F). Start with a high-smoke-point oil like refined avocado oil (smoke point: 480–520°F, per WebstaurantStore, 2026) to sear the asparagus, then add butter only in the final 60 seconds. This is the core principle of The Two-Stage Fat Technique — oil for char, butter for flavor.
What are some common mistakes to avoid when cooking asparagus?
The three most common mistakes are: starting with a cold pan, adding butter too early, and skipping the drying step. A cold pan causes steaming instead of searing, producing limp, pale spears. Early butter burns before the asparagus finishes cooking, adding bitter flavor. Wet spears from skipping the drying step lower pan temperature on contact and prevent char formation. A fourth common mistake is ignoring spear thickness — pencil-thin and thick spears have completely different timing requirements and should never be cooked on the same schedule.
What is the best way to cook asparagus in a pan?
The best way to cook asparagus in a pan is the Two-Stage Fat Technique: heat a skillet to medium-high, add a high-smoke-point oil (avocado or refined olive oil), sauté trimmed, dry spears in a single layer for 3–7 minutes based on thickness, then add butter and optional garlic in the final 60 seconds. Verify doneness with the 3-Test Framework (fork resistance, visual char cue, bend test) and serve immediately with a squeeze of lemon. This method produces crisp-tender, lightly charred asparagus with rich buttery flavor — without burned fat or soggy texture.
Why is my pan-fried asparagus stringy?
Pan-fried asparagus becomes stringy when the woody ends are not properly trimmed before cooking. Always snap or cut the bottom 1 to 2 inches off each spear to remove the dense, lignified tissue. Additionally, very thick spears have a fibrous outer skin that should be peeled with a vegetable peeler to ensure a tender bite. Taking time to prep your asparagus properly guarantees a better texture.
Conclusion
For home cooks who’ve struggled with limp, pale asparagus, learning how to cook asparagus in a pan correctly isn’t about finding a different recipe — it’s a different understanding of heat and fat. Pan-frying asparagus correctly means using a properly preheated skillet, starting with a high-smoke-point oil for char, and finishing with butter only in the final 60 seconds. According to the Time-by-Thickness chart, pencil-thin spears need just 2–4 minutes while thick spears need 6–8 minutes — that single variable explains most pan-asparagus failures. The best approach combines correct pan temperature, the Two-Stage Fat Technique, and the 3-Test Doneness Framework for results that hold up every time.
The Two-Stage Fat Technique reframes a seemingly simple vegetable as a science-backed process: oil provides the structural heat tolerance for searing (smoke point 480–520°F for refined avocado oil), while butter delivers the fat-soluble flavor compounds that create the restaurant-quality finish most home cooks are chasing. Together, they solve the problem that one fat alone cannot — you get both the char and the richness, without the burned bitterness that comes from adding butter to a hot pan too early.
Start with one pound of fresh medium-thickness asparagus, a 12-inch stainless steel skillet, and 10 minutes. Follow the five steps, use the Time-by-Thickness chart, and apply the 3-Test Doneness Framework before pulling the pan off the heat. After one successful batch, the method becomes instinctive — and that gap between “good enough” and genuinely great asparagus closes permanently.

quickdishcook
Recipe developer and writer at Quick Dish Cookbook.