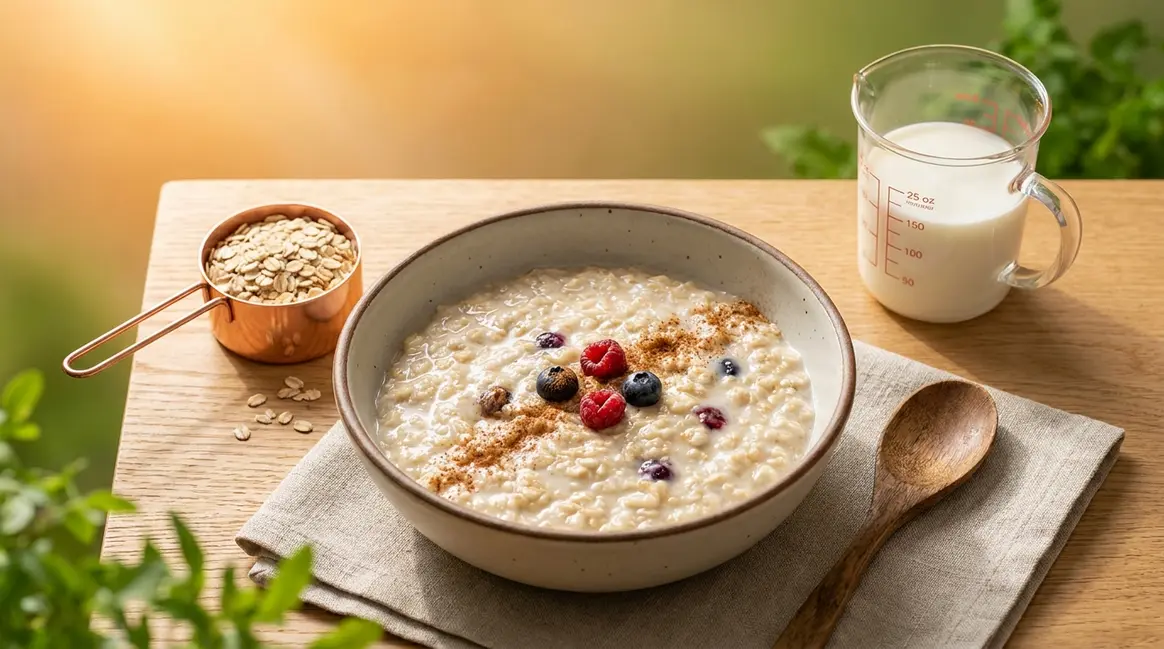

To cook quick oats, combine ½ cup of oats with 1 cup of liquid (water or milk) — the 1:2 ratio — then heat for 1–2 minutes in the microwave or about 1 minute on the stovetop after the liquid boils. This 5-step process takes under 5 minutes total and produces a creamy, filling bowl every time.
What’s in this guide
- What You'll Need Before You Start
- Step 1: Measure Your Oats and Liquid Using the 1:2 Ratio
- Step 2: Cook Quick Oats in the Microwave in Under 2 Minutes
- Step 3: Cook Quick Oats on the Stovetop in 5 Minutes
- Step 4: Choose the Right Oat Type for Your Goals
- Step 5: Customise Your Oats with Toppings and Variations
- Verify Your Results: The Texture Checkpoint
- Troubleshooting Common Issues
- Frequently Asked Questions
- A Repeatable Morning Breakfast, Finally
You’ve been there. You pour quick oats into a bowl, guess at the water, and end up with either grey wallpaper paste or a watery soup that tastes like cardboard. Or worse — you turn away for 30 seconds and the microwave looks like a porridge volcano.
“Store-bought flavoured oats are SO expensive for what they are.”
— A common sentiment across cooking communities
That frustration makes complete sense. Pre-flavoured packets cost three to four times more than a bag of plain quick oats, yet the instructions on the box leave out the details that actually matter. This guide teaches you how to cook quick oats properly — the exact 1:2 ratio, the Overflow Prevention Protocol for the microwave, and a five-step process you can repeat on busy mornings without thinking. You’ll cover: measuring your oats (Step 1), the microwave method (Step 2), the stovetop method (Step 3), choosing your oat type (Step 4), and customising with toppings (Step 5).
What You’ll Need Before You Start
Before you begin, gather these items. Having everything ready makes the process genuinely take 2 minutes.
- Ingredients:
- ½ cup dry quick oats (roughly the volume of a tennis ball)
- 1 cup water or milk (a standard coffee mug holds about 1 cup)
- Pinch of salt (optional — improves flavour without making oats taste salty)
- Equipment:
- Microwave method: A large microwave-safe bowl with at least 4-cup capacity — a standard cereal bowl is too small
- Stovetop method: A small saucepan and a wooden spoon or silicone spatula
- Measuring cup (or use the mug-as-cup trick above)
Quick oats are pre-cut rolled oats that cook in 1–2 minutes. They’re different from old-fashioned rolled oats (which take 5 minutes) and instant oats (which only need hot water). If the label says “1-minute oats” or “quick-cooking oats,” you’re in the right place.
Step 1: Measure Your Oats and Liquid Using the 1:2 Ratio
The single most important variable in cooking quick oats is the liquid ratio. Quick oats require a 2-to-1 liquid-to-oat ratio — 2 cups of water or milk for every 1 cup of dry oats — according to Oregon State University’s recommended liquid ratio for quick oat preparation (updated July 2025). Get this wrong and you’ll either have dry, gluey clumps (too little liquid) or a watery soup (too much). Get it right, and texture becomes predictable every single time.
This is the first pillar of The 2-Minute Mastery Method — the repeatable framework of Ratio + Method + Texture Checkpoint that makes perfect oats achievable for any beginner on any morning.
What Is the Correct Oat-to-Water Ratio?
The correct ratio for quick oats is 1 part oats to 2 parts liquid. For a single serving, that means ½ cup of dry quick oats plus 1 cup of water or milk. For two servings, double it: 1 cup of oats plus 2 cups of liquid.
Why does this ratio work? Quick oats are pre-cut and pre-steamed during manufacturing, so they absorb liquid very rapidly when heated. The 1:2 ratio accounts for the liquid absorbed by the oats plus a small amount of evaporation during cooking. Use less than 1 cup of liquid per ½ cup of oats and the oats won’t fully hydrate — you’ll get a dense, gummy result. Use significantly more and the oats finish cooking before the liquid reduces, leaving you with porridge soup.
For a standard bowl on a busy morning, start with ½ cup dry quick oats and 1 cup of water. That’s it.
Checkpoint: You should now have your oats and liquid measured and ready in a pot or microwave-safe bowl. The liquid should be roughly double the volume of the oats.
Thin, Medium, or Thick: Adjusting Your Ratio
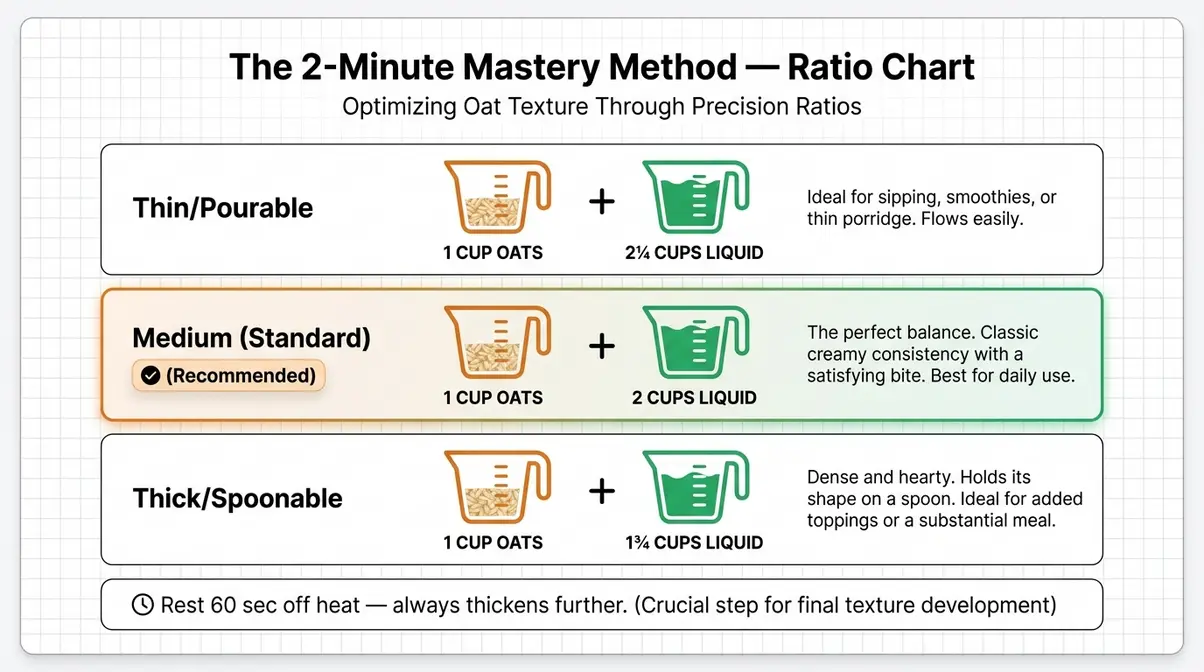
Once you know the standard ratio, you can adjust it for your preferred texture. Here’s a simple reference:
| Texture | Oats | Liquid | Result |
|---|---|---|---|
| Thin / pourable | 1 cup | 2¼ cups | Loose, easy to stir in toppings |
| Medium (standard) | 1 cup | 2 cups | Creamy and thickened — the classic |
| Thick / spoonable | 1 cup | 1¾ cups | Dense, holds toppings well |
There’s also a resting trick that most people miss. Remove your oats from the heat, cover the pot or bowl, and wait 60 seconds. The oats continue absorbing liquid after cooking stops — the result is always noticeably thicker than what you see in the pan. If your oats look slightly too thin when you pull them off the stove, cover and wait 60 seconds. They’ll thicken on their own.
Does Liquid Type (Water vs. Milk) Change the Ratio?
The ratio stays the same (1:2) whether you use water, dairy milk, oat milk, or any other liquid. Milk produces a creamier, richer result because of its fat content. Water heats faster and adds zero calories. For the richest taste with no extra effort, swap water for whole milk or oat milk — same ratio, noticeably creamier result.
One important caution for microwave users: milk foams more aggressively than water and increases overflow risk. When cooking with milk in the microwave, use a bowl with at least 4-cup capacity and keep a close eye on it during the final 30 seconds. This connects directly to the Overflow Prevention Protocol in Step 2.
Step 2: Cook Quick Oats in the Microwave in Under 2 Minutes
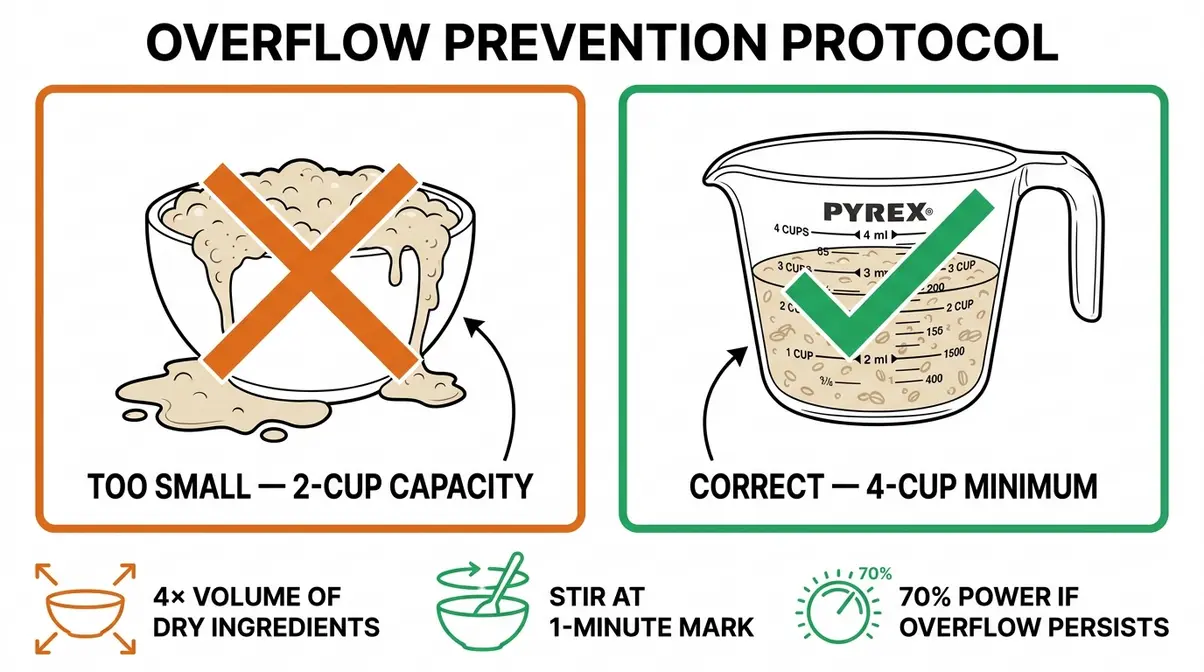
Cooking quick oats in the microwave takes 1–2 minutes and produces a creamy bowl with minimal cleanup — if you use the right bowl size. The most common beginner mistake isn’t the ratio; it’s using a standard cereal bowl and watching the oats bubble over the sides. A 4-cup microwave-safe bowl eliminates that problem entirely.
How to Cook Quick Oats in the Microwave: Full Instructions
Follow these steps in order for a perfect result every time:
- Combine ½ cup quick oats and 1 cup water (or milk) in a large microwave-safe bowl — minimum 4-cup capacity. A 4-cup Pyrex measuring jug works perfectly: it’s deep, easy to clean, and has a handle.
- Do not cover the bowl. A lid traps steam and dramatically increases overflow risk.
- Microwave on HIGH for 1 minute. Stay nearby — this is when boil-overs are most likely.
- Stir thoroughly. This redistributes heat, breaks up hot spots, and prevents the bottom from scorching.
- Microwave for another 30–60 seconds until the oats are thickened and most of the liquid is absorbed.
- Let stand for 1 minute before eating. The oats continue cooking from residual heat and reach their final, creamy texture during this rest.
If you’re using milk, watch the last 30 seconds closely — milk foams faster than water and can rise suddenly. Stirring at the halfway point (Step 4) stops this 90% of the time.
Checkpoint: You should now see oats that have absorbed most of the liquid and expanded to roughly double their dry volume. The surface should look set, not soupy.
How to Prevent Microwave Overflow
Overflow happens because oat starch and liquid create a foam that expands rapidly when heated. Recipe testing and food science sources, including guidance from Serious Eats’ overflow prevention testing (April 2026), confirm three reliable prevention techniques:
1. Use a bowl at least 4× the volume of your dry ingredients. For a standard ½-cup serving, that means a bowl holding at least 4 cups. A large soup bowl or a glass measuring jug both work. A standard cereal bowl does not.
2. Stir at the halfway point. Pausing at 1 minute and stirring breaks the foam structure before it can rise high enough to spill. This single step stops overflow the vast majority of the time.
3. Reduce power if overflow persists. Drop your microwave to 70% power and add 20–30 seconds to the cook time. Lower power means slower heating and less dramatic foam formation.
Never cover the bowl tightly — a loose paper towel is fine to catch splatter, but a lid creates a steam trap that makes overflow worse.
How Long to Cook Quick Oats in the Microwave
Cook time depends on your microwave’s wattage. Most home microwaves fall between 700W and 1,200W:
| Microwave Wattage | Cook Time | Method |
|---|---|---|
| 1,000W+ | 1 min + 30–45 sec | High power, stir halfway |
| 800–900W | 1 min + 60 sec | High power, stir halfway |
| 700W or below | 2.5–3 minutes total | High power, stir at 1 min 30 sec |
Not sure of your wattage? Check the label inside the microwave door. If you don’t know, start with the 800–900W timing — you can always add 15-second increments until the oats look right.
Step 3: Cook Quick Oats on the Stovetop in 5 Minutes
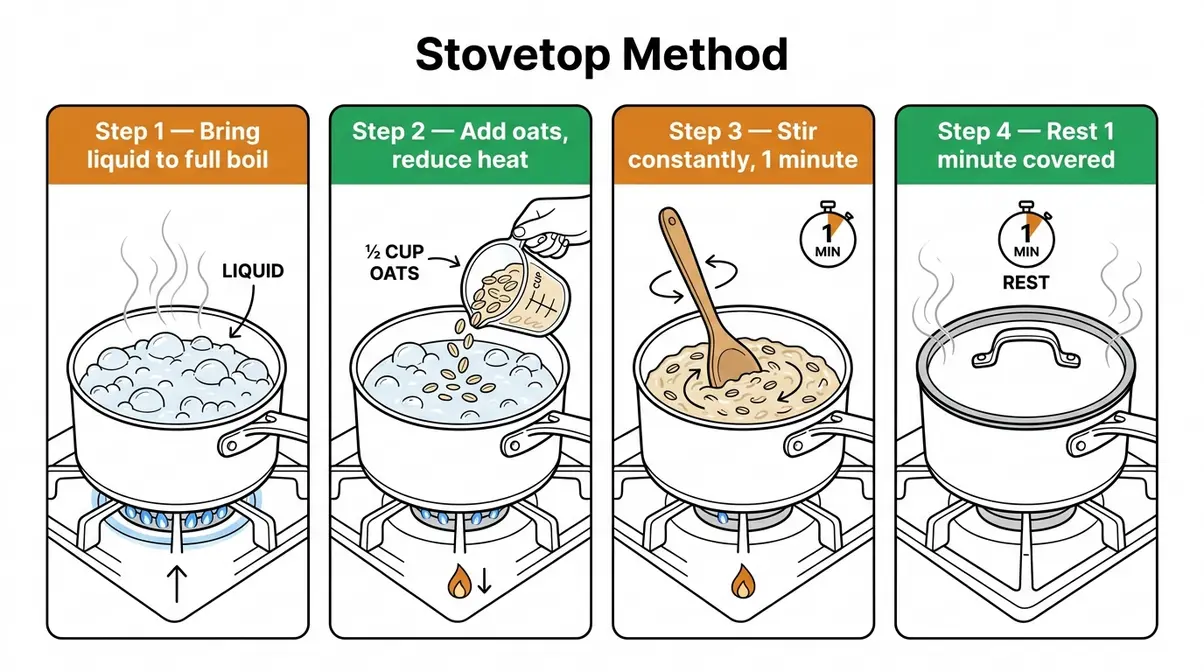
The stovetop method takes slightly longer than the microwave but gives you more control over texture. Many recipe testers prefer it for a creamier, more consistent result — especially when cooking with milk. The key is bringing the liquid to a boil before adding the oats, not after.
Stovetop Instructions
Follow these steps exactly:
- Pour 1 cup of water or milk into a small saucepan. Add a pinch of salt if using.
- Bring to a full boil over medium-high heat. You’ll see steady, rolling bubbles — not just steam.
- Reduce heat to medium-low. This prevents scorching.
- Add ½ cup of quick oats and stir immediately to combine.
- Cook for 1 minute, stirring constantly. Constant stirring prevents the oats from sticking to the bottom of the pan. Quick oats cook fast — 60 seconds is usually all they need.
- Remove from heat. Cover the pan and let rest for 1 minute. The oats will thicken noticeably during this rest.
For a bigger batch on busy mornings, scale linearly: 1 cup oats + 2 cups liquid = 2 servings. Store leftovers in an airtight container in the fridge for up to 4 days. Reheat with a splash of water or milk to loosen.
Checkpoint: You should now see oats that are creamy and thickened, pulling slightly away from the sides of the pan when you stir. The mixture should hold its shape briefly on a spoon before settling.
How to Avoid Sticking and Gummy Texture
Sticking happens when oats sit in contact with a hot pan without enough movement. Gummy texture happens for a different reason — overcooking breaks down oat starch and releases too much of it into the liquid.
Three rules prevent both problems:
- Stir constantly once the oats go in. This keeps oats in suspension and off the pan bottom.
- Keep the heat at medium-low. High heat after adding oats causes rapid starch release — the main cause of gluey oatmeal.
- Don’t cook longer than 1–2 minutes. Quick oats are pre-cooked during manufacturing. They only need to absorb liquid and warm through — they don’t need prolonged cooking.
According to Oregon State University’s recommended liquid ratio guidance (updated 2025), quick oats on the stovetop are done when they’ve fully absorbed the liquid and the mixture looks uniformly creamy — typically within 60 seconds of reducing the heat.
Stovetop Cook Time at a Glance
| Serving Size | Oats | Liquid | Cook Time After Adding Oats |
|---|---|---|---|
| Single serving | ½ cup | 1 cup | ~1 minute |
| Double serving | 1 cup | 2 cups | ~1–2 minutes |
| Big batch (4 servings) | 2 cups | 4 cups | ~2–3 minutes |
Checkpoint (cumulative): You’ve now completed the core cooking steps. The 2-Minute Mastery Method’s first two pillars — Ratio and Method — are in place.
Step 4: Choose the Right Oat Type for Your Goals
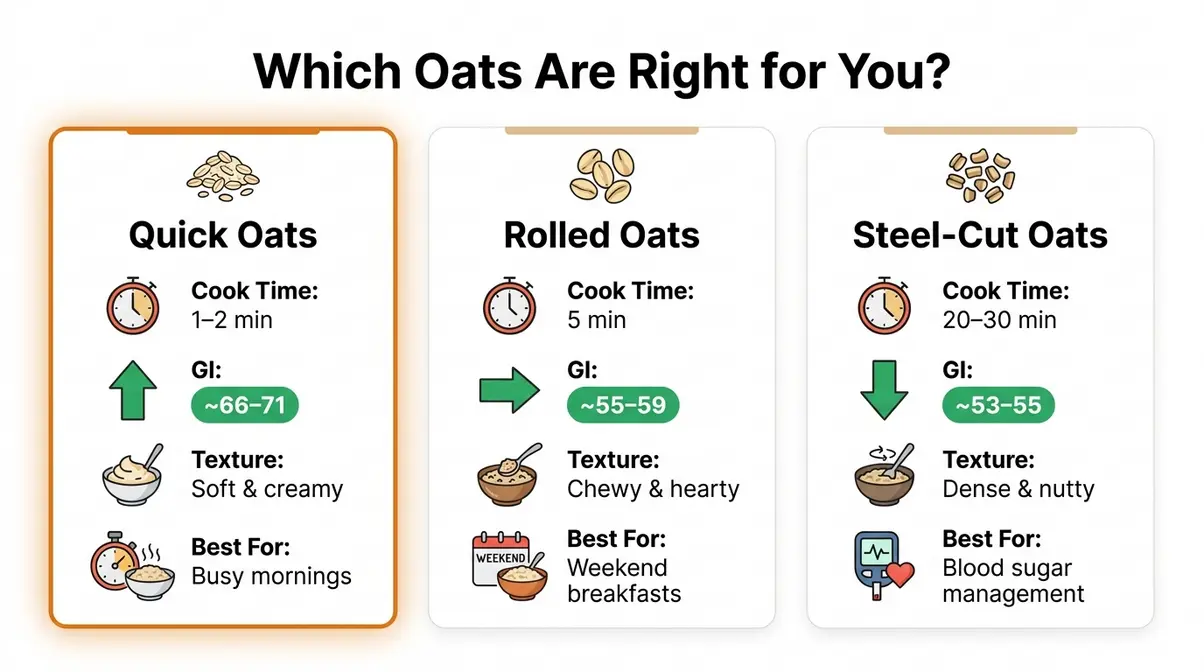
Not all oats are the same. The type you choose affects cook time, texture, and — importantly for health-conscious eaters — how quickly your blood sugar rises after eating. Understanding the differences takes 2 minutes and helps you make a smarter choice at the supermarket.
Quick Oats vs. Rolled Oats vs. Steel-Cut Oats
Here’s how the three main types compare:
| Oat Type | Cook Time | Texture | GI Score | Best For |
|---|---|---|---|---|
| Quick oats | 1–2 min | Soft, creamy | ~66–71 | Busy mornings, smoothies |
| Rolled (old-fashioned) oats | 5 min | Chewy, hearty | ~55–59 | Baked goods, weekend breakfasts |
| Steel-cut oats | 20–30 min | Dense, nutty | ~53–55 | Meal prep, blood sugar management |
Quick oats are rolled oats that have been cut into smaller pieces and rolled thinner. They cook fast because the oat is smaller and more porous, absorbing liquid almost instantly.
Rolled oats (sometimes called old-fashioned oats) are whole oat groats that have been steamed and flattened. They take longer to cook but produce a chewier, heartier texture that many people prefer for weekend breakfasts.
Steel-Cut Oats: When to Choose Them Instead
Steel-cut oats are oat groats that have been chopped into pieces but not rolled or pre-steamed. They take 20–30 minutes to cook and produce a dense, chewy, nutty bowl — the polar opposite of quick oats in texture.
The key difference for health-conscious eaters is the glycemic index. A 2015 systematic review published in the British Journal of Nutrition (Tosh & Chu) found that quick-cooking oats have a mean GI of 71, while steel-cut oats have a mean GI of approximately 53. A lower GI means slower glucose release into the bloodstream — a meaningful difference for anyone managing blood sugar levels. For people with type 2 diabetes, expert consensus from sources including Healthline’s oat comparison guide (updated July 2026) consistently recommends steel-cut or thick rolled oats over quick or instant varieties.
Quick oats are a perfectly healthy choice for most people. But if tight blood sugar control is a priority, steel-cut oats are the better option — even if they require more planning.
Checkpoint: You should now know which oat type suits your schedule and health goals. Quick oats win on speed; steel-cut oats win on glycemic response.
Step 5: Customise Your Oats with Toppings and Variations
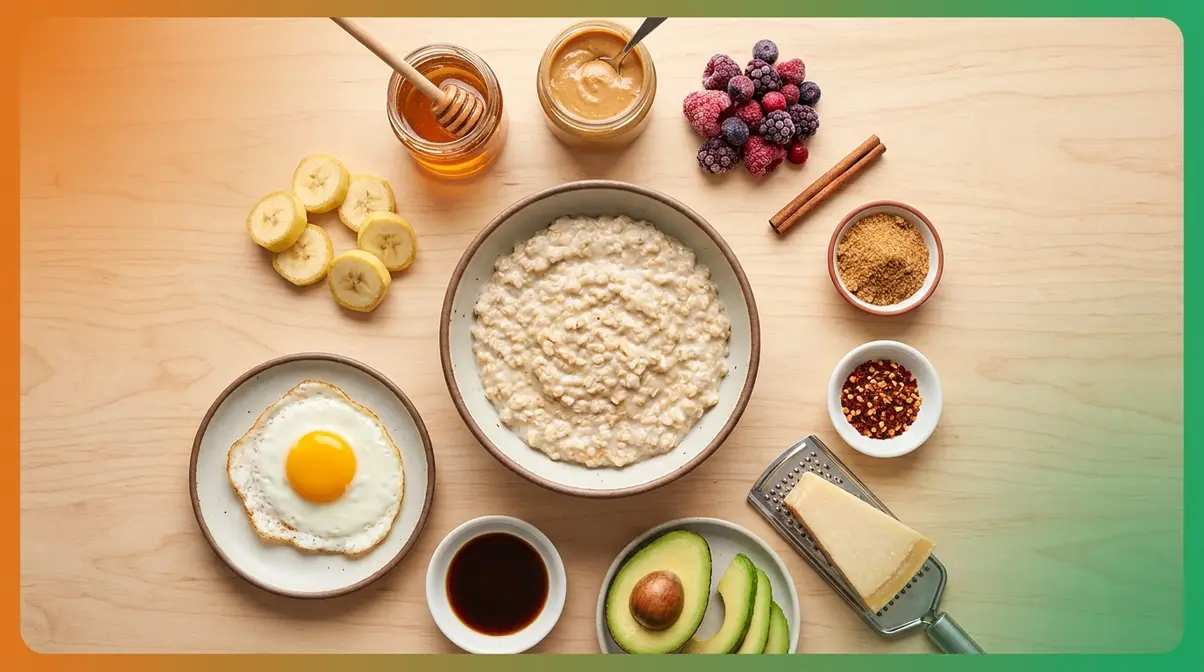
Plain oats cooked with the 1:2 ratio taste mild and slightly nutty. That’s a blank canvas — and a good one. The right toppings turn a functional breakfast into something you actually look forward to, without spending more than the flavoured packets that cost three times as much.
Sweet Topping Ideas
These combinations work with either the microwave or stovetop method:
- Brown sugar and cinnamon — the classic. Add ½ tsp cinnamon and 1 tsp brown sugar directly to the oats during the last 30 seconds of cooking so the sugar melts in.
- Banana and honey — slice half a banana on top, drizzle 1 tsp honey. The banana adds natural sweetness and potassium.
- Peanut butter and jam — stir 1 tbsp peanut butter into hot oats immediately after cooking (it melts smoothly), then add a small spoonful of jam on top.
- Berries and maple syrup — frozen berries thaw in about 60 seconds on hot oats; add a drizzle of maple syrup for depth.
Savoury Topping Ideas
Savoury oats sound unusual but are popular in many cooking communities — and genuinely satisfying. Try:
- Fried egg and soy sauce — cook your oats with water (not milk), top with a fried egg, a splash of soy sauce, and a pinch of sesame seeds.
- Avocado and chilli flakes — mash ¼ avocado on top, season with salt, pepper, and a pinch of dried chilli.
- Grated parmesan and black pepper — stir in 2 tbsp parmesan right off the heat. Rich, filling, and ready in the same 2 minutes.
Overnight Oats: No-Cook Variation
Overnight oats are a no-cook alternative that takes 5 minutes to prepare the night before. Combine ½ cup quick oats with 1 cup milk or yogurt in an airtight container, stir, and refrigerate overnight. By morning, the oats have absorbed the liquid and softened completely — no heat required.
Quick oats work for overnight oats, though the texture is softer than using rolled oats. If you prefer more chew, swap to rolled oats for the overnight version.
High-Protein Oats
To significantly increase the protein content of your bowl, stir in one of these after cooking:
- 1 scoop protein powder — add after removing from heat; stir vigorously to prevent lumps
- 2 tbsp Greek yogurt — stir in for a creamy, tangy result with extra protein and probiotics
- 2 tbsp nut butter — peanut, almond, or cashew; adds protein and healthy fats
Recipe testers report that stirring protein powder into oats that are slightly cooled (about 30 seconds off heat) prevents the powder from clumping and producing a chalky texture.
Checkpoint: You should now have a fully finished, personalised bowl of oats. This is the third pillar of the 2-Minute Mastery Method — the Texture Checkpoint — confirming your oats are creamy, thickened, and ready to eat.
Verify Your Results: The Texture Checkpoint
Before you eat, run this quick check. It takes 10 seconds and confirms your oats are done correctly.
- Your oats are perfect if:
- The mixture is creamy and thickened — it holds shape briefly on a spoon
- The surface looks set, not glossy and liquid
- The colour is a uniform pale tan (not dry white or grey-brown)
- Your oats need adjustment if:
- Still soupy → cover and rest 1 more minute off heat, or return to heat for 30 seconds
- Too thick/gluey → stir in 1–2 tablespoons of warm water or milk until loosened
- Dry lumps visible → stir vigorously; if lumps persist, add a tablespoon of liquid and microwave for 20 seconds
The 2-Minute Mastery Method works because the Texture Checkpoint catches problems before they become a ruined breakfast. Run it every time until the result becomes intuitive — most people need fewer than five attempts.
Troubleshooting Common Issues
Even with the correct ratio, a few problems come up repeatedly. Here’s how to fix each one.
Common Mistakes (and How to Fix Them)
Problem: Oats are watery and thin.
What went wrong: Too much liquid, or the oats didn’t cook long enough to absorb it.
Fix: Return to heat for 30–60 seconds, stirring constantly. Alternatively, cover and rest 2 minutes — the oats will continue absorbing liquid. Next time, reduce liquid by 2 tablespoons per serving.
Problem: Oats are thick, gluey, or gummy.
What went wrong: Too little liquid, or overcooking broke down the oat starch.
Fix: Stir in warm water or milk, 1 tablespoon at a time, until the texture loosens. Next time, stick to the 1:2 ratio and stop cooking at the 1-minute mark.
Problem: Oats overflowed in the microwave.
What went wrong: Bowl was too small, or you didn’t stir at the halfway point.
Fix: Upgrade to a 4-cup bowl (or larger). Stir at the 1-minute mark every single time. If overflow persists, reduce microwave power to 70% and add 20 seconds to the total time.
Problem: Oats stuck to the bottom of the pan.
What went wrong: Heat was too high, or you didn’t stir continuously.
Fix: Soak the pan immediately — dried oats are cement. Next time, reduce heat to medium-low as soon as you add the oats and stir constantly for the full 60 seconds.
Problem: Oats taste bland.
What went wrong: No salt, no flavour-building step.
Fix: Add a pinch of salt to the liquid before cooking — this amplifies all other flavours without making oats taste salty. Cook with milk instead of water for a richer base.
When Quick Oats Aren’t the Right Choice
Quick oats are an excellent everyday breakfast for most people. However, there are specific situations where a different oat type serves you better:
- Blood sugar management / diabetes: Quick oats have a GI of approximately 66–71 (British Journal of Nutrition, 2015). Steel-cut oats (GI ~53) and thick rolled oats (GI ~55) produce a significantly slower blood sugar rise. If you have type 2 diabetes or insulin resistance, choose steel-cut oats and pair them with protein and healthy fat.
- You want more texture and chew: Quick oats are soft by nature. For a heartier bowl, use old-fashioned rolled oats (5-minute cook time) or steel-cut oats (20–30 minutes).
- Baking: Quick oats absorb moisture faster than rolled oats and can make baked goods (cookies, bars) dense and mushy. Use old-fashioned rolled oats for baking.
Frequently Asked Questions
What is the ratio of water to quick oats?
The correct ratio of water to quick oats is 2:1 — 2 parts liquid to 1 part dry oats. For a single serving, that’s 1 cup of water (or milk) to ½ cup of dry quick oats. According to Oregon State University’s recommended liquid ratio guidance (updated July 2025), this 2:1 liquid-to-oat ratio applies to both stovetop and microwave cooking. Using less liquid produces gluey oats; using more produces watery oats. Stick to this ratio and adjust only for texture preference after your first attempt.
How do you cook 1 cup of oats?
To cook 1 cup of quick oats, use 2 cups of liquid — that’s two servings at the standard 1:2 ratio. On the stovetop, bring 2 cups of water or milk to a boil, add 1 cup of oats, reduce heat to medium-low, and stir constantly for 1–2 minutes until thickened. In the microwave, combine in a large bowl (minimum 8-cup capacity for this volume), microwave on high for 2 minutes, stir at the 1-minute mark, then let stand for 1 minute. One cup of dry oats yields approximately two standard servings.
Do I need to boil quick oats?
You do not need to boil quick oats — they only need to be heated enough to absorb liquid, not fully boiled. On the stovetop, bring the liquid to a boil first, then add the oats and reduce heat to a simmer. The oats cook in about 60 seconds at this lower temperature. In the microwave, high heat for 1–2 minutes achieves the same result without a visible boil. Quick oats are pre-cooked during manufacturing, so they simply need rehydration — prolonged boiling makes them gluey.
How do you cook quick oats for one person?
For a single serving, combine ½ cup quick oats with 1 cup of liquid. Microwave in a 4-cup bowl on high for 1 minute, stir, then microwave for another 30–60 seconds. On the stovetop, boil 1 cup of water or milk, add the oats, reduce heat, stir for 60 seconds, then rest covered for 1 minute. This produces a standard bowl — roughly 1½ cups of cooked oatmeal. Add toppings after the rest period, not during cooking, so they don’t affect the liquid ratio.
How much water do I add to ½ cup of oats?
Add 1 cup of water (or milk) to ½ cup of quick oats. This is the standard 1:2 ratio and produces a single, creamy serving. If you prefer thinner oats, increase to 1¼ cups of liquid. For thicker, more spoonable oats, reduce to ¾ cup. Always measure both the oats and the liquid rather than estimating — even small deviations from the 1:2 ratio produce noticeably different results, especially when you’re still learning.
How much water do I add to 1 cup of quick oats?
Add 2 cups of water or milk to 1 cup of quick oats. This makes two standard servings. The 1:2 ratio scales linearly — double the oats means double the liquid, every time. For a big batch on Sunday that covers the whole week, use 2 cups of oats plus 4 cups of liquid (four servings). Store in an airtight container in the refrigerator for up to 4 days and reheat individual portions with a splash of water.
Can quick oats help you stay fuller longer?
Yes — quick oats contain beta-glucan, a type of soluble fiber that research consistently links to increased satiety. Harvard T.H. Chan School of Public Health (2026) identifies beta-glucan as the primary mechanism by which oats help slow digestion and suppress appetite. A 2023 NIH-hosted review (Impact of Oats on Appetite Hormones and Body Weight Management) found that 4 grams of high-molecular-weight oat beta-glucan increased feelings of satiety and fullness. A standard ½-cup serving of dry oats provides approximately 2 grams of beta-glucan — pair with protein (an egg, Greek yogurt, or nut butter) to extend fullness further.
A Repeatable Morning Breakfast, Finally
For anyone who’s ended up with watery porridge or a microwave mess, the fix is simpler than it looks. Quick oats deliver a genuinely nutritious, filling breakfast in under 5 minutes — Harvard T.H. Chan School of Public Health confirms their beta-glucan fiber helps slow digestion and increase satiety (2026). The best approach combines three things: the exact 1:2 liquid-to-oat ratio, your chosen method (microwave with a 4-cup bowl, or stovetop with constant stirring), and a 60-second rest off the heat that solves most texture problems on its own.
The 2-Minute Mastery Method works because it removes guesswork. Ratio + Method + Texture Checkpoint — run that sequence five mornings in a row, and perfect oats become automatic. No more expensive flavoured packets, no more grey porridge, no more microwave disasters.
Start with the microwave method today: ½ cup oats, 1 cup water, 4-cup bowl, 90 seconds on high, stir, 30 more seconds, rest 1 minute. That’s your first attempt. Adjust texture from there using the ratio chart. By the end of the week, you won’t need to think about it at all.

quickdishcook
Recipe developer and writer at Quick Dish Cookbook.