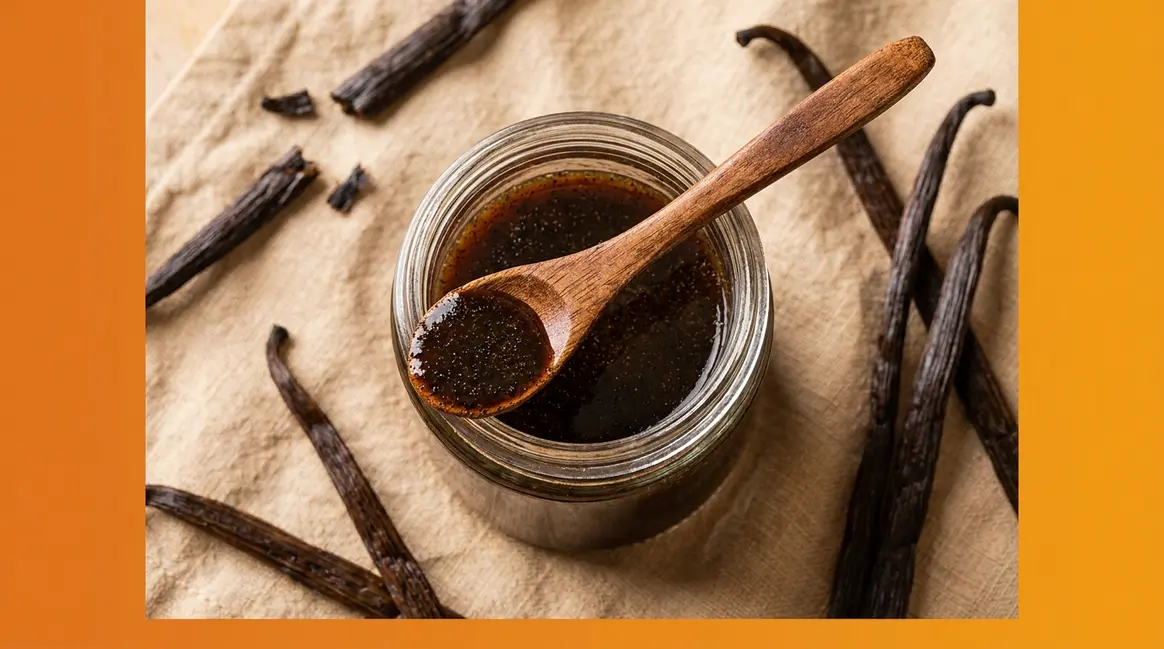

A jar of store-bought vanilla bean paste can cost $4–$8 per ounce — and many brands pad their ingredient lists with artificial thickeners and colors. A homemade batch using real Grade A Madagascar beans costs roughly $1.50 per ounce (Milk Glass Home, 2026), tastes noticeably richer, and takes about 15 minutes of hands-on work.
What’s in this guide
- What You'll Need Before You Start
- Step 1: Choose Beans and Base Ingredients
- Step 2: Prep Your Vanilla Beans
- Step 3: Blend Your Vanilla Bean Paste
- Step 4: Strain and Transfer to a Jar
- Step 5: Store Your Vanilla Bean Paste Correctly
- Verify Your Results
- Troubleshooting Common Mistakes
- Vanilla Bean Paste vs. Extract: When to Use Each
- Limitations and Considerations
- Frequently Asked Questions
- Conclusion
Still, the hesitation is real. Which beans should you buy? Do you need alcohol? Will it spoil in a month? Those questions stop a lot of home bakers before they even open a search tab.
“My quick and easy vanilla bean paste recipe will elevate your own treats at home with intense vanilla flavor for bakery-style results.”
By the end of this guide, you’ll have a jar of rich, speckled vanilla bean paste — plus the ingredient science to customize it, the storage know-how to make it last, and the confidence to make it again.
To make homemade vanilla bean paste, blend whole vanilla beans with sugar, alcohol (or vegetable glycerin for an alcohol-free version), water, and corn syrup in a high-speed blender until smooth. This 5-step vanilla bean paste recipe takes about 15 minutes of active time plus an overnight rest for the paste to thicken fully — and it costs up to 60% less than store-bought.
Key Takeaways: Homemade Vanilla Bean Paste
Making your own homemade vanilla paste recipe takes 5 steps and about 15 minutes — with results that rival any bakery. Here’s what to know before you start:
- Cost: Homemade vanilla paste costs roughly $1.46–$1.50 per ounce vs. $3.25–$8+ per ounce store-bought — about 50–70% savings (Milk Glass Home, 2026; Patchwork Times, 2026).
- Shelf Life: Alcohol-based paste lasts up to 1 year in a cool, dark cupboard; glycerin-based paste is best used within 6 months.
- The Vanilla Paste Matrix: Your flavor and shelf life depend on two choices — your alcohol type (or glycerin) and your thickener. This guide walks you through both.
- Alcohol-Free Option: Substitute vegetable glycerin 1:1 for vodka to make a fully alcohol-free version.
- Use Ratio: Substitute vanilla paste 1:1 for vanilla extract in any recipe — you get the same flavor plus visible vanilla specks.
What You’ll Need Before You Start
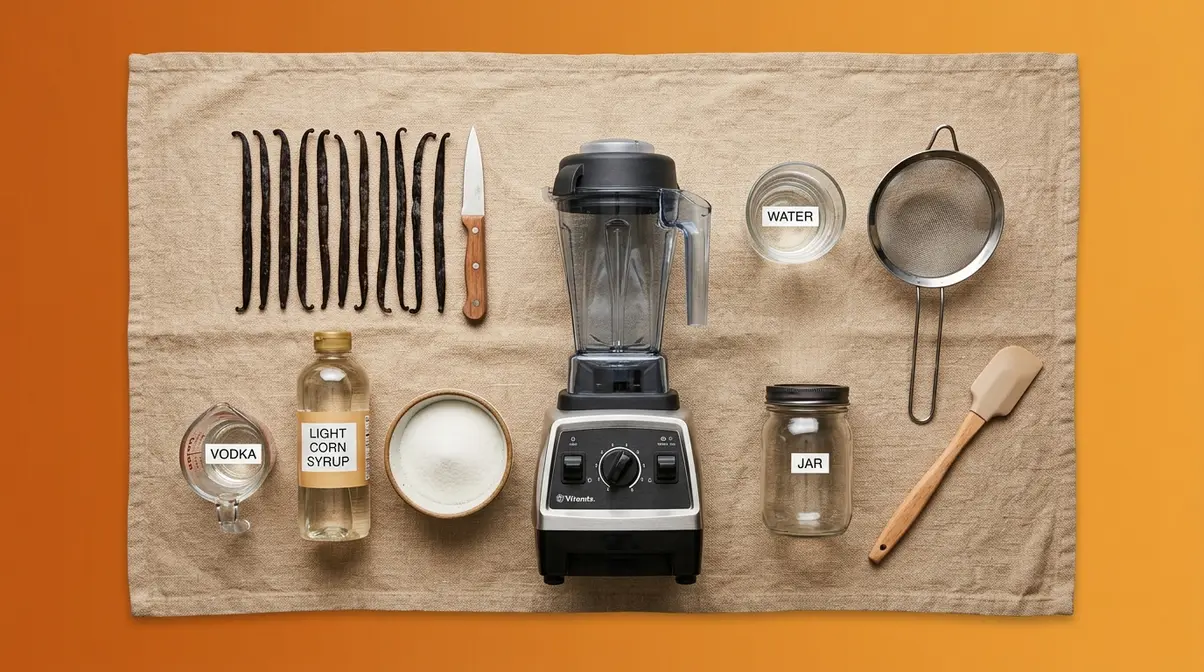
Gathering everything before you begin prevents mid-recipe interruptions and keeps the process smooth.
- Ingredients (makes approximately 4–5 oz):
- 10 Grade A vanilla beans (splits or cuts work equally well — see Step 1 for details on grades)
- ¼ cup vodka (or ¼ cup food-grade vegetable glycerin for an alcohol-free version)
- 2 tablespoons light corn syrup (or invert sugar, agave syrup, or ¼ tsp xanthan gum)
- 2 tablespoons granulated white sugar
- 2–3 tablespoons water (adjust for consistency)
- Equipment:
- High-speed blender, 600W minimum (32 oz capacity recommended — see note below)
- Fine-mesh sieve or cheesecloth
- Small airtight glass jar (4–8 oz)
- Sharp knife and cutting board
- Small spatula
Blender power matters. A standard 300–400W blender will produce a grainier paste because it cannot fully break down the fibrous vanilla bean pod tissue. A 600W+ high-speed blender (such as a Vitamix, Ninja, or comparable model) creates a much smoother final texture. This is one detail competitors mention without explaining — the wattage directly affects how silky your paste turns out.
- Time and difficulty:
- Active time: ~15 minutes
- Rest time: 8–12 hours (overnight)
- Difficulty: Easy — no special culinary technique required
Once you have everything on the counter, you’re ready to make the single most important decision in this recipe — choosing your ingredients.
Step 1: Choose Beans and Base Ingredients
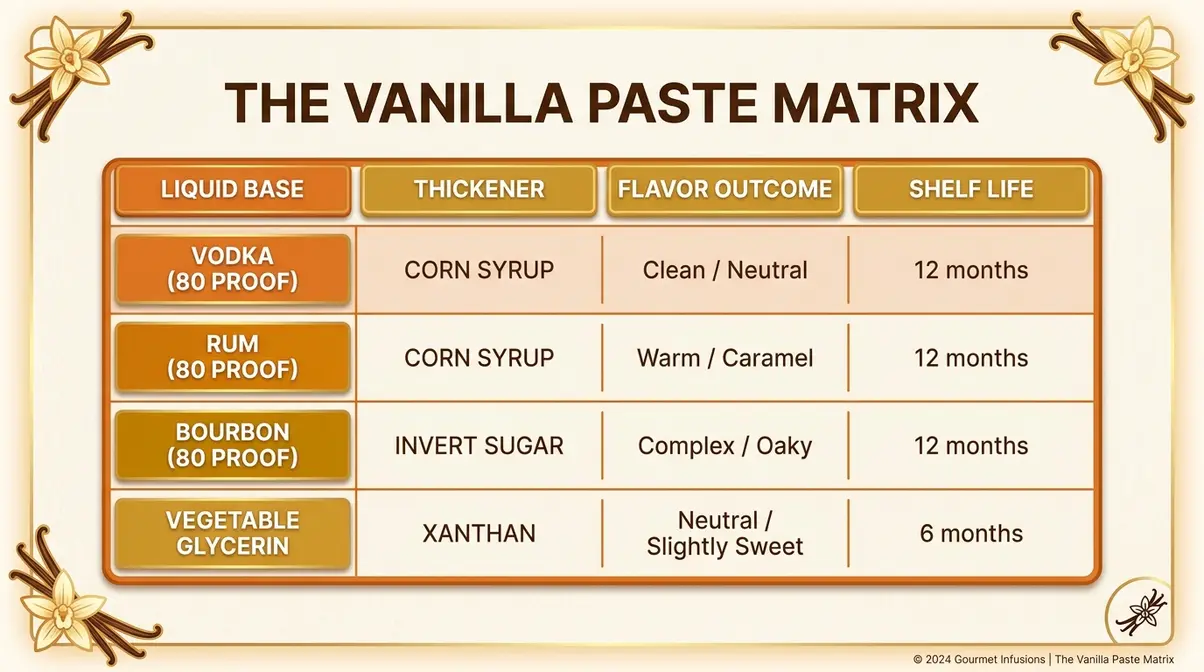
Your ingredient choices determine three things before you ever turn on the blender: flavor profile, shelf life, and final texture. This is where The Vanilla Paste Matrix comes in — a simple decision framework that maps your two key choices (liquid base and thickener) to a predictable outcome. Make these two decisions now, and you’ll know exactly what your finished batch will taste like and how long it will last. To learn how to make vanilla paste at home with even more variations, that resource covers additional flavor combinations worth exploring.
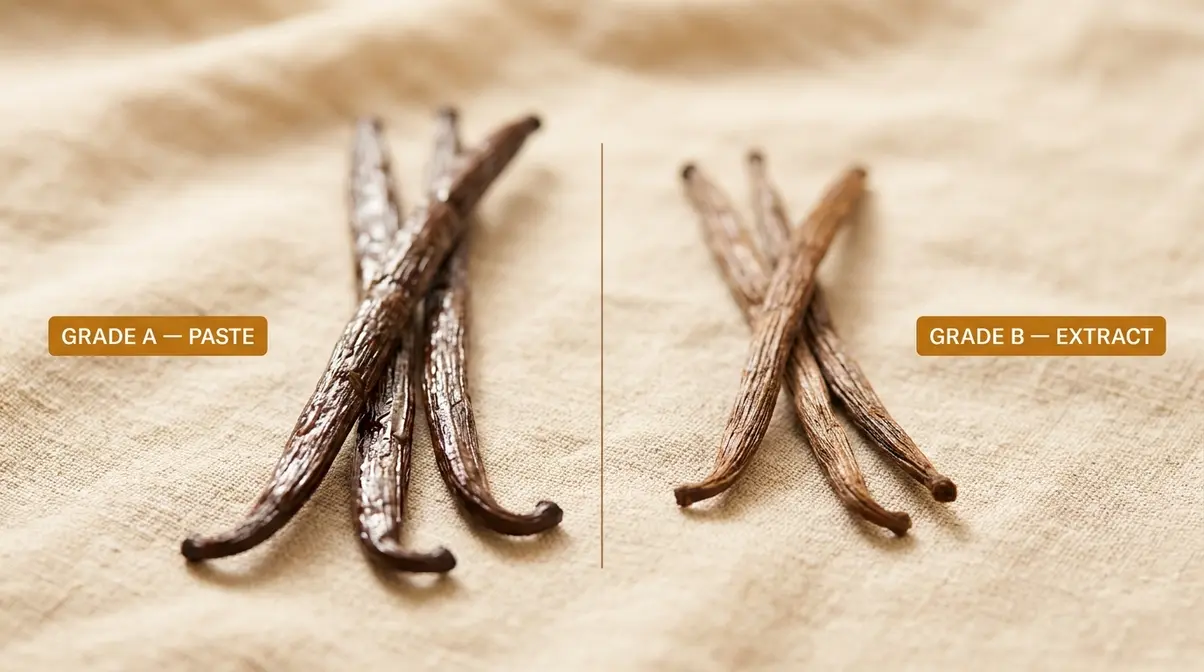
Vanilla Bean Grades: Grade A vs. B
Grade A vanilla beans (also called “gourmet” grade) are plump, moist pods at least 12 cm long, with a moisture content of up to 30% by weight — that moisture is what gives your paste its smooth, spreadable texture. According to University of Florida IFAS Extension, Grade A1 capsules require a length over 12 cm and a maximum moisture content of 30% (2026). Grade B vanilla beans are shorter, drier, and more concentrated — better suited for dry extracts, where their lower water content is an advantage rather than a limitation.
Think of it this way: Grade A beans are like ripe peaches — plump and full of moisture. Grade B beans are like dried fruit — less moisture, more concentrated flavor per gram. For paste, you want that moisture. If you see Grade B beans priced significantly lower, save those for a homemade vanilla extract recipe — for paste, Grade A’s higher moisture content is worth the extra cost.
The three most common varieties, according to Cornell University, are Madagascar (Planifolia species — classic, creamy, the most familiar vanilla flavor), Tahitian (x tahitensis species — floral and slightly fruity, more delicate), and Mexican (Planifolia grown in Mexico — spicier, woodier notes) (2021). For a beginner’s first batch, Madagascar Grade A is the most forgiving and widely available choice.
| Feature | Grade A | Grade B |
|---|---|---|
| Moisture content | Up to 30% | Lower (~15–20%) |
| Length | ≥12 cm | Often shorter |
| Best for | Paste, whole bean use | Dry extracts |
| Price | Higher | Lower |
One money-saving tip most recipes skip: “vanilla splits” or “cuts” (beans with a natural split along the pod) are often sold at a discount of 20–30% and work identically in paste. The split is a cosmetic imperfection, not a quality defect — the caviar (the tiny black seeds inside a vanilla bean) is fully intact. You can also add a small number of spent beans (previously used beans from which the caviar has been scraped) to the blender for extra depth, though they shouldn’t replace fresh beans as the primary ingredient.
Once you’ve chosen your beans, the next decision is your liquid base — and this is where flavor customization begins.
Best Alcohol for Vanilla Paste?
What is the best alcohol to make vanilla bean paste? The answer is a neutral, 80-proof (40% ABV — that is, 40% alcohol by volume) spirit. Vodka produces the cleanest, most neutral flavor profile; rum adds warm caramel and molasses undertones; bourbon contributes oak and vanilla-adjacent warmth. All three work beautifully — your choice simply depends on the flavor direction you want.
The 80-proof specification matters for two distinct reasons. First, alcohol acts as a solvent — it extracts the flavor compounds (primarily vanillin and hundreds of supporting aromatic molecules) from the vanilla bean tissue. Second, it acts as a preservative — it inhibits bacterial and mold growth, which is why alcohol-based paste lasts up to 12 months. The FDA standard of identity for vanilla extract requires a minimum of 35% ethyl alcohol by volume (21 CFR § 169.175) — going below that threshold meaningfully reduces both extraction efficiency and preservation.
The Vanilla Paste Matrix — Liquid Base Dimension:
| Alcohol | Flavor Note | Shelf Life |
|---|---|---|
| Vodka (80 proof) | Clean, neutral | Up to 12 months |
| Rum (80 proof) | Warm, caramel | Up to 12 months |
| Bourbon (80 proof) | Complex, oaky | Up to 12 months |
| Vegetable glycerin | Neutral, slightly sweet | ~6 months |
For a first batch, vodka is the most forgiving choice — it won’t compete with the vanilla flavor and gives you the truest read on your bean quality.
A common question is whether Everclear (95% ABV / 190 proof) is better than vodka. The answer is no — high-proof grain alcohol at that concentration can actually make the paste taste harsh and medicinal. The 80-proof sweet spot extracts flavor compounds efficiently without overwhelming them.
If you’d prefer a version without any alcohol at all, the next option is just as effective.
Alcohol-Free: Vegetable Glycerin
Can you make vanilla bean paste without alcohol? Yes — substitute vegetable glycerin 1:1 for the vodka. Vegetable glycerin is a thick, sweet, plant-derived liquid that acts as both a solvent and a preservative, and it’s available at most health food stores and online. Use the same quantity: if the recipe calls for ¼ cup vodka, use ¼ cup food-grade vegetable glycerin.
One critical distinction: always use food-grade vegetable glycerin, not cosmetic-grade. Cosmetic-grade glycerin is not safe for consumption and is sold for skin care applications only. The label should explicitly state “food-grade” or “USP grade.”
The trade-offs are worth knowing. Glycerin is an effective solvent and preservative, but less potent than alcohol — this means the shelf life is shorter (approximately 6 months vs. 12 months for alcohol-based paste) and the finished paste may carry a very faint sweet undertone. Neither is a dealbreaker, just a trade-off. Glycerin-based vanilla paste is a popular choice for those baking for children, pregnant individuals, or anyone avoiding alcohol entirely.
Whether you choose alcohol or glycerin, you’ll also need a thickener — and your choice here affects both texture and crystallization.
Thickeners: Corn Syrup & Alternatives
A thickener gives your paste its characteristic glossy, spreadable consistency. More importantly, it prevents crystallization — without one, the natural sugars in the vanilla bean can supersaturate (meaning they exceed their solubility limit and form solid crystals) within two to four weeks, turning your smooth paste grainy. According to West Virginia University Extension, ingredient ratios significantly affect both texture and preservation in homemade culinary extracts.
You have three good options:
- Light corn syrup — the most common choice; readily available, effectively interferes with sucrose crystallization, and produces a smooth, glossy result. Start with 2 tablespoons per 10 beans.
- Invert sugar or agave syrup — a natural alternative that works similarly. Invert sugar (sucrose broken into glucose and fructose) is particularly effective at crystallization prevention; agave produces a slightly milder sweetness.
- Xanthan gum — a tiny amount (¼ teaspoon per batch) thickens without adding any sweetness. This is the best option for those monitoring sugar intake.
The Vanilla Paste Matrix — Thickener Dimension:
| Thickener | Texture Result | Sugar Added | Crystallization Risk |
|---|---|---|---|
| Light corn syrup | Smooth, glossy | Moderate | Very low |
| Invert sugar / agave | Smooth, natural | Low-moderate | Very low |
| Xanthan gum | Thicker, dense | None | Low |
| None | May become grainy | None | High (2–4 weeks) |
If you’re new to making paste, start with light corn syrup — it’s the most predictable and forgiving thickener. Once you’ve made a batch successfully, experiment with invert sugar for a corn-syrup-free version.
Checkpoint: You should now have all ingredients assembled and two decisions made — your liquid base and your thickener. You’re ready to prep your beans.
Step 2: Prep Your Vanilla Beans
Good prep takes about five minutes and makes a real difference in your final texture when following this homemade vanilla paste recipe. The goal is to expose as much of the bean’s interior as possible before blending.
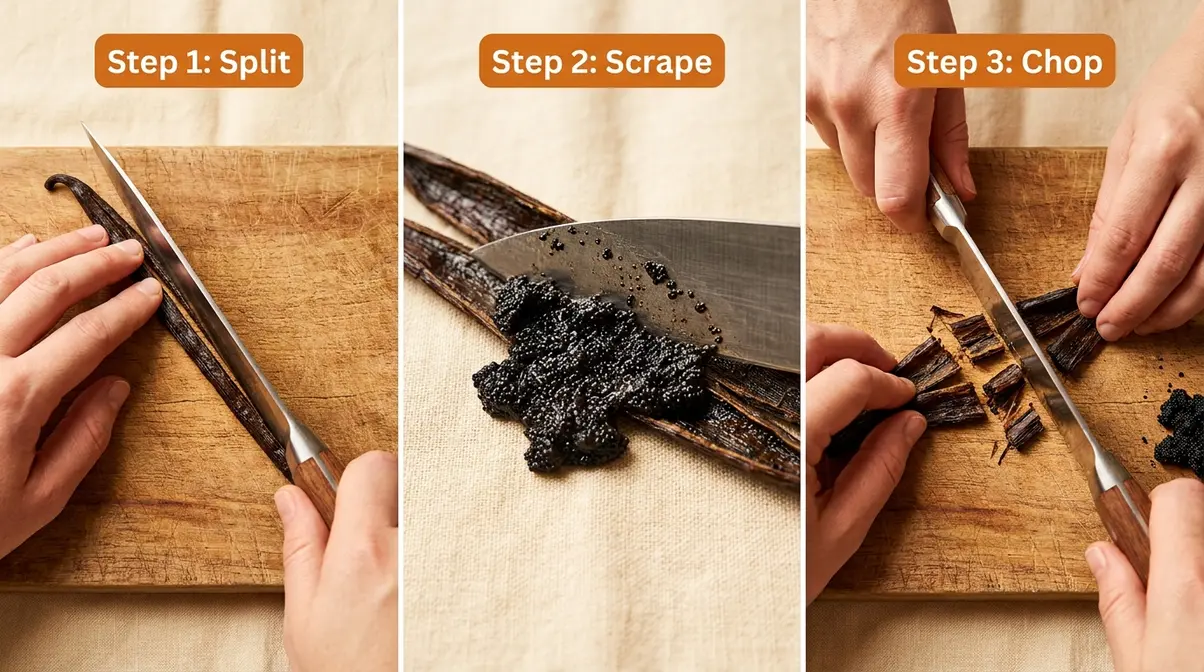
Scraping and Chopping Your Beans
Follow these steps in order to extract the caviar:
- Lay one vanilla bean flat on your cutting board. Hold it steady at one end.
- Use your sharp knife to slice lengthwise along the pod — cut from one end to the other, applying light pressure. You’re splitting it open, not cutting through it entirely.
- Open the pod flat and use the back (dull side) of your knife blade to scrape along the interior. This releases the caviar — the tiny black seeds packed inside. These seeds carry concentrated flavor compounds.
Once the caviar is exposed, you can move on to preparing the pods themselves for blending:
- Place the caviar and the split pod both into the blender jar. You’re blending the whole pod, not just the seeds — the pod tissue contributes body and additional flavor.
- Repeat for all 10 beans. Once all beans are scraped and in the blender, use your knife to chop the empty pods into 1-inch pieces. Smaller pieces blend more efficiently and reduce strain on the blender motor.
- Add your liquid base (vodka, rum, bourbon, or vegetable glycerin), corn syrup (or chosen thickener), sugar, and water to the blender jar.
A note on “spent beans”: If you have spent beans saved from previous baking (pods from which you’ve already scraped the caviar), you can add 2–3 of them to this batch. They still contain aromatic compounds in the pod tissue and add depth to the finished paste. They’re not a substitute for fresh beans, but they’re a worthwhile addition.
Checkpoint: You should now have a blender jar containing chopped bean pieces, scraped caviar, your liquid base, thickener, sugar, and water — ready for blending.
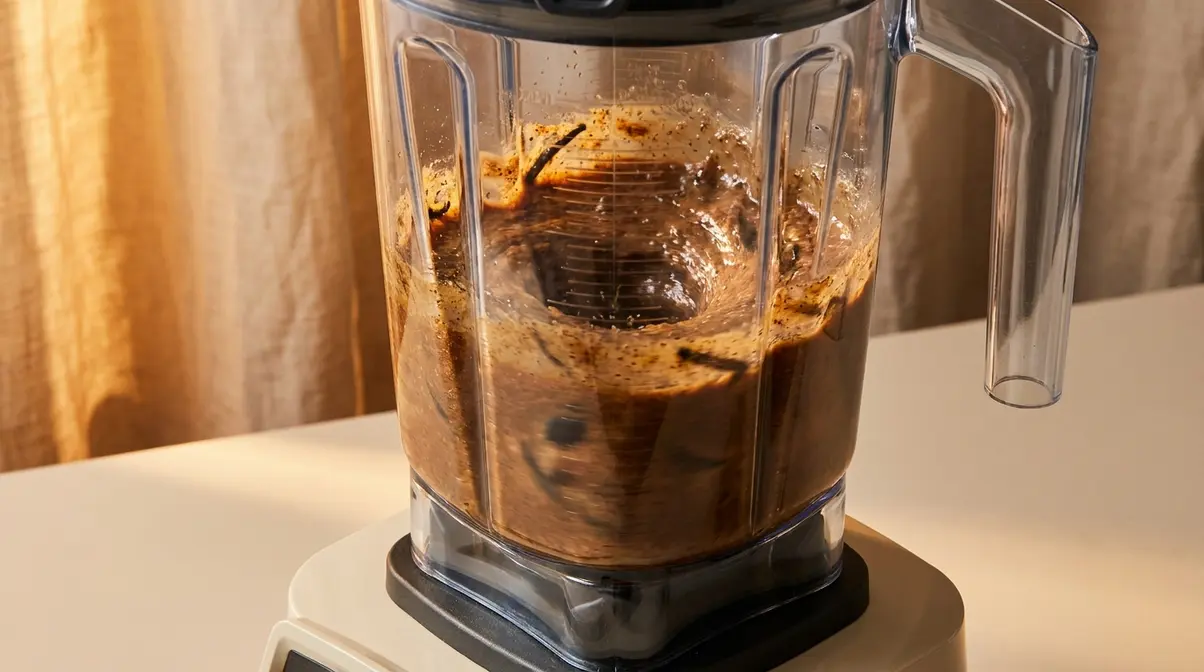
Step 3: Blend Your Vanilla Bean Paste
Blending is where the vanilla bean paste recipe comes together. The goal is a uniformly smooth paste with no large fibrous chunks remaining.
Blending Method
- Secure the blender lid firmly — the mixture will be liquid initially and can splash.
- Start on low speed for 15–20 seconds to break up the larger bean pieces. This prevents the blade from getting overwhelmed by whole chunks.
- Increase to high speed and blend for 2–3 minutes. The mixture will shift from chunky and dark to a smoother, thicker consistency as the pod tissue breaks down.
- Stop and scrape the sides with your spatula at the 1-minute mark. Bean fibers often cling to the blender walls above the blade level.
- Resume on high speed for another 1–2 minutes. You’re looking for a paste that looks uniformly dark brown with visible specks — no large fibrous strings.
Estimated time: ~4–5 minutes total blending, including the pause to scrape.
If your blender struggles or the motor sounds strained, add 1 additional tablespoon of water and blend again. The mixture should be fluid enough for the blades to spin freely.
Preventing Crystallization
If you want to discover the best ingredients for vanilla paste, understanding the food science pays off. The natural sugars in vanilla beans — primarily sucrose — are prone to crystallization (the process by which dissolved sugar molecules form solid crystals as the liquid cools and concentrates). This is why a plain vanilla bean purée without a thickener turns grainy within weeks.
Corn syrup contains glucose molecules that physically interfere with sucrose crystal formation, keeping the sugar in solution. Invert sugar works similarly because its glucose and fructose components are already separated, preventing the orderly lattice structure that sucrose crystals require. Xanthan gum achieves the same result mechanically — its long-chain molecules create a gel structure that traps sugar molecules in place.
“Properly thickened vanilla paste resists crystallization for 6–12 months; an unthickened batch may turn grainy within 2–4 weeks.” This is why your thickener choice from Step 1 directly determines how long your paste stays smooth.
Adjusting Texture
After blending, assess your paste’s consistency:
- Too thin (runs off a spoon quickly): Add ½ teaspoon xanthan gum, blend for 30 seconds, then check again.
- Too thick (won’t pour at all): Add water, 1 tablespoon at a time, blending briefly between each addition.
- Target consistency: The paste should flow slowly off a spoon — thicker than extract, thinner than jam. It will thicken further during the overnight rest.
Checkpoint: You should now have a smooth, dark brown paste with visible vanilla specks throughout. It should smell intensely of real vanilla — no harsh alcohol edge.
Step 4: Strain and Transfer to a Jar
Straining removes the larger fibrous pieces of pod tissue that even a high-speed blender can’t fully break down. This step determines whether your finished homemade vanilla paste recipe yields a silky or slightly rustic result — both are valid, but most bakers prefer the smoother texture.
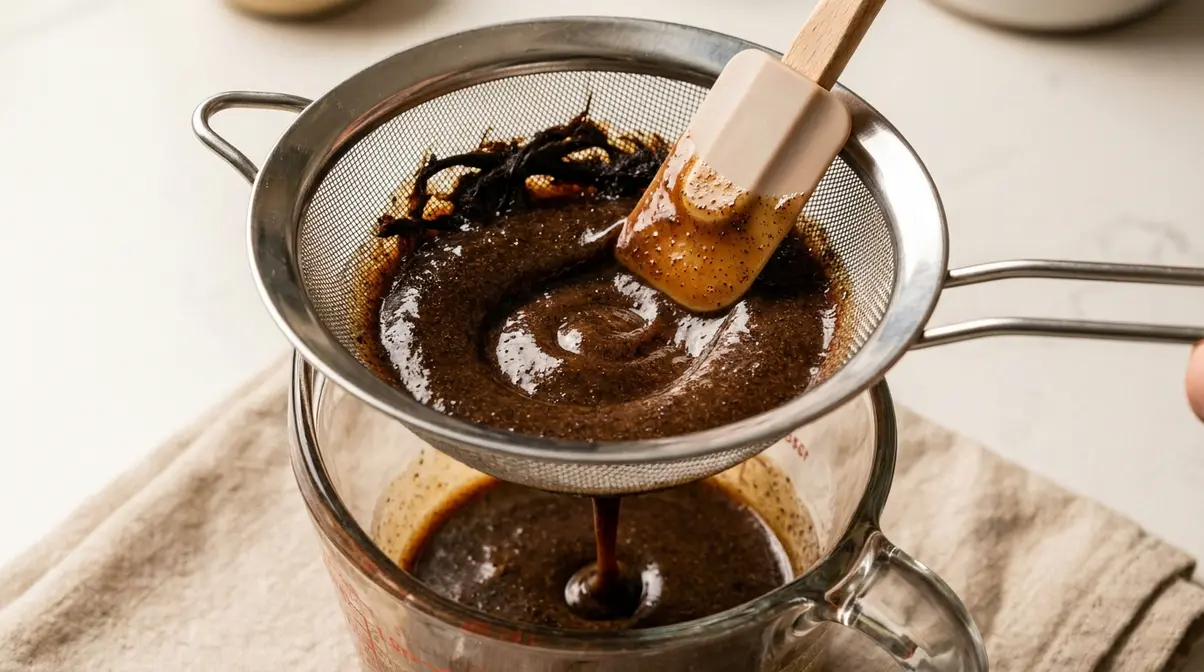
Straining the Paste
- Set your fine-mesh sieve (or cheesecloth-lined colander) over a bowl or measuring cup.
- Pour the blended paste into the sieve and let gravity do the initial work for 1–2 minutes.
- Use your spatula to press the paste through the mesh in circular motions. Apply firm, consistent pressure — you want to push the liquid paste through while leaving the coarser fibrous material behind.
- Scrape the underside of the sieve periodically to collect paste that clings to the mesh.
How much to strain is a matter of preference. Straining through a fine-mesh sieve gives a smoother, more pourable paste that works beautifully in custards, ice cream bases, and buttercreams. Straining through cheesecloth produces an even smoother result. Skipping straining entirely gives a more rustic, textured paste that works well in cookies and quick breads where the texture blends in.
Transferring to Your Jar
- Sterilize your glass jar before filling: wash with hot soapy water, rinse thoroughly, and either run through the dishwasher on a hot cycle or pour boiling water into the jar and let it sit for 30 seconds, then drain.
- Pour the strained paste into the jar using your spatula to scrape every bit from the bowl.
- Seal the jar tightly with its lid.
- Label the jar with the date made and the liquid base used (e.g., “Vodka — July 2026”).
Checkpoint: You should now have a sealed jar of dark, glossy vanilla paste. Leave it at room temperature overnight — the paste will thicken noticeably over the next 8–12 hours as the ingredients fully integrate.
Step 5: Store Your Vanilla Bean Paste Correctly
Storage is the step most recipes treat as an afterthought. It is crucial to understand how to store homemade vanilla paste because the right container and location directly determine how long your batch stays safe and flavorful.
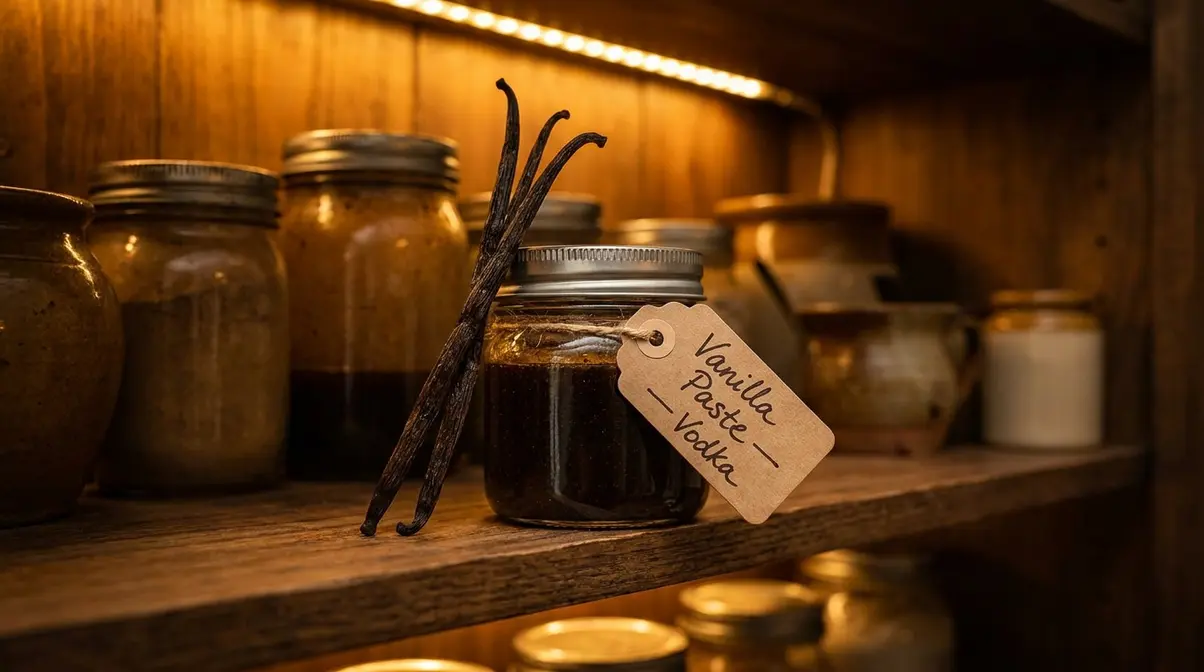
Container and Storage Location
Use a small, airtight glass jar (4–8 oz). Glass is preferred over plastic because it doesn’t absorb odors or leach compounds into your paste over time. Metal lids with rubber seals provide the best airtight closure.
Store your jar in a cool, dark cupboard — away from the stove, oven, and any windows. Heat and light both accelerate flavor degradation. A pantry shelf, a back corner of a cabinet, or a spice drawer all work well.
Should you refrigerate it? This depends on your recipe. Alcohol-based pastes are shelf-stable at room temperature in a cool, dark location. Some bakers prefer refrigeration, especially in warm climates — refrigeration extends shelf life slightly and the cold temperature poses no harm to the paste. Glycerin-based paste benefits more from refrigeration, particularly in summer months. However, avoid temperature fluctuations — repeatedly moving the jar from fridge to counter and back can cause condensation inside the jar, which can introduce moisture and reduce shelf life.
How Long Does Vanilla Paste Last?
Multiple recipe sources and vanilla suppliers confirm the following ranges (Savory Fork, 2026; The Salted Pepper, 2026; Veena Azmanov, 2026):
| Storage Method | Alcohol-Based Paste | Glycerin-Based Paste |
|---|---|---|
| Cool, dark pantry | 6–12 months | ~6 months |
| Refrigerated | Up to 1 year | Up to 6–8 months |
| Frozen | Up to 12 months | Up to 6 months |
Signs your paste has spoiled: discard immediately if you see any mold growth, notice an off or sour smell (distinct from the normal sharp alcohol note), or observe significant liquid separation with an unusual odor. A small amount of settling — where the paste separates slightly and thickens at the bottom — is normal. Simply stir before using.
Alcohol vs. Glycerin Shelf Life
Ethyl alcohol (ethanol) at 80 proof creates a hostile environment for bacteria and mold — microorganisms cannot survive in solutions with high enough alcohol concentration. This is why alcohol-based vanilla products have been shelf-stable for centuries. Glycerin is also antimicrobial, but less potent than ethanol at equivalent concentrations. The practical result: glycerin-based paste is safe and delicious but should be used within 6 months for best quality and food safety.
“Alcohol-based vanilla paste lasts up to 12 months because ethanol at 40% ABV effectively prevents microbial growth; glycerin-based paste, while safe, offers approximately half that shelf life under the same storage conditions.”
Checkpoint: You should now have a labeled, sealed jar of vanilla paste resting in a cool, dark cupboard. After 8–12 hours, it will be ready to use — though many bakers notice the flavor deepens and mellows after 1–2 weeks as the ingredients fully integrate.
Verify Your Results
After the overnight rest, open the jar and check these three things:
1. Texture: The paste should be thick, glossy, and flow slowly off a spoon. It should look similar to a thick chocolate sauce — not watery, not completely solid.
2. Color: Deep brown-black with clearly visible vanilla specks (the caviar) distributed throughout. If the color looks pale or grey, the beans may have been underripe or lower quality than Grade A.
3. Aroma: Rich, deep, intensely vanilla — with a background note of your chosen alcohol or the mild sweetness of glycerin. The harsh alcohol edge from blending should have softened considerably overnight.
If texture, color, and aroma all look right, your homemade vanilla bean paste recipe succeeded. Recipe testing using a standard 64-oz blender with 10 Grade A Madagascar beans consistently produces these results when the blending time reaches at least 3 full minutes and the overnight rest is not skipped.
Troubleshooting Common Mistakes
Even with a straightforward recipe, a few things can go wrong. Here’s how to diagnose and fix the most common issues.
My paste is too thin and watery.
What went wrong: Too much water was added during blending, or the corn syrup quantity was insufficient. Fix: Add ½ teaspoon xanthan gum to the blender, blend for 30 seconds, then transfer back to the jar and let rest overnight again. Alternatively, simmer the paste gently in a small saucepan over very low heat, stirring constantly, for 5–10 minutes to reduce some of the excess liquid. Do not boil — high heat degrades the volatile flavor compounds.
Paste Turned Grainy or Crystallized
What went wrong: Either no thickener was used, or not enough was added. The natural sugars in the vanilla beans crystallized without an interfering agent. Fix: Return the paste to the blender, add 2 tablespoons of corn syrup or invert sugar, and blend again on high for 2 minutes. Transfer back to a sterilized jar. Going forward, increase your thickener quantity by 1 tablespoon per batch.
The Vanilla Flavor Is Too Weak
What went wrong: The most likely causes are Grade B beans used instead of Grade A, insufficient blending time (fibrous tissue not fully broken down), or beans that were old and dried out. Fix: For the current batch, add 2–3 more scraped Grade A beans and re-blend. For future batches, check bean freshness by bending one — a fresh Grade A bean should be pliable and bend without snapping. Dried-out beans snap cleanly and will produce weaker flavor.
My paste smells too strongly of alcohol.
What went wrong: This is normal immediately after blending — the alcohol aroma is sharp when freshly made. Fix: Simply wait. After 1–2 weeks of resting in the sealed jar, the alcohol aroma mellows significantly as it integrates with the vanilla compounds. If the harsh smell persists beyond two weeks, the alcohol-to-bean ratio may have been too high — reduce vodka to 3 tablespoons in future batches.
Vanilla Bean Paste vs. Extract: When to Use Each
Before you explore the differences between vanilla paste and extract, remember that vanilla bean paste and vanilla extract are not interchangeable in every situation — they share the same core flavor but behave differently in recipes. Understanding when each shines will make you a more confident baker. This section also covers a homemade vanilla extract recipe comparison, cost analysis, and the legal questions cottage-industry bakers are asking.
Comparison: Paste vs. Extract
Vanilla paste is vanilla extract with texture added — it contains the same alcohol-extracted vanilla flavor compounds, plus the ground bean solids and a thickener that give it body. The key practical difference is visual: paste leaves those distinctive dark specks in finished baked goods, while extract is completely invisible.
| Feature | Vanilla Bean Paste | Vanilla Extract |
|---|---|---|
| Appearance | Dark, thick, speckled | Clear to amber liquid |
| Flavor intensity | Slightly more intense | Standard |
| Visible specks | Yes (caviar) | No |
| Best for | Custards, ice cream, buttercream, shortbread | Cakes, cookies, muffins |
| Shelf life (homemade) | 6–12 months | 1–2+ years |
| Substitution ratio | 1:1 for extract | 1:1 for paste |
| Cost (homemade) | ~$1.50/oz | ~$0.80–1.20/oz |
Use paste when the specks are part of the appeal — crème brûlée, vanilla ice cream, pastry cream, white chocolate ganache, and frosted cakes where guests will see the flecks. Use extract when the visual doesn’t matter and you want a longer shelf life — most everyday cookies, quick breads, and pancakes.
The substitution ratio is 1:1 in both directions. One teaspoon of paste replaces one teaspoon of extract and vice versa, with no other adjustments needed.
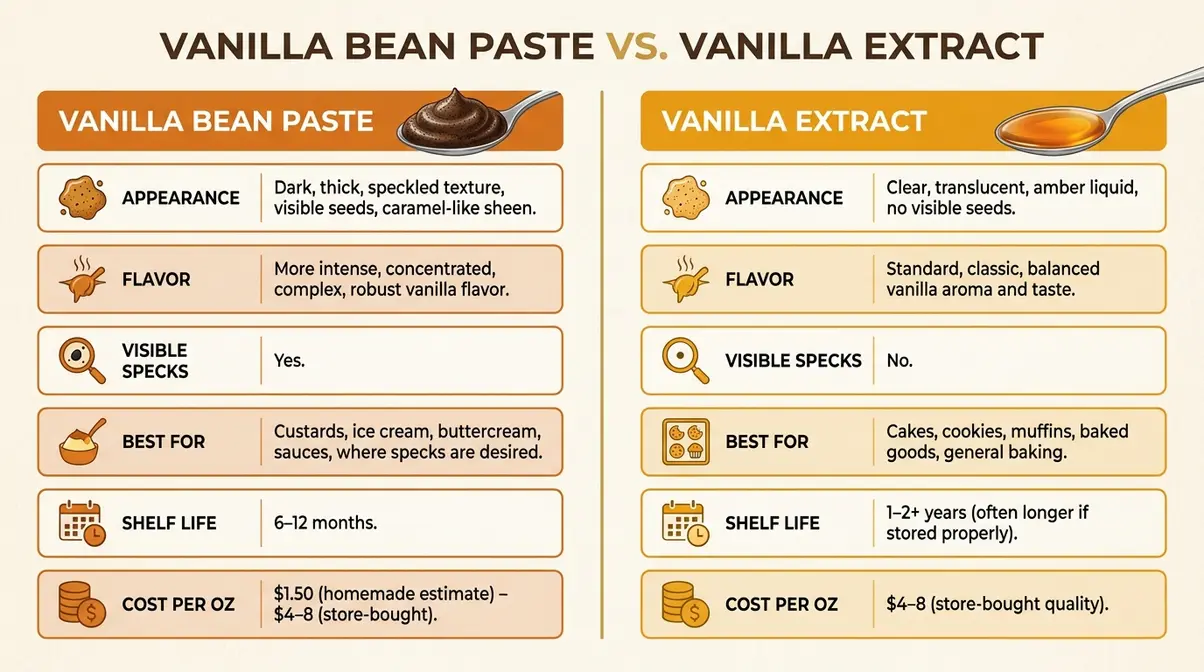
Substitution Ratio and Usage Tips
The 1:1 substitution ratio holds across nearly all standard recipes. A few nuances are worth noting:
- In no-bake applications (raw cheesecake filling, whipped cream, mousse), paste delivers a noticeably richer vanilla flavor because no heat-volatilization occurs. Consider starting with ¾ teaspoon paste per teaspoon of extract called for, then adjusting to taste.
- In high-heat applications (cookies baked above 375°F, caramelized desserts), the flavor difference between paste and extract narrows because heat drives off some volatile compounds regardless of form.
- For a homemade vanilla extract recipe, use Grade B beans in a 1:4 ratio of beans to 80-proof vodka (approximately 4–5 Grade B beans per cup of vodka), seal, and rest in a dark location for 6–8 weeks. Grade B beans are specifically recommended for extract by West Virginia University Extension due to their lower water content, which produces a cleaner extraction.
Cost-Per-Ounce Analysis
One of the strongest arguments for making your own vanilla paste is the cost difference — and the numbers are verifiable.
Homemade cost breakdown (per batch of ~5 oz):
| Ingredient | Approximate Cost |
|---|---|
| 10 Grade A Madagascar beans (~$7.81/oz at Slofoodgroup, 2026) | ~$5.50–7.00 |
| ¼ cup vodka | ~$0.50 |
| 2 tbsp corn syrup | ~$0.15 |
| 2 tbsp sugar + water | ~$0.10 |
| Total per batch (~5 oz) | ~$6.25–7.75 |
| Cost per ounce | ~$1.25–1.55 |
Store-bought vanilla bean paste currently retails at $3.25–$8+ per ounce, with mainstream brands like Rodelle ($3.93–4.83/oz), Nielsen-Massey ($5.00/oz at Target), and McCormick ($6.05–8.08/oz) all falling well above the homemade range (Floral Apron, 2026). Only Trader Joe’s ($1.25/oz) and some Costco bulk purchases approach homemade pricing.
“Homemade vanilla bean paste costs approximately $1.46–1.50 per ounce — roughly 50–70% less than mainstream store-bought brands that typically run $4–8 per ounce” (Patchwork Times, 2026; Milk Glass Home, 2026).
Vanilla Bean Price Guide Note: Bean prices fluctuate with Madagascar harvest conditions. Grade A retail prices ranged from $7.81–$9.37/oz in early 2026 (Slofoodgroup; Amazon listings). Recheck current bean prices semi-annually when calculating cost savings.
Legally Selling Vanilla Paste
This is the question cottage-industry bakers search for constantly — and almost no recipe site answers it clearly. Here is a plain-English summary. This is general information, not legal advice; always consult your state’s specific cottage food regulations and a licensed attorney for compliance guidance.
The federal framework has two layers:
Layer 1 — FDA Standard of Identity (21 CFR § 169.175): The FDA’s Code of Federal Regulations defines “vanilla extract” as a solution requiring a minimum of 35% ethyl alcohol by volume and a minimum vanilla constituent content. If your product meets this standard, it can be labeled “vanilla extract.” If it doesn’t — for example, if it’s glycerin-based or uses a different formulation — it must be labeled differently (such as “vanilla flavoring” or “vanilla bean paste”). You cannot call a glycerin-based product “vanilla extract” under federal law.
Layer 2 — TTB (Alcohol and Tobacco Tax and Trade Bureau): TTB.gov clarifies that vanilla extracts containing alcohol are covered by FDA regulations at 21 CFR 169.175–169.181. Products intended for use as food ingredients (not beverages) are generally handled under FDA jurisdiction rather than TTB’s beverage alcohol permits — but this depends on ABV and intended use.
State cottage food laws control what you can actually sell:
| Jurisdiction | Status for Vanilla Extracts/Paste |
|---|---|
| Illinois | Allowed — extracts like vanilla extract may be sold if not intended as a beverage (Illinois Extension, 2026) |
| Utah | Vanilla extract explicitly permitted (Utah Agriculture, 2026) |
| Washington | Extracts such as vanilla extract included in cottage food definitions (WA HB 2703, 2026) |
| Michigan | Extracts listed among foods that may be considered for cottage food programs (Michigan MDARD, 2026) |
| All other states | Varies — check your state’s Department of Agriculture website |
- Four practical steps before selling:
- Check your state’s cottage food law — search ” cottage food law” on your state’s Department of Agriculture website.
- Label correctly — include product name, ingredients in descending order by weight, net weight, allergen information, and your contact information.
- Confirm the “not for beverage” rule — in states that allow alcohol-containing extracts as cottage foods, the product must be intended for use as a food ingredient, not consumed as a drink.
- Consult a local food safety extension office — many state universities offer free cottage food guidance through their extension programs.
Limitations and Considerations
Common Pitfalls to Avoid
Pitfall 1 — Using a low-wattage blender. A 300–400W standard blender will not fully break down the fibrous pod tissue. The result is a gritty paste with visible fiber strings. If you only have a standard blender, chop the beans into very fine pieces (1 cm or smaller) before blending, and blend in two separate 3-minute sessions with a 5-minute rest between them to prevent motor overheating.
Pitfall 2 — Skipping the overnight rest. Many bakers test the paste immediately after blending and conclude the flavor is too harsh or the alcohol too prominent. The overnight rest is not optional — it’s when the alcohol integrates, the thickener activates fully, and the flavor deepens. Skipping it produces an unfinished result.
Pitfall 3 — Using a non-sterilized jar. Introducing bacteria from an unclean container can spoil your paste within days, even with an alcohol base. A 30-second hot water rinse is the minimum — a dishwasher hot cycle is better.
Pitfall 4 — Storing near the stove. Heat and light are the primary enemies of vanilla flavor compounds. A jar stored on the counter next to the oven can lose significant flavor intensity within 4–6 weeks. A dark cupboard away from heat sources is essential.
When to Choose Alternatives
Choose vanilla extract instead of paste when making large batches of everyday baked goods (a triple batch of chocolate chip cookies, for example) where the cost per recipe matters and the visual specks aren’t a factor. Homemade extract from Grade B beans costs approximately $0.80–1.20/oz — meaningfully cheaper than paste.
Choose store-bought paste when time is a constraint and you’re baking something special on short notice. A jar of Nielsen-Massey or Rodelle from a grocery store is a reliable backup — the quality is high even if the cost per ounce is significantly more.
When to Seek Expert Help
If you plan to sell your vanilla paste commercially (beyond cottage food limits), consult a licensed food safety consultant and your state’s Department of Agriculture before scaling up. Commercial production triggers different labeling, facility, and licensing requirements than cottage food operations. Your state’s cooperative extension service can often provide a free initial consultation.
Frequently Asked Questions
Can I make my own vanilla paste?
Yes — making homemade vanilla bean paste is straightforward with a high-speed blender and five ingredients. The process takes about 15 minutes of active work, followed by an overnight rest. You need Grade A vanilla beans, a liquid base (vodka or vegetable glycerin), a thickener (corn syrup or xanthan gum), sugar, and water. The finished paste costs roughly $1.46–1.50 per ounce Milk Glass Home — significantly less than most store-bought brands.
Does vanilla paste need to be refrigerated?
No, alcohol-based vanilla paste does not require refrigeration and is shelf-stable at room temperature. However, storing it in the fridge can extend its shelf life slightly. Glycerin-based paste benefits more from refrigeration, especially in warm climates. Always keep the jar tightly sealed to prevent moisture from entering.
Can I substitute vanilla paste for vanilla extract?
Yes, you can substitute vanilla paste for vanilla extract in a 1:1 ratio. One teaspoon of paste equals one teaspoon of extract. Paste is ideal for recipes where you want visible vanilla bean specks, like ice cream or light-colored frostings, while extract is better for smooth, clear batters.
Vanilla Paste Without Alcohol?
Yes — substitute food-grade vegetable glycerin 1:1 for the vodka in any vanilla paste recipe. Vegetable glycerin is a plant-derived liquid that acts as both a solvent and a mild preservative. The trade-off is a slightly shorter shelf life (approximately 6 months vs. 12 months for alcohol-based paste) and a faint sweet undertone. Always use food-grade glycerin, not cosmetic-grade, which is not safe for consumption.
Is Selling Vanilla Extract Legal?
Selling homemade vanilla extract is legal in many U.S. states under cottage food laws, but the rules vary by state. Illinois, Utah, Washington, and Michigan all explicitly permit vanilla extract sales as cottage food products, provided the product is intended as a food ingredient (not a beverage). Federal law under 21 CFR § 169.175 FDA requires that anything labeled “vanilla extract” contain at least 35% alcohol by volume. Check your specific state’s Department of Agriculture website before selling.
Conclusion
For home bakers who want bakery-style results without the bakery price tag, this homemade vanilla paste recipe delivers on both counts. Homemade paste costs roughly $1.46–1.50 per ounce compared to $4–8+ for mainstream store-bought brands (Milk Glass Home, 2026; Patchwork Times, 2026) — and the flavor from real Grade A Madagascar beans is noticeably richer than most commercial products.
The Vanilla Paste Matrix is the framework that makes this recipe repeatable, not just a one-time success. By understanding that your liquid base choice (vodka, rum, bourbon, or glycerin) controls shelf life and flavor direction — and that your thickener choice (corn syrup, invert sugar, or xanthan gum) controls texture and crystallization resistance — you can customize every batch with confidence. That knowledge is what separates a baker who follows a recipe from one who truly understands it.
Your first batch is the proof-of-concept. Make it with 10 Grade A Madagascar beans, ¼ cup vodka, and 2 tablespoons of light corn syrup — the most forgiving combination in the Matrix. Let it rest overnight, then use it in a recipe where the specks will show: vanilla custard, ice cream, or a simple buttercream. Once you taste the difference, the $1.50-per-ounce math will feel even better.

quickdishcook
Recipe developer and writer at Quick Dish Cookbook.