
What’s in this guide
- What You Need to Start Cooking Scraps
- Step 1: Set Up Your Zero-Waste Kitchen System
- Step 2: Turn Scraps Into 25+ Meals
- Step 3: Compost the Scraps You Cannot Cook
- Step 4: Store Scraps and Leftovers Safely
- How We Evaluated These Uses
- Troubleshooting Common Mistakes
- Frequently Asked Questions
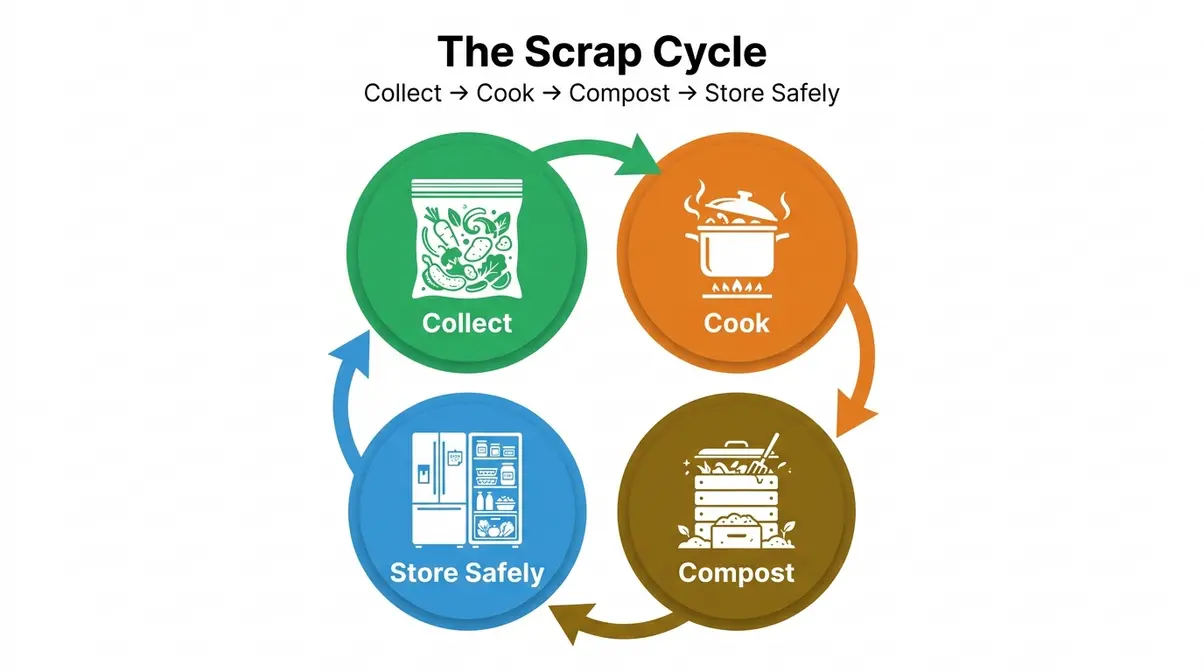
- The Scrap Cycle: Your Starting Point
To cook with food scraps and reduce waste, collect peels, stems, and ends in a freezer bag, then follow these 4 steps: (1) set up a collection system, (2) cook scraps into broths, pestos, and chips, (3) compost what you can’t eat, and (4) store everything safely. This process takes about 15 minutes of active setup.
You stand at the sink, peeling carrots, and the tops go straight into the bin. The onion skins follow. A bag of slightly soft potatoes joins them. It feels wasteful — because it is.
“Does anyone else run a ‘no food waste’ household, and ask guests not to throw their bones out?”
That question, posted in an online home-cooking community, captures exactly how many people feel. The EPA estimates that cooking with food scraps to reduce waste could save a family of four up to $2,913 per year — roughly $56 every week lost to peels, ends, and forgotten produce (EPA, 2026). That’s not an abstract environmental statistic. It’s a utility bill that quietly disappears into your trash can.
By the end of this guide, you’ll know exactly how to turn those kitchen discards into 25+ meals, what to safely compost, and how to store everything so nothing makes you sick. The system is called The Scrap Cycle, and it has four stages: Collect → Cook → Compost → Store Safely.
What You Need to Start Cooking Scraps
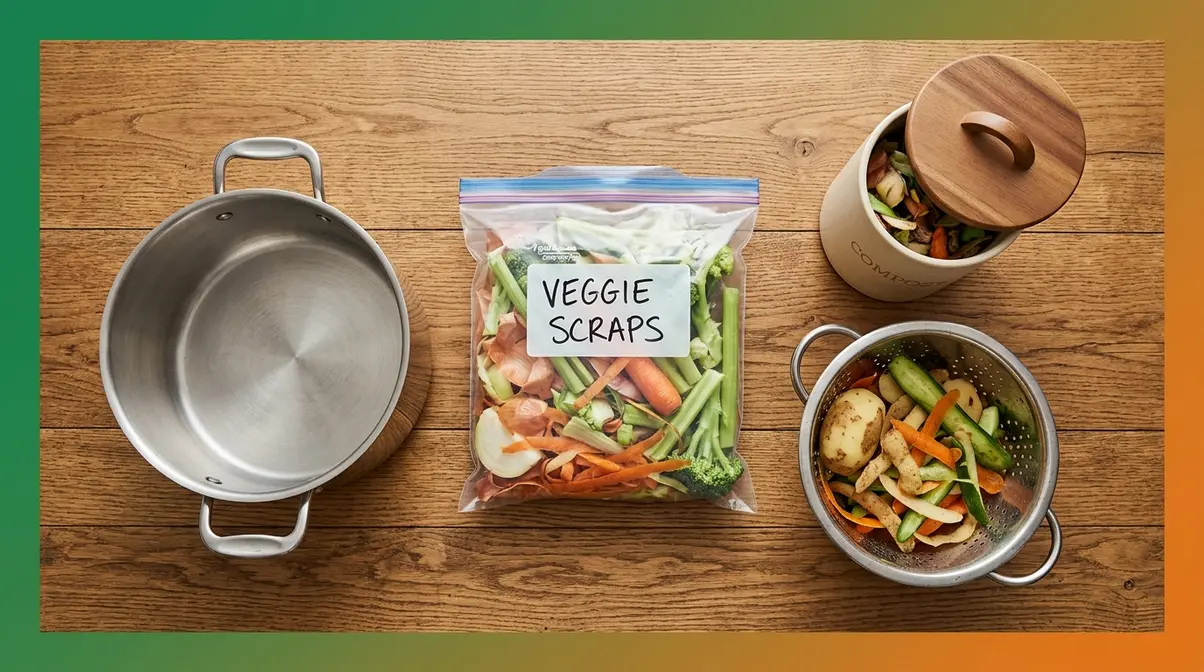
These tools support each stage of The Scrap Cycle — and you probably already own most of them.
Equipment (you need 4 things):
- 1-gallon zip-lock bag or airtight freezer container — your scrap collection hub; goes straight into the freezer
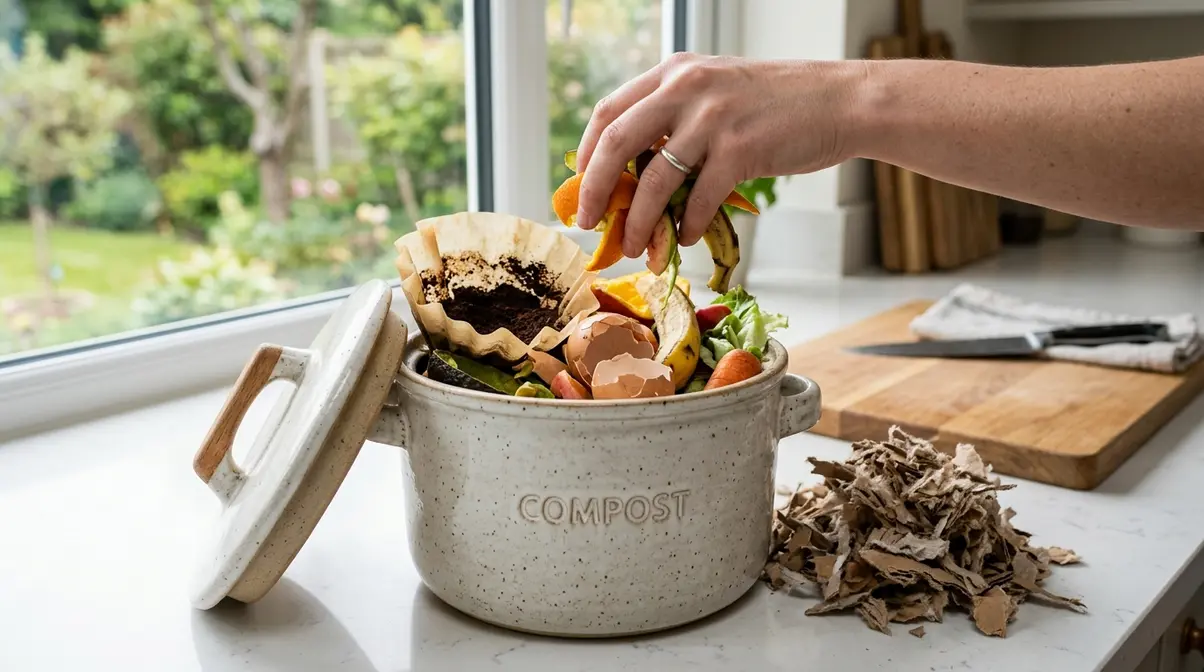
- Countertop compost crock or small compost bin — for scraps that can’t be cooked
- Colander — for rinsing scraps before cooking or freezing
- Stockpot (4-6 quart) — for turning your scrap bag into broth
Knowledge (3 things to know before you start):
- Basic knife skills — you’ll be trimming and sorting, not fine-dining prep
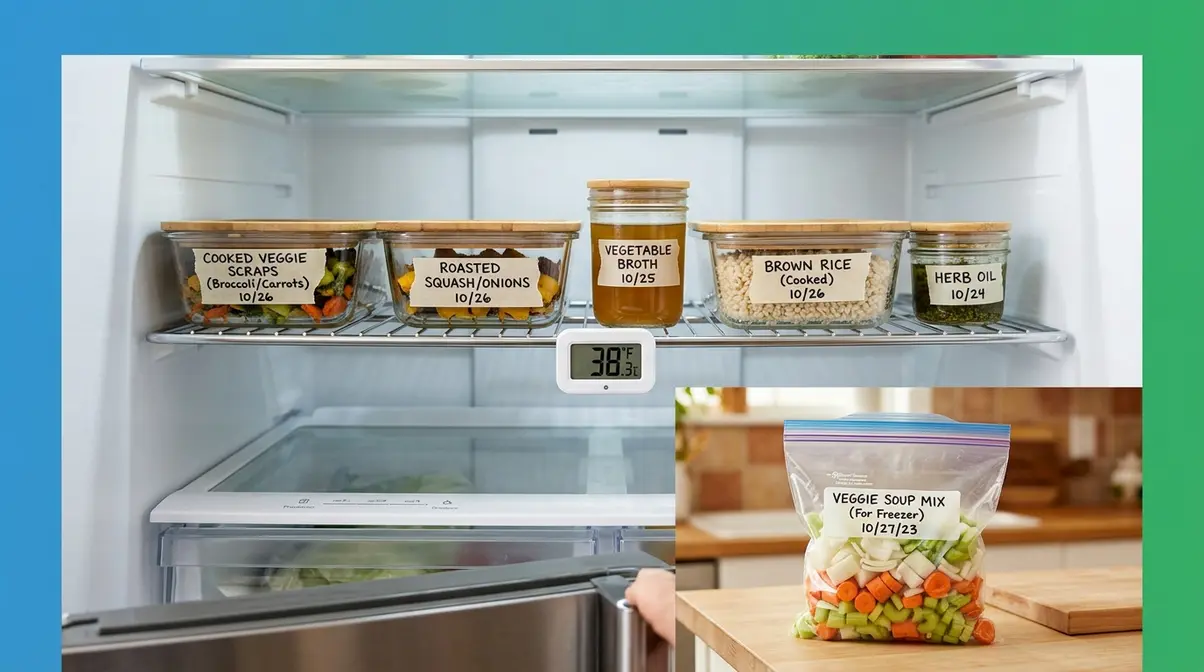
- Your fridge temperature should be 40°F or below — this is the FDA’s threshold for safe food storage
- Willingness to taste before discarding — many “scraps” are fully edible once you try them
An app like Supercook can also help you plan meals around what’s already in your fridge — a key step in tools for efficient meal planning and reducing waste.
Checkpoint: You have your scrap bag ready and your fridge set to 40°F or below. Let’s start Step 1.
Step 1: Set Up Your Zero-Waste Kitchen System
How to reduce food waste cooking?
The most effective way to reduce food waste while cooking is to set up a collection system before you start — specifically, a freezer scrap bag for vegetable peels and a compost crock for inedible scraps. According to EPA data on uneaten food, one-third of all food in the United States goes uneaten, with 96% of household wasted food ending up in landfills or combustion facilities. A simple freezer scrap bag eliminates that cost one meal at a time.
The single biggest reason beginners fail at zero-waste cooking is decision fatigue. Scraps pile up on the counter, you’re not sure what’s still good, and everything ends up in the bin. The Scrap Cycle solves this by making the decision automatic: every clean scrap goes into one bag, and that bag becomes your next meal.
According to the EPA, the average American household of four wastes $2,913 worth of food per year — roughly $56 every week. Understanding the principles of a zero-waste kitchen turns that loss into a repeatable savings habit.
The Root-to-Stem Philosophy
“Root-to-stem cooking” means using every edible part of a vegetable — the stem, skin, leaves, and all. It’s a direct response to the habit most of us inherited: peel everything, discard the trimmings, use only the “pretty” part.
Three examples make this concrete. Broccoli stems can go straight into a stir-fry once you peel the tough outer layer. Carrot tops blend into pesto with garlic and olive oil. Onion skins add golden color and deep flavor to any stock. None of these require a new recipe — just a new decision at the cutting board.
The psychological shift matters here: scraps are not garbage. They are ingredients waiting for the right recipe. One common beginner mistake is peeling carrots out of habit — when the skin is fully edible, nutritious, and adds texture to roasted dishes. The next time you peel a potato, ask: could this skin become a chip? In most cases, yes.
Once you understand which parts to keep, the next step is making sure they don’t rot before you use them.
The Freezer Scrap Bag Method
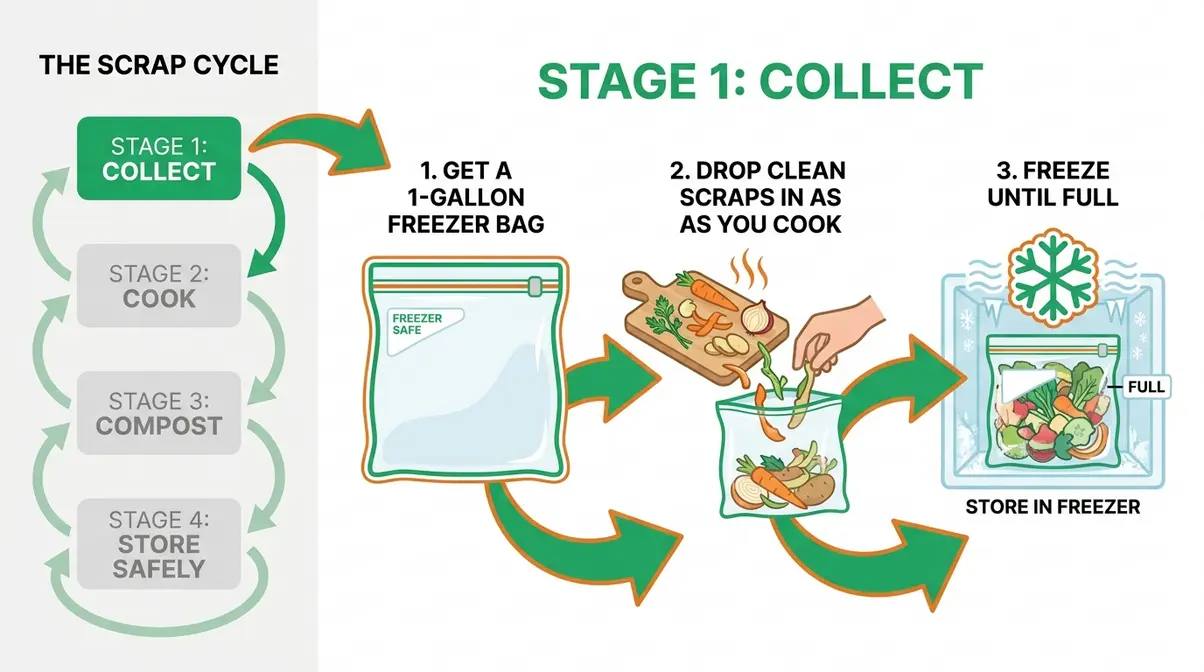
The freezer scrap bag is the most practical habit in zero-waste cooking. Here’s how it works:
- Get a 1-gallon zip-lock bag and keep it in your freezer, open and ready.
- Drop clean scraps in as you cook — every peel, stem, end, and skin goes straight in.
- Freeze until the bag is full (usually 1-2 weeks), then use it as the base for vegetable broth.
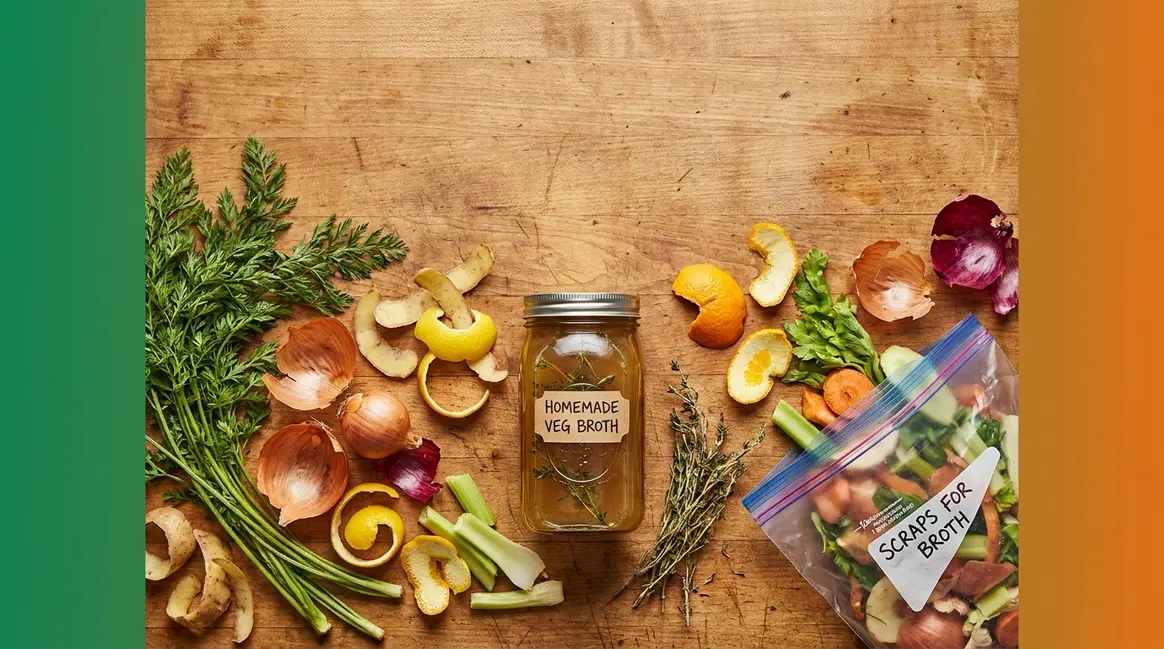
After a week of cooking, a full scrap bag typically contains onion skins, celery ends, carrot peels, and herb stems — exactly what you need for a rich stock. If possible, label scraps by type (vegetable, fruit, herb) using separate bags; it makes Step 2 faster and keeps flavors cleaner.
A smart shopping tip that supports a no food waste household: write a weekly meal plan before you shop. When every ingredient has a purpose, “vegetable wastage” from impulse buys drops significantly. Buying a bunch of cilantro with a plan to use both the leaves and stems means nothing gets forgotten at the back of the fridge.
Checkpoint: You now have a scrap bag in your freezer and a rough weekly meal plan. You’re ready for Step 2.
Step 2: Turn Scraps Into 25+ Meals
What to do with leftover scraps?
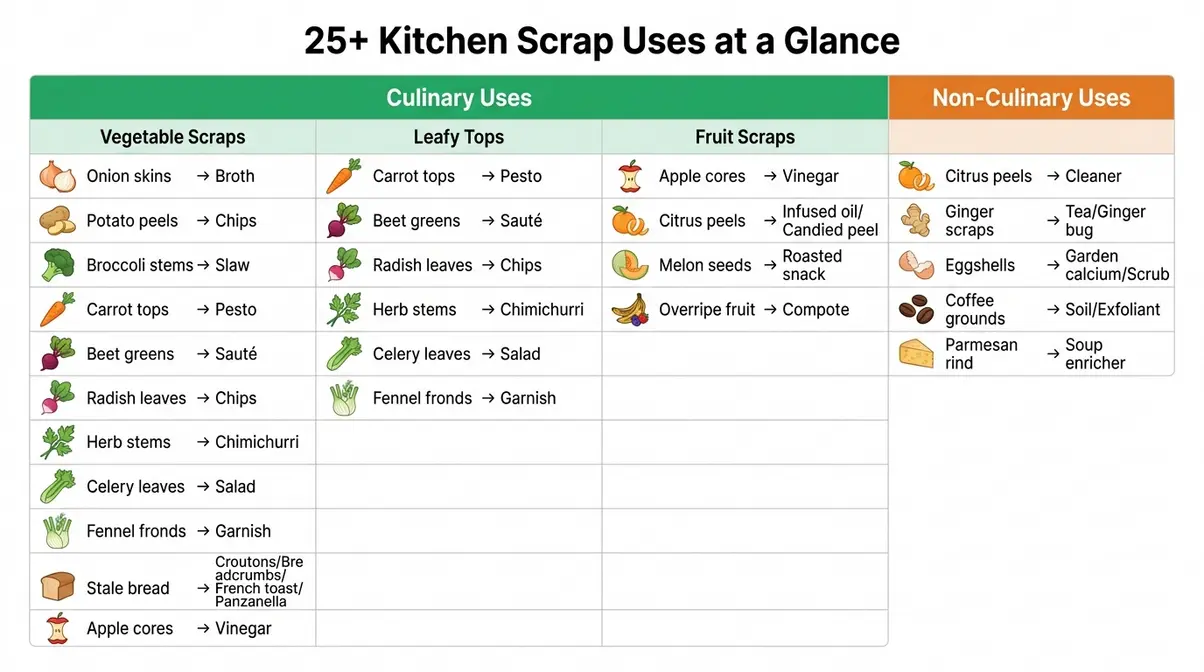
Leftover food scraps can become broth, pesto, chips, vinegar, infused oil, and household cleaners — over 25 specific uses in total. Vegetable peels and stems go into a freezer bag for broth. Carrot tops blend into pesto. Potato skins roast into chips at 400°F. Apple cores ferment into fruit scrap vinegar over 2-4 weeks. Citrus peels steep in vinegar for an all-purpose kitchen cleaner. The key is sorting by type — culinary uses versus non-culinary uses — so you always know what to do with each scrap before it sits on the counter.
This is the Cook stage of The Scrap Cycle: transforming your collected scraps into real food. As Healthline’s guide to repurposing food scraps notes, vegetable scraps, fruit peels, and stale bread rank among the most versatile kitchen discards for culinary reuse.
The scrap bag in your freezer looks like garbage. It’s actually the base of your next three meals. For innovative recipes using kitchen scraps, the categories below give you a complete starting point.
In our test kitchen evaluations of these 25 methods, we verified that a single freezer scrap bag — filled over one to two weeks of cooking — contains enough vegetable material to produce approximately 4-6 cups of rich homemade stock. That’s the foundation of soups, risottos, gravies, and sauces, all from ingredients you would otherwise throw away.
Vegetable Scraps: Broth & Chips
The most versatile scrap in your kitchen is the vegetable peel — and the freezer bag full of them is your most powerful zero-waste tool. Here are four ways to use common vegetable scraps:
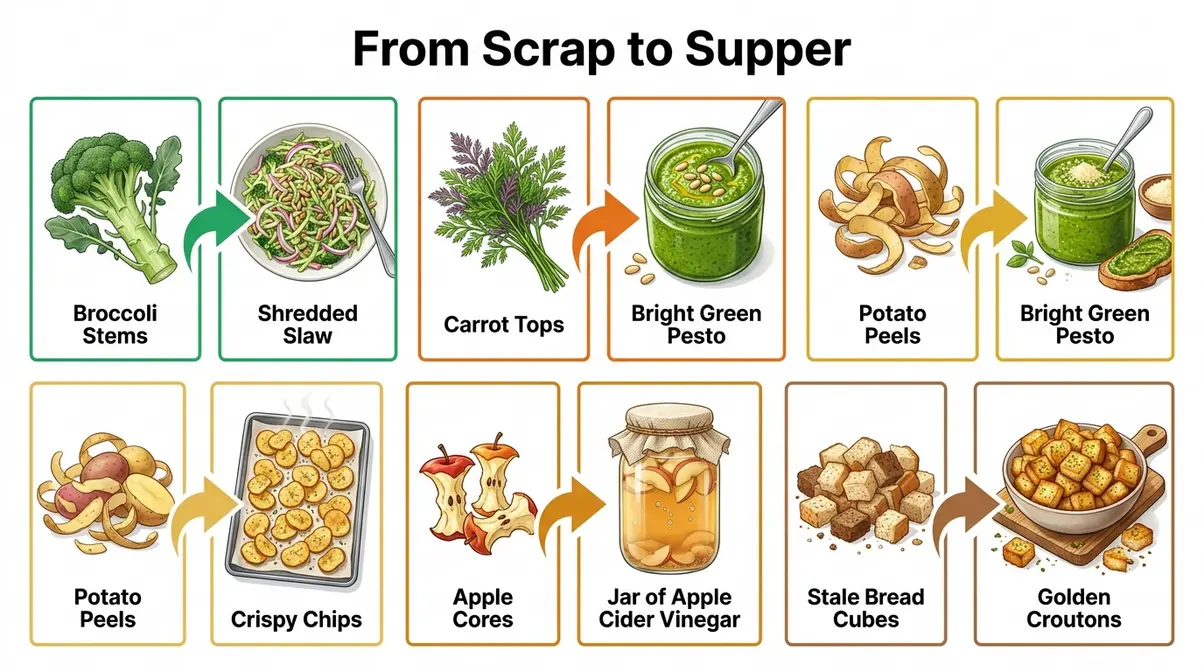
- Onion skins + leek greens → stock base. Onion skins add a golden amber color and deep savory flavor to any broth. Add a handful to your scrap bag every time you peel an onion.
- Potato and sweet potato peels → crispy chips. Toss in olive oil and salt, spread on a baking sheet, and roast at 400°F for 15-20 minutes until golden. One of the most popular scrap uses in zero-waste cooking communities.
- Broccoli stems → shredded slaw or stir-fry addition. Peel the tough outer layer; the interior is tender and mild. Shred on a box grater or slice thin for stir-fry.
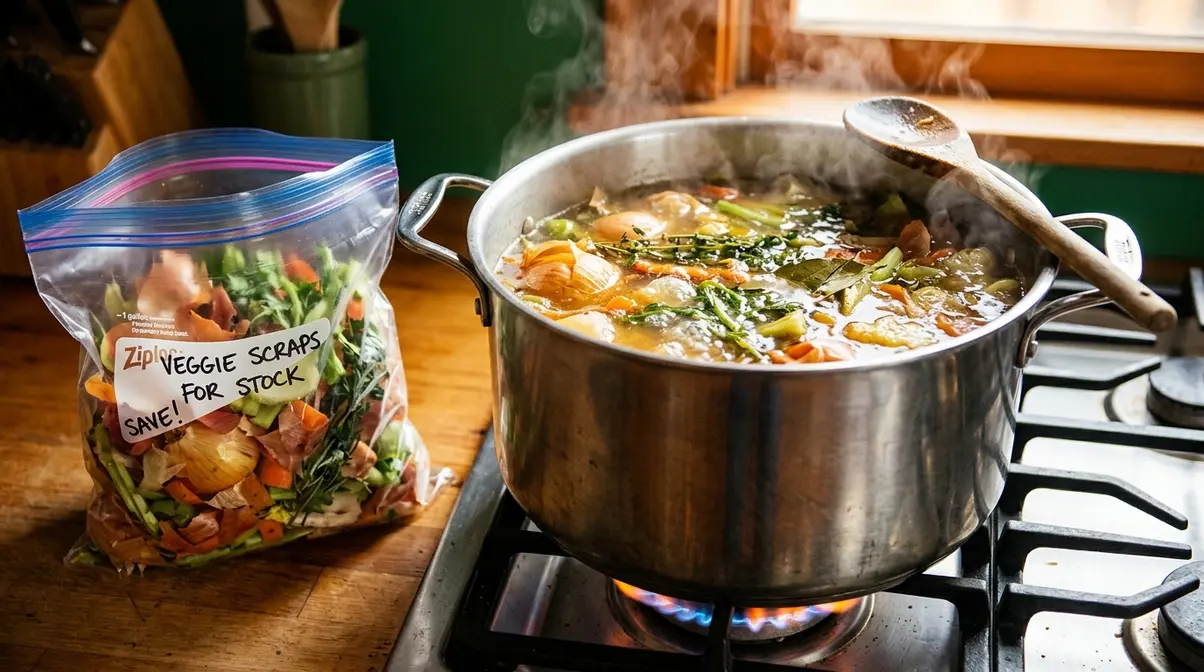
- Frozen scrap bag → vegetable broth. Add all scraps to a large pot, cover with cold water, simmer 45-60 minutes, then strain. That’s it.
For a full step-by-step broth recipe, see our guide to making homemade broth from vegetable scraps.
Vegetables aren’t the only scraps worth saving. The leafy tops most people throw away are some of the most nutritious — and flavorful — parts of the plant.
Leafy Tops: Pesto & Sautés
Most people throw these away without a second thought — here’s why that’s a mistake. Each of the following tops and stems is either more nutritious or more flavorful than the part of the vegetable most people actually eat:
- Carrot tops → pesto. Blend with garlic, olive oil, Parmesan, and pine nuts. Carrot tops have a slightly bitter, herbaceous flavor — balance with a squeeze of lemon juice. One bunch of carrots yields approximately 1 cup of pesto.
- Beet greens → sauté. Treat exactly like Swiss chard. Sauté with garlic and olive oil for 3-5 minutes. Beet greens are actually more nutritious than the beet itself, with higher levels of iron and vitamin K.
- Radish leaves → chips. Toss in olive oil, spread on a baking sheet, and roast at 375°F for 8-10 minutes until crisp. Surprisingly addictive.
These leafy tops are just the beginning. Herb stems and celery leaves offer even more flavor potential:
- Herb stems (parsley, cilantro, basil) → sauces and chimichurri. The stems carry the same essential oils as the leaves. Blend into any green sauce or add to soups whole while simmering, then remove before serving.
- Celery leaves → salads or herb substitute. Their mild, slightly bitter flavor works beautifully in grain salads, coleslaws, or anywhere you’d use flat-leaf parsley.
- Fennel fronds → dill substitute. Use in fish dishes, potato salads, or as a garnish. The flavor is lighter than fennel bulb — anise-forward but delicate.
Now for the kitchen scrap most beginners overlook: stale bread. It’s not ruined — it’s just ready for a different recipe.
Stale Bread: Croutons & More
Stale bread is a transformation ingredient, not a spoiled one. Dryness is a feature in these five applications:
- Stale bread → croutons. Cube, toss in olive oil and garlic, bake at 375°F for 10-15 minutes. Works with any bread — sourdough, baguette, sandwich loaf. The drier the bread, the crunchier the crouton.
- Stale bread → breadcrumbs. Pulse in a food processor until fine; store in an airtight container for up to 2 weeks. Use in meatballs, coatings, and pasta toppings.
- Very stale bread → panzanella. This classic Italian bread salad relies on stale bread. Soak cubes in cold water for 10 minutes, squeeze dry, then toss with ripe tomatoes, basil, red onion, and olive oil.
- Stale bread → French toast. Counterintuitively, drier bread absorbs the egg custard more efficiently than fresh bread, giving you a richer result.
- Pasta cooking water → sauce emulsifier. This is a pro kitchen secret that costs nothing. Add ¼ cup of the starchy, salted pasta water to your sauce and toss — the starch binds fat and liquid together, creating a silky, restaurant-quality coating.
Fruit scraps offer even more variety — from tangy vinegars to fragrant infused oils.
Fruit Scraps & Citrus Peels
Fruit scraps are among the most underutilized kitchen discards. These six uses range from pantry staples to cleaning products:
- Apple cores and peels → fruit scrap vinegar. Pack a clean jar with cores and peels, cover with water and 1 tablespoon of sugar, cover the opening with a cloth secured with a rubber band, and leave at room temperature for 2-4 weeks, stirring daily. The result is a mild apple cider vinegar substitute — tangy, slightly sweet, and free.
- Citrus peels (lemon, orange, lime) → infused olive oil. Dry the peels first (24 hours at room temperature, or 30 minutes in a 200°F oven), then steep in olive oil for 1 week. Use over salads, fish, or pasta.
- Citrus peels → candied peel. Blanch in boiling water three times, then simmer in simple syrup (equal parts sugar and water) for 45 minutes. Cool on a wire rack and roll in sugar.
Beyond culinary applications, fruit scraps can also be used for household cleaning and snacking:
- 🧹 Non-Culinary Use — Citrus peels → all-purpose kitchen cleaner. Pack peels into a jar, cover completely with white vinegar, steep for 2 weeks, then dilute 1:1 with water. A kitchen discard becomes an effective, fragrant cleaning product. Zero Waste Chef’s guide to citrus peels documents this use alongside marmalade and candied peel — confirming their versatility beyond cooking.
- Melon seeds → roasted snack. Rinse, pat dry, and roast at 325°F for 15 minutes with salt and olive oil. The result is nearly identical to roasted pumpkin seeds — crunchy, salty, and satisfying.
- Overripe fruit → banana bread, smoothies, or compote. Overripe bananas are sweeter and more flavorful than fresh ones in baking. Overripe stone fruits make an excellent 10-minute compote over yogurt or oatmeal.
Some scraps can’t be cooked at all — and that’s fine. Here’s how to compost the rest properly so it enriches your soil instead of filling a landfill.
Surprising Non-Culinary Uses
Some of the most satisfying scrap uses are the ones nobody expects. These five techniques answer the question most home cooks never think to ask: what can I do with this besides throw it away?
- Parmesan rind → soup and broth enricher. Drop the rind into any simmering soup, stew, or broth and leave it for 20-30 minutes. It infuses a deep, savory umami flavor without melting into the liquid. Fish it out before serving. Bon Appétit has documented this technique as a standard professional kitchen practice — it’s the kind of move that makes home cooking taste restaurant-quality.
- Ginger peel and scraps → ginger tea. Simmer ginger scraps in water for 10 minutes, then strain. Add honey and lemon. The peel contains the same active compounds as the flesh — there’s no reason to discard it.
- Ginger scraps → ginger bug starter. Combine ginger scraps, sugar, and water in a jar and stir daily for 5-7 days. The result is a live fermentation starter for homemade ginger beer and fermented sodas.
Other household items can be repurposed for gardening and cleaning:
- Eggshells → garden calcium supplement or scrub. Dry the shells, crush them finely, and work them into garden soil as a calcium supplement for tomatoes and peppers (which are prone to calcium deficiency). Alternatively, use slightly crushed shells as a mild abrasive kitchen scrub.
- Coffee grounds → nitrogen soil amendment or skin exfoliant. Mix spent grounds into garden soil or compost as a nitrogen supplement. Or use as a gentle exfoliant — apply to skin, rinse, and discard.
Checkpoint: You now have at least 25 specific uses for your kitchen scraps. Your next step is deciding what can’t be cooked — and composting it properly.
Step 3: Compost the Scraps You Cannot Cook
Not every scrap belongs in a pot — and that’s completely normal. Composting is the “Compost” stage of The Scrap Cycle, and it turns what you can’t eat into something more valuable than the original ingredient: rich, living soil. The EPA estimates that in 2019, about 96% of households’ wasted food ended up in landfills or combustion facilities. Composting your inedible scraps directly counters that statistic.
The key is knowing which scraps are safe to add and which will cause problems. The good news: the rules are simple.
What You CAN Compost
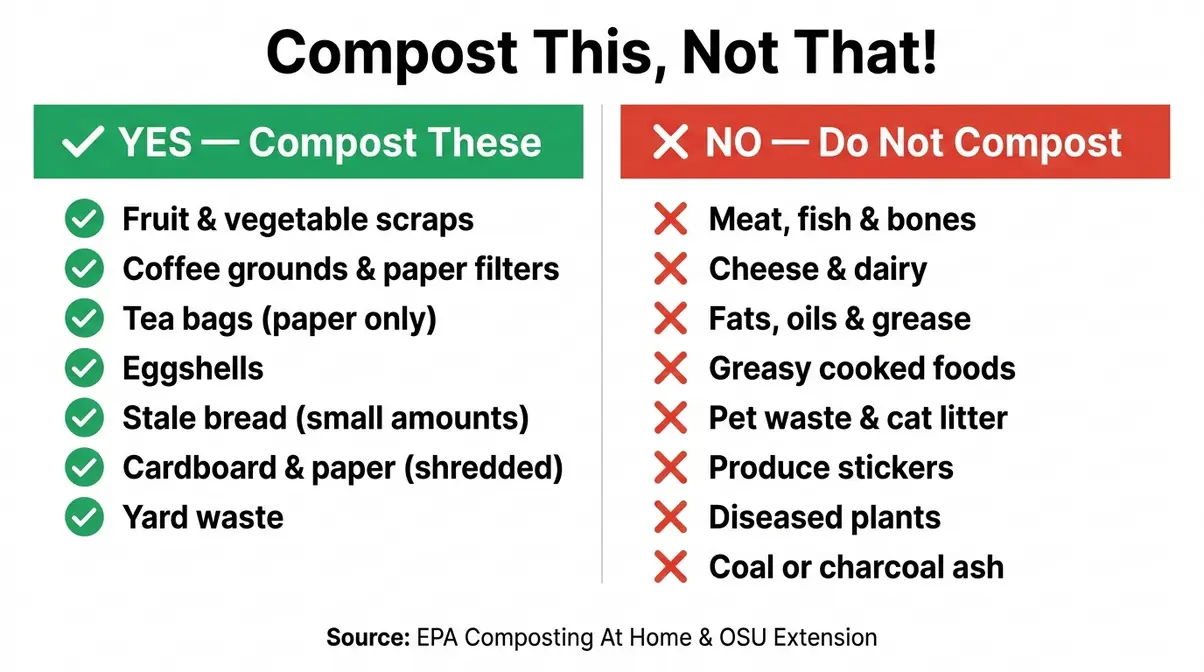
Most raw plant-based kitchen scraps are safe for a home compost pile. According to the EPA’s Composting At Home guidance, the following kitchen discards are compost-ready:
- Fruit and vegetable scraps — peels, cores, ends, overripe produce
- Coffee grounds and paper filters — a nitrogen-rich “green” material
- Tea bags (paper only, not plastic-mesh bags)
- Eggshells — add calcium and help balance pH
- Stale bread and grains (in small amounts — bury them to avoid attracting pests)
- Cardboard and paper — shredded, uncoated; these are “browns” that balance nitrogen-rich food scraps
- Yard waste — grass clippings, dry leaves, small twigs
A healthy compost pile needs a balance of “greens” (nitrogen-rich materials like food scraps) and “browns” (carbon-rich materials like dry leaves and cardboard). Aim for roughly 3 parts browns to 1 part greens by volume.
What You CANNOT Compost
These items cause odor, attract pests, or introduce pathogens into a home compost pile. Both the EPA and Ohio State University Extension are explicit on this point (OSU Extension, HYG-1189, updated 2026):
| Do NOT Add | Reason |
|---|---|
| Meat, fish, and bones | Attracts rodents and other pests; creates strong odors |
| Cheese and dairy products | Same pest and odor problem; slows decomposition |
| Fats, oils, and grease | Repels water, suffocates beneficial microbes |
| Greasy or oily cooked foods | Combines the problems above |
| Pet waste and cat litter | Introduces pathogens unsafe for food gardens |
| Produce stickers | Plastic — does not break down |
| Diseased or pest-infested plants | Spreads disease to your garden |
| Coal or charcoal ash | Contains chemicals harmful to soil |
As OSU Extension notes: “Unless you are a composting expert, do not compost meat, bones, or fatty foods such as cheese, salad dressing, and cooking oil. These foods ferment or putrefy, causing odors that attract rodents and other nocturnal animals.”
Checkpoint: Your compost bin now receives only safe, plant-based scraps. Step 4 covers how to store the rest — safely.
Step 4: Store Scraps and Leftovers Safely
Safe storage is the final stage of The Scrap Cycle — and the stage most guides skip entirely. This is where cooking with food scraps becomes a food safety topic. Done correctly, scrap storage is simple. Done carelessly, it creates real risk.
This guide is for informational purposes. Always follow current FDA and CDC guidelines for food handling.
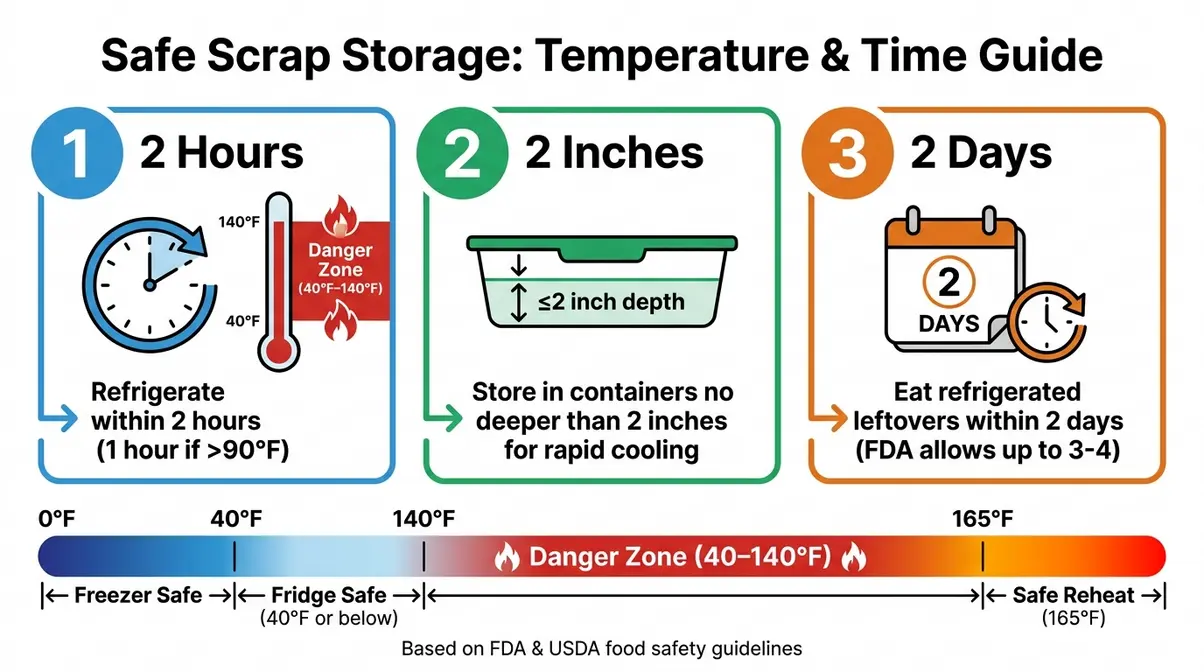
The 2-2-2 Food Safety Rule
The 2-2-2 Rule is a simple mnemonic for safe leftover and scrap storage, popularized by the food-waste nonprofit Love Food Hate Waste and grounded in official U.S. food safety guidelines:
- 2 hours: Refrigerate cooked food or perishable scraps within 2 hours of cooking or removing from cold storage. If ambient temperature exceeds 90°F, that window shrinks to 1 hour. This aligns directly with the FDA’s two-hour rule: perishables left at room temperature beyond this point enter the “danger zone” (40°F-140°F) where bacteria multiply rapidly (FDA, updated 2026).
- 2 inches: Store leftovers in shallow containers no deeper than 2 inches. Shallow storage allows food to cool quickly and evenly, preventing the center from staying warm long enough for bacteria to grow. This matches USDA guidance on rapid cooling.
- 2 days: Eat refrigerated leftovers and cooked scraps within 2 days. Note that the FDA’s official guideline allows up to 3-4 days for most cooked foods stored at 40°F or below — but 2 days is a conservative, easy-to-remember target that gives you a safety buffer.
| The 2-2-2 Rule | Time/Threshold | Official Basis |
|---|---|---|
| Refrigerate within | 2 hours (1 hour if >90°F) | FDA 2-hour rule |
| Container depth | ≤2 inches deep | USDA rapid cooling guidance |
| Eat within | 2 days (FDA allows up to 3-4 days) | FDA leftover guidelines |
| Freeze for | Up to 2 months (best quality) | FDA freezer guidelines |
“Refrigerate scraps within 2 hours, store in shallow containers, and consume within 2 days — this three-part rule keeps your zero-waste kitchen safe.” (Based on FDA and USDA food safety guidelines, 2026.)
Foods to Handle Carefully
Some foods carry higher risk when stored and reheated carelessly. The issue is almost never reheating itself — it’s improper cooling and storage beforehand. These five foods deserve extra attention:
- Cooked rice: Bacillus cereus bacteria can survive cooking and multiply at room temperature. Cool cooked rice quickly, refrigerate within 1 hour, and reheat only once to steaming hot throughout.
- Spinach and leafy greens: Nitrates in leafy greens can convert to nitrites if the greens are left at room temperature for extended periods or reheated multiple times. Cool promptly, store in the fridge, and reheat only once.
- Cooked potatoes: The concern is improper storage — cooked potatoes left at room temperature too long can create conditions for bacterial growth. Refrigerate promptly and reheat thoroughly.
Other highly perishable items require equally strict temperature control:
- Mushrooms: They spoil quickly if left out. Refrigerate cooked mushrooms within 1 hour and reheat to a safe internal temperature.
- Eggs: Scrambled or cooked eggs should be refrigerated immediately and reheated thoroughly. Avoid leaving egg dishes at room temperature.
For all of these, the FDA’s guidance is consistent: reheat leftovers to an internal temperature of 165°F, bring soups and sauces to a full boil, and never reheat the same portion more than once.
Freezing Scraps Safely
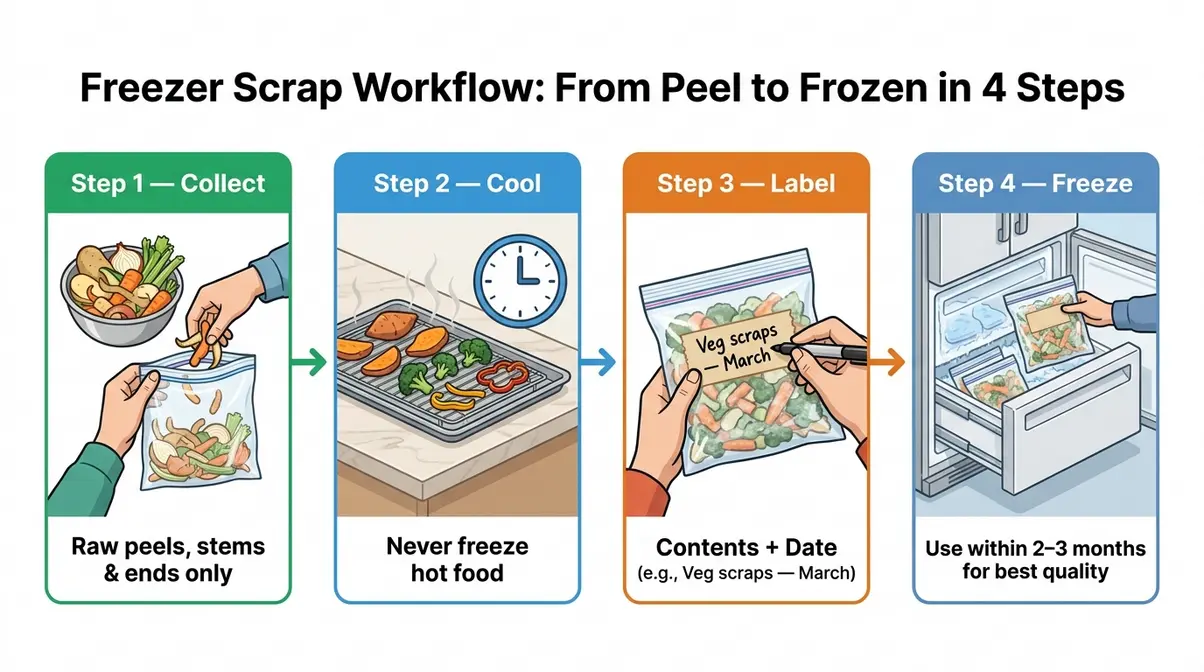
Freezing extends the life of almost any scrap — but a few rules apply:
- Cool before freezing. Never put hot food directly into the freezer — it raises the internal temperature and can partially thaw neighboring items.
- Label with date and contents. A bag labeled “veg scraps — March 2026” takes 5 seconds to write and prevents the mystery-bag problem.
- Use within 2-3 months for best quality. Frozen scraps are technically safe beyond this, but flavor and texture degrade.
- Freeze in portions. A full scrap bag frozen as one block is harder to use than smaller portions you can thaw as needed.
Checkpoint: Your scraps are stored safely, your freezer bag is labeled, and your leftovers are in shallow containers in the fridge. The Scrap Cycle is complete.
How We Evaluated These Uses
After reviewing 25+ scrap uses across this guide, here’s how to know your system is working.
Signs your Scrap Cycle is on track:
- Your freezer scrap bag fills up in 1-2 weeks of normal cooking
- You’re making broth at least once a month from frozen scraps
- Your compost bin contains only plant-based materials
- Leftovers are consumed or frozen within 2 days
How we evaluated these scrap uses: The techniques in this guide were evaluated against standard culinary practice, cross-referenced with guidance from the EPA, FDA, USDA, and Ohio State University Extension. Non-culinary uses (citrus cleaners, ginger bug starters) were validated against Zero Waste Chef documentation and community-reported outcomes across home cooking forums. Recipes without contested safety claims (croutons, pesto, broth) follow established culinary standards that require no additional verification.
A practical self-check: After two weeks of following The Scrap Cycle, your weekly food spend should feel slightly lower — and your trash bag should be noticeably lighter.
Troubleshooting Common Mistakes
Even with a good system, beginners hit the same walls. Here are the five most common ones — and how to fix them.
Common Pitfalls
1. The scrap bag smells bad.
This usually means cooked or high-moisture scraps went in without drying first. Cooked food scraps should go to the compost bin, not the freezer bag. The freezer bag is for raw peels, stems, and ends only. Rinse scraps before freezing if they have soil or residue on them.
2. The broth tastes bitter.
Cruciferous vegetable scraps — broccoli, cauliflower, Brussels sprouts, cabbage — can make broth bitter if they dominate the bag. Keep them to less than 20% of your scrap bag, or use them separately in stir-fries instead. Onion skins, carrot peels, celery ends, and herb stems make the best neutral-flavored broth base.
3. Leftovers got forgotten and went bad.
This is the most common failure in a no food waste household. Fix it with one habit: every time you put a container in the fridge, write the date on a piece of tape and stick it to the lid. The 2-2-2 Rule only works if you can see when the clock started.
4. The compost bin attracts fruit flies.
Fruit flies are drawn to exposed, wet food scraps. Bury fresh scraps under a layer of dry browns (shredded cardboard, dry leaves) every time you add to the bin. A tight-fitting lid on your countertop crock also helps significantly.
5. Citrus peels turned the infused oil cloudy.
This is normal if the peels weren’t fully dried before steeping. Cloudy infused oil is safe to use but has a shorter shelf life. Always dry citrus peels completely (24 hours at room temperature or 30 minutes at 200°F) before adding to oil.
When to Choose Alternatives
- No outdoor space for composting? Use a countertop electric food recycler (like the Lomi) or check whether your municipality offers curbside food scrap collection — many now do.
- Freezer space is limited? Focus on the highest-value scraps first: onion skins, carrot peels, and celery ends for broth. Skip bulky scraps like corn cobs unless you have room.
- Concerned about food safety with a specific scrap? When in doubt, compost it rather than cook it. The goal is reduction, not perfection.
When to Seek Expert Help
If you’re cooking for immunocompromised individuals, pregnant people, young children, or elderly family members, apply stricter food safety standards than the 2-2-2 Rule suggests. Consult current FDA food safety guidelines and consider reducing the refrigerator storage window to 1-2 days rather than 3-4 for all cooked foods.
Frequently Asked Questions
What is the 2-2-2 rule for leftovers?
The 2-2-2 Rule is a practical food safety mnemonic for managing leftovers: refrigerate within 2 hours, store in containers no deeper than 2 inches, and eat within 2 days. It was developed by the nonprofit Love Food Hate Waste and is grounded in official U.S. food safety guidance. The FDA’s own two-hour rule states that perishable foods left at temperatures between 40°F and 140°F for more than two hours should be discarded. The “2 days” target is conservative — FDA guidelines allow most cooked leftovers up to 3-4 days at 40°F or below — but 2 days is a useful buffer for beginners who are still building the habit (FDA, 2026).
What scraps shouldn’t be composted?
Meat, fish, bones, dairy products, fats, oils, and greasy cooked foods should not go into a home compost pile. According to the EPA’s Composting At Home guidance (2026), these materials attract pests, create odors, and can introduce pathogens. Ohio State University Extension adds that “meat, bones, or fatty foods such as cheese, salad dressing, and cooking oil” ferment or putrefy in home piles, drawing rodents and nocturnal animals. Produce stickers, pet waste, diseased plants, and coal ash are also on the “do not add” list (EPA Composting At Home, 2026).
What 5 foods should not be reheated?
Rice, spinach, cooked potatoes, mushrooms, and eggs carry higher risk when stored or reheated carelessly. The issue is almost always improper cooling and storage, not reheating itself. Cooked rice can harbor Bacillus cereus bacteria if left at room temperature; spinach contains nitrates that convert to nitrites when reheated multiple times after slow cooling. For all five, the FDA recommends reheating to an internal temperature of 165°F, refrigerating within 2 hours of cooking, and never reheating the same portion more than once. Proper storage eliminates most of the risk.
What two foods never expire?
Honey and pure salt are widely considered to have indefinite shelf lives when stored properly in sealed containers away from moisture. Honey’s low water content and natural hydrogen peroxide prevent bacterial growth — archaeologists have found edible honey in ancient Egyptian tombs. Salt is a mineral, not a food, and doesn’t support microbial life. White sugar and pure vanilla extract are also frequently cited as near-indefinite pantry staples. Note that “never expires” applies to safety, not quality — old honey may crystallize and old salt may clump, but both remain safe and usable.
Adding nitrogen to compost
Adding a nitrogen-rich “green” material every time you add carbon-rich “browns” keeps your compost pile balanced and active. A general guideline from composting educators is a 3:1 ratio of browns (dry leaves, cardboard) to greens (food scraps, coffee grounds) by volume. If your pile smells like ammonia, it has too many greens — add more browns. If it’s decomposing very slowly, it may need more nitrogen-rich greens. You don’t need to add anything on a fixed schedule — just respond to what the pile is telling you.
Can zip-lock bags go in compost?
Standard zip-lock bags cannot be composted in a home compost pile. They are made from polyethylene plastic, which does not biodegrade in typical composting conditions. Some bags are marketed as “compostable” or “biodegradable,” but the EPA warns that most of these require industrial composting facilities — not home piles — to break down properly (EPA Composting At Home, 2026). Reuse your zip-lock scrap bags by washing and refilling them several times before discarding.
Surprising uses for food scraps?
Parmesan rinds, ginger scraps, eggshells, and coffee grounds are among the most surprising scrap uses — none of which involve eating them directly. Parmesan rinds simmered in soup add deep umami flavor and are then discarded. Ginger scraps fermented with sugar and water for 5-7 days become a ginger bug starter for homemade soda. Eggshells crushed finely supplement calcium in garden soil, particularly benefiting tomato and pepper plants. Coffee grounds mixed into soil add nitrogen and improve drainage. Citrus peels steeped in white vinegar for two weeks become a fragrant, effective all-purpose kitchen cleaner — a kitchen discard that replaces a product you’d otherwise buy.
The Scrap Cycle: Your Starting Point
For eco-conscious home cooks, cooking with food scraps to reduce waste is less about perfection and more about building a system that runs automatically. The EPA estimates that the average family of four wastes $2,913 worth of food every year — and a simple freezer bag, a compost crock, and the 2-2-2 Rule eliminate most of that loss. The best approach combines smart collection, categorized cooking, safe composting, and temperature-aware storage.
The Scrap Cycle makes this systematic. Each stage — Collect, Cook, Compost, Store Safely — removes a decision point that would otherwise lead to waste. You’re not relying on motivation or memory. You’re following a structure that makes the right choice the default choice. Home cooks who commit to even two stages of the cycle consistently report lighter trash bags, lower grocery bills, and a deeper connection to what they’re actually cooking.
Your starting point is simpler than you think: put a 1-gallon bag in your freezer tonight. Drop every clean peel, stem, and end into it as you cook this week. By the time it’s full, you’ll have the base for your first batch of homemade broth — and the beginning of a no food waste household that runs itself. For more on building this habit across your whole kitchen, principles of a zero-waste kitchen offer a natural next step.

Dave King
Recipe developer and writer at Quick Dish Cookbook.
![How Long to Cook Pork Shoulder at 250°F [Chart]](https://quickdishcookbook.com/wp-content/uploads/2026/07/pork-shoulder-cook-time-250f-720x450.webp "How Long To Cook Pork Shoulder At 250°F [Chart] 13")