Slow Cooker Guide for Beginners: Safety, Tips & Recipes

“Please can you help with advice for using a slow cooker. I am afraid of putting in too little liquid and cracking the bowl but then I end up with soup every time 😳 is there a magic ratio please?”
What’s in this guide
- What Is a Slow Cooker and How Does It Work?
- Prep & Safety: Liquids, Layering, and Food Safety
- Top 5 Beginner Mistakes (and How to Fix Them)
- Your First 4 Foolproof Slow Cooker Recipes
- Oven-to-Slow-Cooker Recipe Conversion Guide
- Troubleshooting: When Slow Cooker Meals Go Wrong
- Frequently Asked Questions
- Common Pitfalls and When to Get Help
- Frequently Asked Questions (continued)
- Your Slow Cooker Journey Starts Today
You are not alone. The fear of adding too little liquid — or far too much — is the #1 question we see from new slow cooker owners. That exact anxiety stops most beginners before they ever make their first meal.
Here is the good news: there is a magic ratio. It is ½ to 1 cup of liquid per pound of meat. There is also a correct layering order, a food safety rule that keeps your family safe, and a three-part framework that ties everything together. This slow cooker guide for beginners gives you all of it in one place.
Unlike most beginner guides, this one gives you exact ratios, USDA-backed safety temperatures, and a troubleshooting section — because “just set it and forget it” isn’t enough when you’re starting from scratch. This guide was researched using USDA Food Safety and Inspection Service publications, FoodSafety.gov guidance, Colorado State University Extension resources, and culinary sources including BBC Good Food and Taste of Home.
This guide covers six sections: what a slow cooker is and how it works, the three prep and safety rules, the top five beginner mistakes, four foolproof starter recipes, an oven-to-slow-cooker conversion guide, and a troubleshooting section for when things go sideways.
Key Takeaways: Your Slow Cooker Cheat Sheet
Welcome to your ultimate slow cooker guide for beginners. Slow cookers cook safely between 170°F and 280°F — no babysitting required (USDA FSIS, 2026).
- Liquid ratio: Use ½ to 1 cup of liquid per pound of meat — never fill more than ¾ full.
- Layering order: Hard root vegetables on the bottom, meat in the middle, soft ingredients on top.
- The Slow Cooker Safety Triangle: Right liquid + correct layers + verified safe temperature (165°F internal) = a perfect meal every time.
- First recipe: Start with pot roast or pulled chicken — the most forgiving “dump & go” meals for beginners.
- Biggest mistake: Lifting the lid during cooking drops the internal temperature by 10–15°F and can add up to 30 minutes to your cook time (University of Minnesota Extension).
What Is a Slow Cooker and How Does It Work?
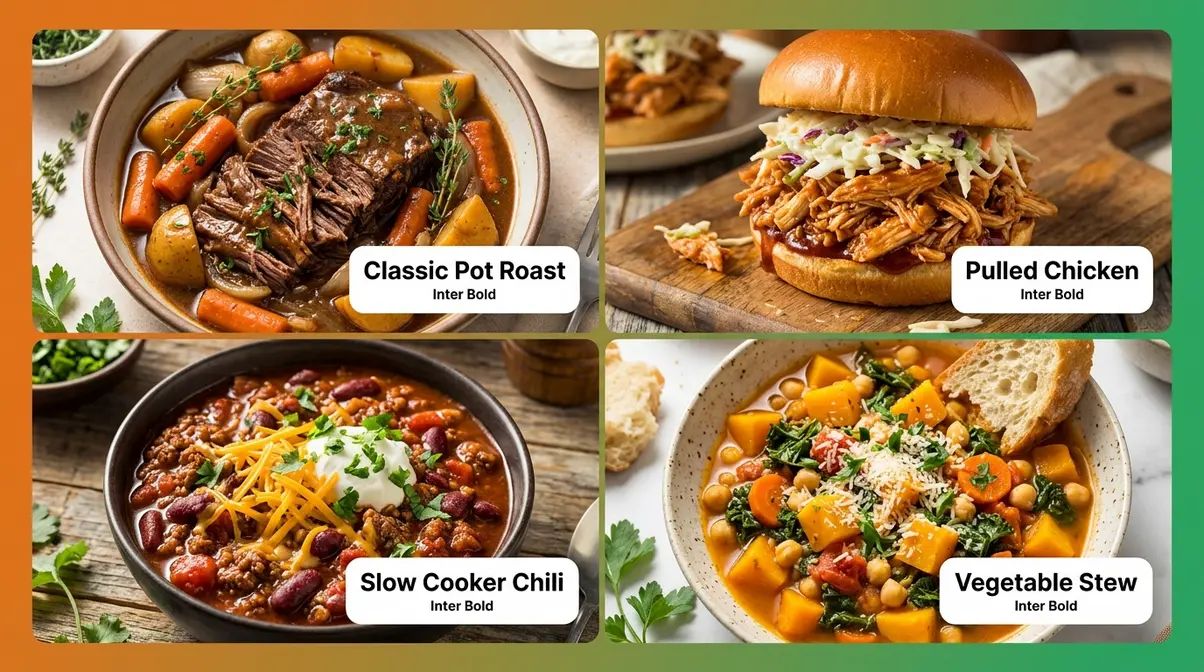
A slow cooker is a countertop appliance that cooks food at low temperatures — between 170°F and 280°F — over several hours, using trapped steam to tenderize tough cuts and develop rich flavors. According to USDA FSIS, the combination of direct heat, long cooking time, and steam created within the tightly covered pot destroys harmful bacteria safely. For a beginner, that means you load the pot in the morning, set the dial, and come home to dinner — no stirring, no watching, no stress.
Slow cookers operate between 170°F and 280°F — a range that slowly dissolves tough connective tissue without drying out meat (USDA Food Safety and Inspection Service, 2026).
What a Slow Cooker Actually Is
This slow cooker guide for beginners starts with the basics, because even the name causes confusion. A slow cooker and a Crock-Pot are not different appliances. “Crock-Pot” is a brand name — owned by the company Rival/Sunbeam — while “slow cooker” is the generic term for the appliance category. It’s the same relationship as “Kleenex” and “tissue.” When a recipe says “use your Crock-Pot,” it simply means any slow cooker you own.
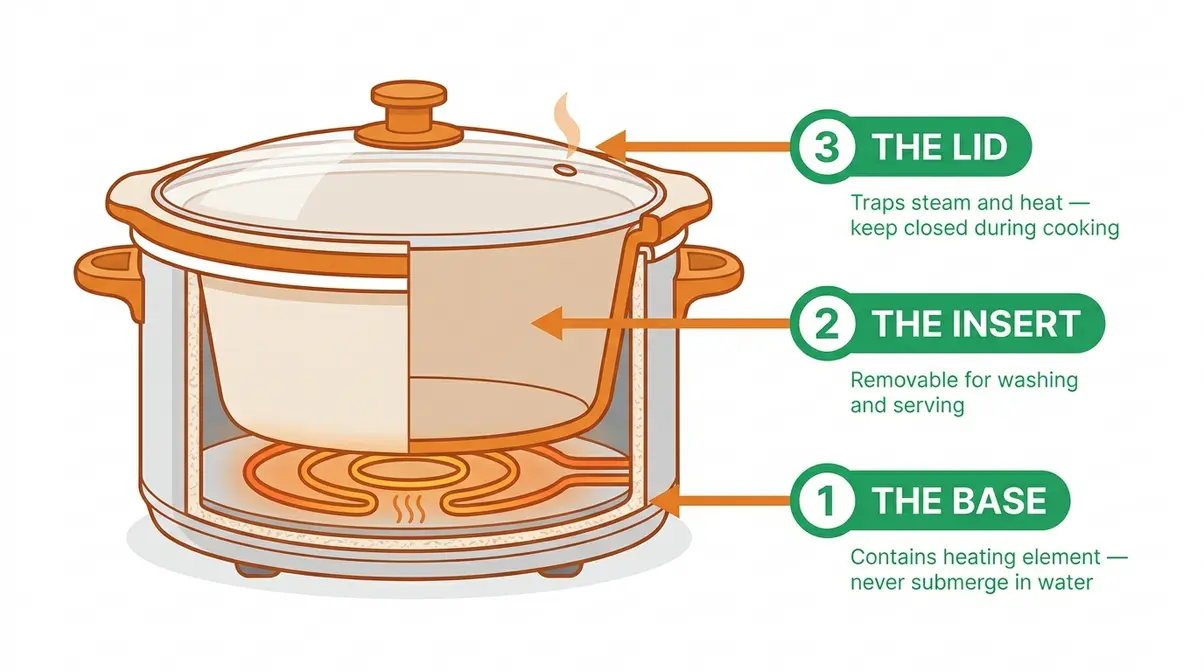
Your slow cooker has three main parts:
- The base — the outer housing that contains the electric heating element. This is what plugs into the wall. Never submerge it in water.
- The insert — the removable ceramic or stoneware bowl where your food actually goes. This is what you fill, carry to the table, and wash.
- The lid — the glass or ceramic cover that traps steam and heat inside the pot.
The insert is removable for two practical reasons: easy washing in the sink or dishwasher, and the ability to carry it straight to the dinner table as a serving bowl. When a recipe says “add to your slow cooker,” they always mean the insert — not the base.
Slow cookers also come in different sizes. A 1.5-quart model suits one to two people; a 6- to 8-quart model suits families. Size matters for liquid ratios — a small insert needs less liquid than a large one, which is covered in the next section. For most beginner recipes, a 4- to 6-quart slow cooker is the most versatile starting point.
How low, moist heat breaks down tough meats — liquid simmering just below 212°F dissolves connective tissue in tougher cuts of meat, which is why cheap cuts like chuck roast become fork-tender after hours on Low (Wirecutter, NYT).
For a deeper dive into appliance history and features, understanding slow cooker basics can help you choose the right model for your kitchen.
Low, High, and Warm Settings
How to use a crockpot correctly starts with understanding what those dial settings actually mean — because they work very differently from your oven. Most beginners assume “High” and “Low” reach different final temperatures, like oven settings. That is not how slow cookers work.
Low and High both reach approximately the same final temperature — around 200°F to 212°F. The difference is how fast they get there. Low heats food slowly over 6–10 hours. High heats food faster over 3–6 hours. This matters enormously for texture: slow collagen breakdown over a long, low cook produces far more tender results in tough cuts than a fast, high cook. A 3-lb pot roast on Low for 8 hours will be more tender than the same roast on High for 4 hours — both are food-safe, but Low wins on texture.
According to USDA guidelines on slow cooker temperatures, slow cookers typically cook foods between 170°F and 280°F (USDA FSIS, 2026).
| Setting | Temperature Range | Best For | Typical Cook Time |
|---|---|---|---|
| Low | ~170°F–200°F | Tough cuts, all-day meals | 6–10 hours |
| High | ~200°F–212°F | Faster meals, chicken breasts | 3–6 hours |
| Warm | ~145°F–165°F | Holding cooked food only | N/A (not for raw food) |
There is one critical warning about the Warm setting: “Warm” is NOT a cooking setting. It only holds already-cooked food above 140°F — the bottom edge of the safe holding zone. Never start a raw recipe on Warm. The food will sit in the temperature danger zone too long and could become unsafe to eat. Always start cooking on Low or High.
Top Benefits of Slow Cooking
Here is the counterintuitive truth about slow cooking: cheaper cuts of meat produce better results. Tough, inexpensive cuts — chuck roast, pork shoulder, chicken thighs — are packed with connective tissue called collagen. Long, slow, moist heat dissolves that collagen into gelatin, creating the rich, silky texture that makes slow cooker meals famous. A $6 chuck roast that would be tough and chewy roasted in an oven becomes restaurant-quality beef stew after 8 hours on Low — no skill required.
The three biggest benefits for beginners, according to consistent reports from the r/slowcooking community:
- True “set-and-forget” cooking. A 5-minute morning prep — chopping vegetables, adding liquid, placing meat — produces an 8-hour dinner. Zero active monitoring required.
- No burning, no boiling over. The low operating temperature makes this the most forgiving cooking appliance a beginner can own. There is no open flame, and food cannot scorch the way it does on a stovetop.
- “Dump & go” simplicity. Many beginner slow cooker tips involve nothing more than layering ingredients, adding liquid, and walking away. The slow cooker does the rest.
The “fall off the bone” tenderness that experienced slow cooker cooks rave about is not a cooking skill — it is simply time. Give a tough cut enough hours on Low, and the collagen breaks down on its own. Knowing your appliance is step one. Step two — and the most important step — is understanding the three rules that keep your meals safe and delicious.
Prep & Safety: Liquids, Layering, and Food Safety
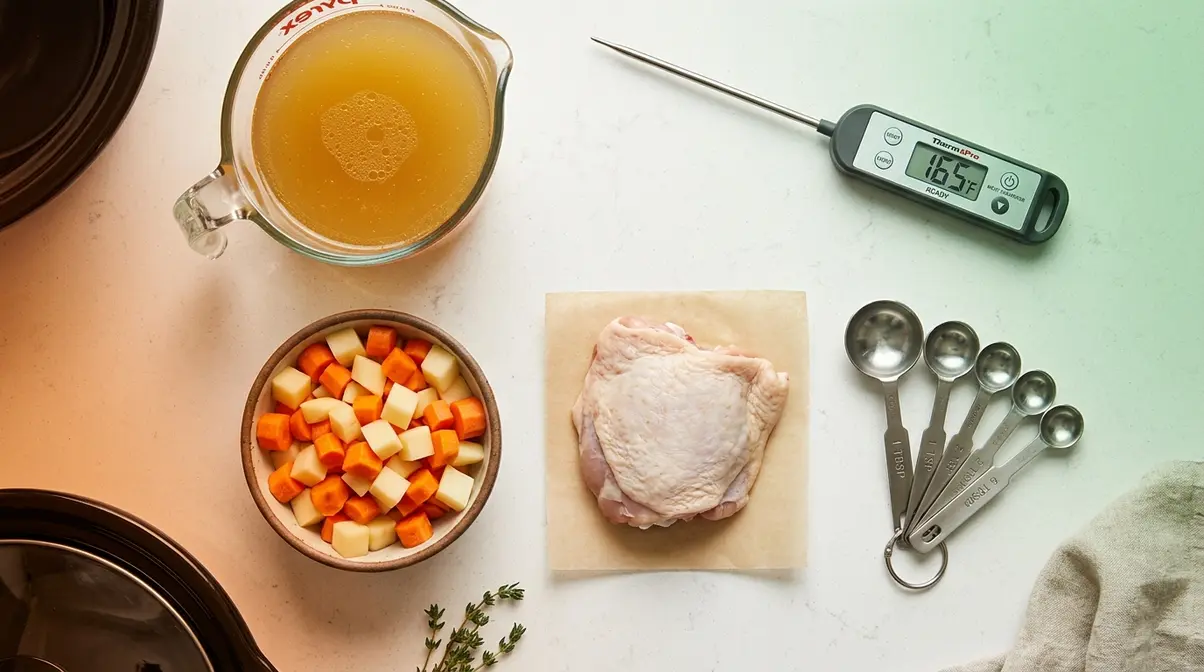
If you’ve ever ended up with watery soup instead of a rich stew, you already know the most common beginner problem — too much liquid. The solution is a three-part framework called The Slow Cooker Safety Triangle: Right Liquid Ratio + Correct Layering Order + Verified Safe Temperature. Master these three rules and you’ll never have that problem again.
The Slow Cooker Safety Triangle
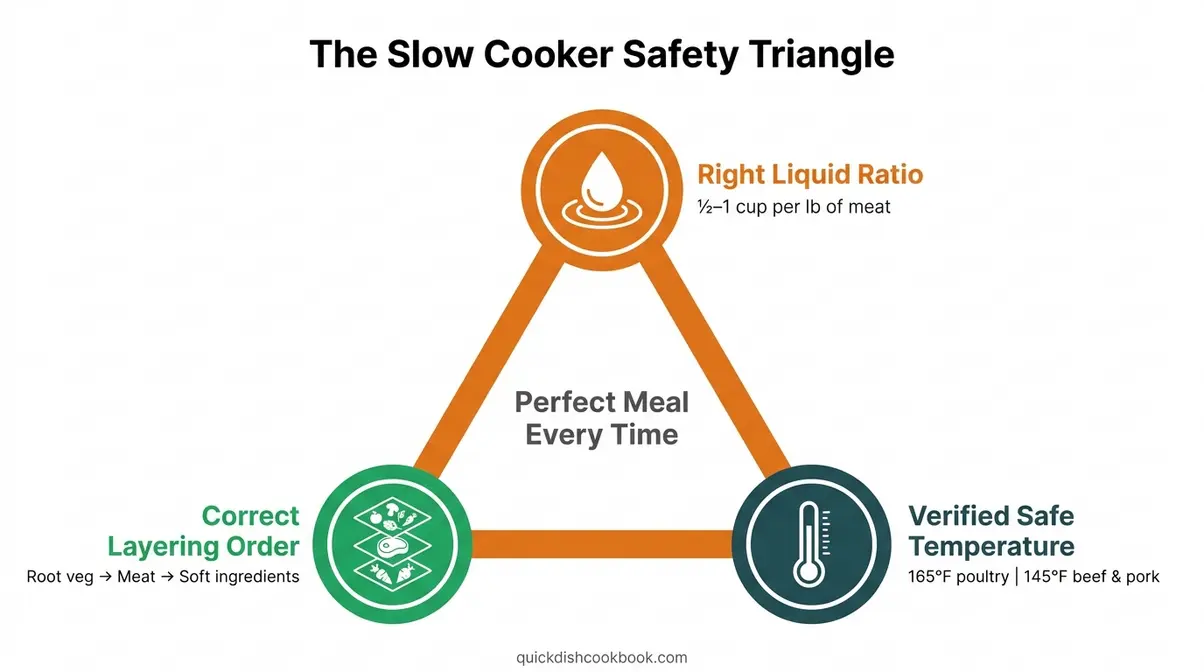
The Slow Cooker Safety Triangle is a three-point framework that covers every variable a beginner needs to control for a safe, delicious meal:
- Right Liquid Ratio — Using the correct amount of liquid prevents watery soup and ensures proper steam circulation.
- Correct Layering Order — Placing ingredients in the right position ensures even cooking from bottom to top.
- Verified Safe Temperature — Confirming your food has reached a safe internal temperature protects your family from foodborne illness.
Think of it like a three-legged stool — remove one leg and the whole thing falls. You can nail the liquid ratio but still have a food safety problem if you never check the internal temperature. All three points work together. This section covers each one in order.
What Liquid Do You Put in a Slow Cooker?
The slow cooker liquid ratio answer is simpler than most beginners expect: use ½ to 1 cup of liquid per pound of meat. That is the magic ratio. For most standard recipes, this translates to roughly 1–2 cups of total added liquid for the average family-sized meal.
Why so little? Because the sealed lid traps steam inside the pot, so almost no liquid evaporates during cooking. According to avoiding excess liquid in slow cookers, condensation during slow cooking produces significant moisture internally — very little liquid is actually lost (Consumer Reports, 2026). This is the opposite of stovetop cooking, where liquid reduces and concentrates. In a slow cooker, liquid increases as meat and vegetables release their own juices during cooking.
What counts as “liquid”: stock, broth (chicken, beef, vegetable), water, wine, tomato juice, or a combination. Wine and alcohol are excellent choices — they add complex flavor and the alcohol cooks off completely during the long cook time. Do NOT count the juice that meat and vegetables release during cooking — they contribute significant additional liquid on their own.
What does NOT count as overfilling: the food itself. The rule is to fill the insert ½ to ¾ full of food, with liquid added on top of that. A pot filled ¾ full of liquid will produce a watery, diluted dish every time.
Here is how the formula scales linearly:
| Meat Weight | Liquid to Add | Fill Level |
|---|---|---|
| 1–2 lbs | ½–1 cup | ½ full |
| 2–4 lbs | 1–2 cups | ½–¾ full |
| 4–6 lbs | 2–3 cups | ¾ full max |
For a 2-lb pot roast: add 1–2 cups of beef broth. For a 4-lb pork shoulder: add 2–3 cups of broth or a mix of broth and wine. Never exceed ¾ full — the steam needs space to circulate.
Rule 2: The Layering Blueprint
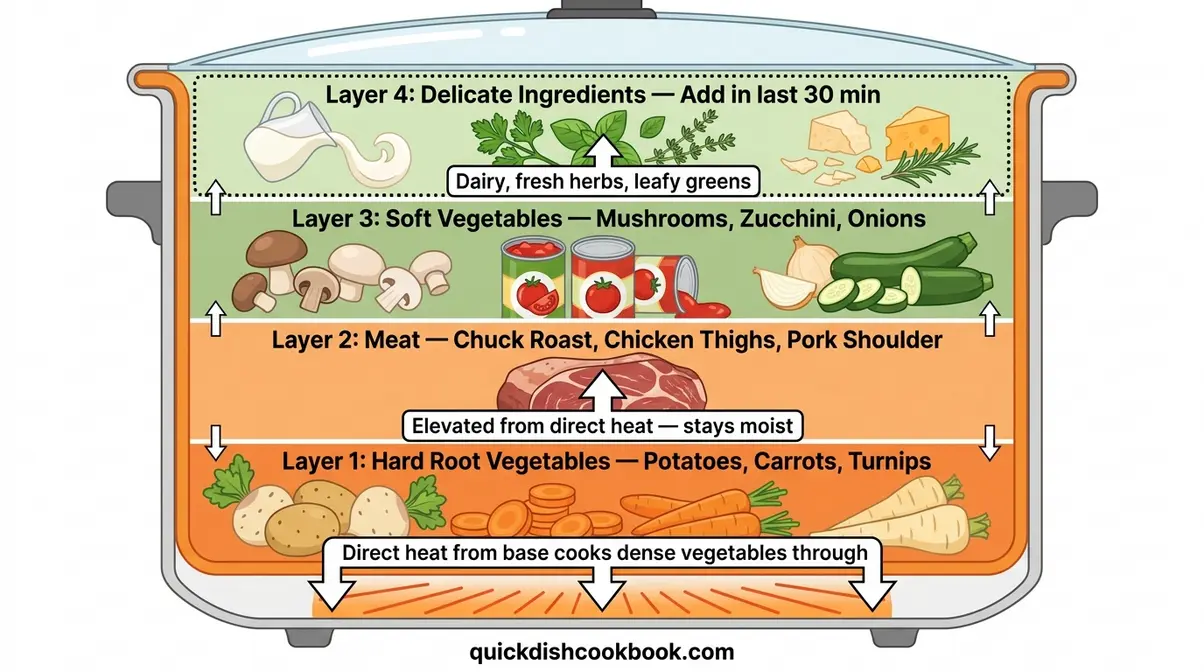
How to layer a slow cooker correctly is one of the most overlooked skills in beginner guides. The order of ingredients directly affects how evenly everything cooks — and getting it wrong is why some vegetables end up mushy while others are still crunchy.
The correct layering order:
- Hard root vegetables on the bottom — potatoes, carrots, parsnips, turnips, sweet potatoes. These take the longest to cook and need direct contact with the heat radiating from the base.
- Meat in the middle — placed on top of the vegetables. This elevates the meat slightly from the direct heat and keeps it moist.
- Softer vegetables on top — mushrooms, zucchini, canned tomatoes, onions. These cook faster and don’t need direct base heat.
- Delicate ingredients added in the last 30 minutes — peas, spinach, fresh herbs, cream, sour cream, cheese.
Why do vegetables go on the bottom? Root vegetables cook more slowly than meat and need the direct heat from the heating element at the base. If you place meat directly on the bottom, it can stick, dry out, or overcook before the vegetables are done.
Ingredients that should NEVER go in for the full cook:
- Dairy — milk, cream, sour cream, and cheese all curdle when exposed to long, sustained heat. Add them in the last 15–30 minutes.
- Fresh herbs — they lose all flavor and turn grey after hours of cooking. Add dried herbs at the start; add fresh herbs at the end.
- Delicate seafood — most fish and shrimp fully overcook in 30–45 minutes. Add them only in the final stretch.
- Leafy greens — spinach, kale, and cabbage turn to mush. Add in the last 20–30 minutes.
For a classic pot roast: potatoes and carrots go in first, then the roast on top, then a can of diced tomatoes, then the beef broth — never the other way around. BBC Good Food also recommends trimming excess fat from meat before slow cooking — fat renders into the cooking liquid and can make the dish greasy.
Can You Put Raw Meat in a Slow Cooker?
Raw meat in a slow cooker is completely safe — and this is the question beginners worry about most. The sustained heat of 170°F–280°F will cook raw meat thoroughly over the course of the recipe. However, searing or browning the meat first adds significant flavor through the Maillard reaction — the chemical process where browning creates hundreds of new flavor compounds that you simply cannot get from slow cooking alone. Searing is optional for food safety, but strongly recommended for flavor.
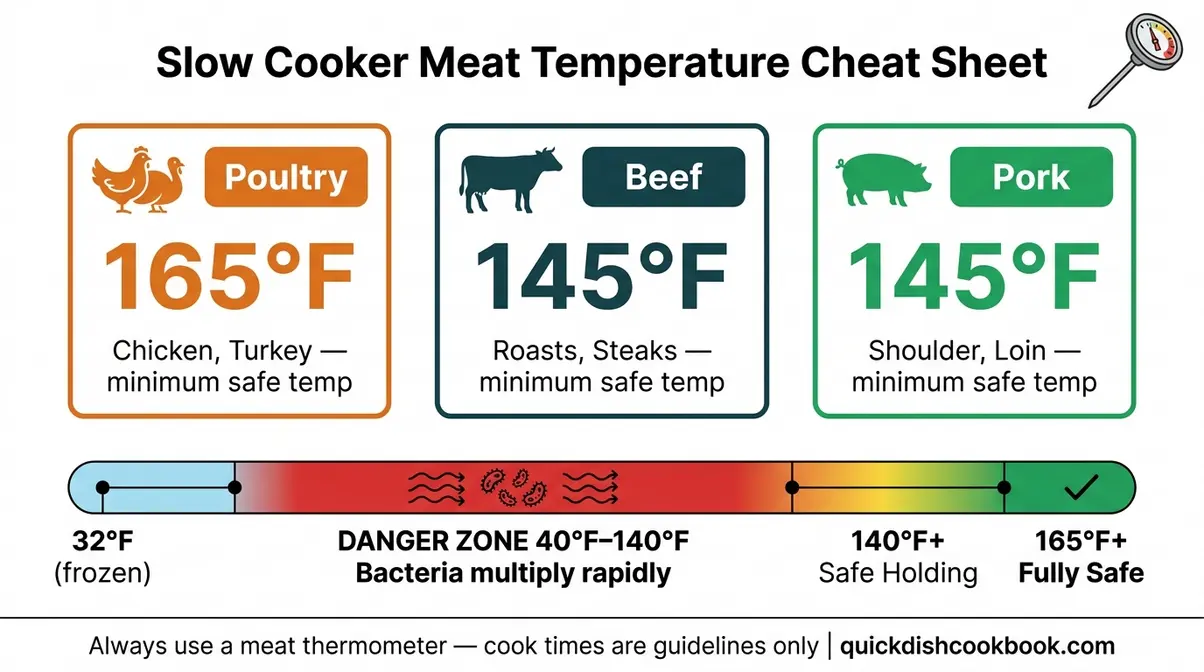
The most important safety concept for slow cooker beginners is the danger zone: 40°F to 140°F. This is the temperature range where harmful bacteria multiply rapidly — doubling in number in as little as 20 minutes, according to USDA FSIS. Slow cookers are specifically designed to move food through this range quickly on startup. According to USDA guidelines on slow cooker temperatures, a properly functioning slow cooker on Low typically reaches 140°F within the first few hours of startup, closing the danger zone window (USDA FSIS, 2026).
⚠️ Food Safety Rule: Always thaw frozen meat completely in the refrigerator before slow cooking. Never place frozen meat directly in the slow cooker — it keeps food in the danger zone (40°F–140°F) too long, creating conditions for bacterial growth.
According to safe thawing practices for slow cooking, frozen meat must be safely thawed in the refrigerator first — placing it directly into the slow cooker frozen is unsafe (FoodSafety.gov, 2026). Frozen meat significantly delays the cooker reaching safe temperatures, extending the time food spends in the danger zone.
Minimum safe internal temperatures — always verify with a meat thermometer, not just the recipe’s stated cook time:
- Poultry (chicken, turkey): 165°F
- Beef and pork: 145°F
- Ground meat: 160°F
According to the minimum safe temperature of 165°F for poultry, use a meat thermometer inserted into the thickest part of the meat to confirm safety before serving (CSU Extension, 2026). A recipe’s stated cook time is a guideline — your thermometer is the final word.
You now have the three rules of The Slow Cooker Safety Triangle. Next: the five mistakes that trip up almost every beginner — and the exact fixes.
Top 5 Beginner Mistakes (and How to Fix Them)
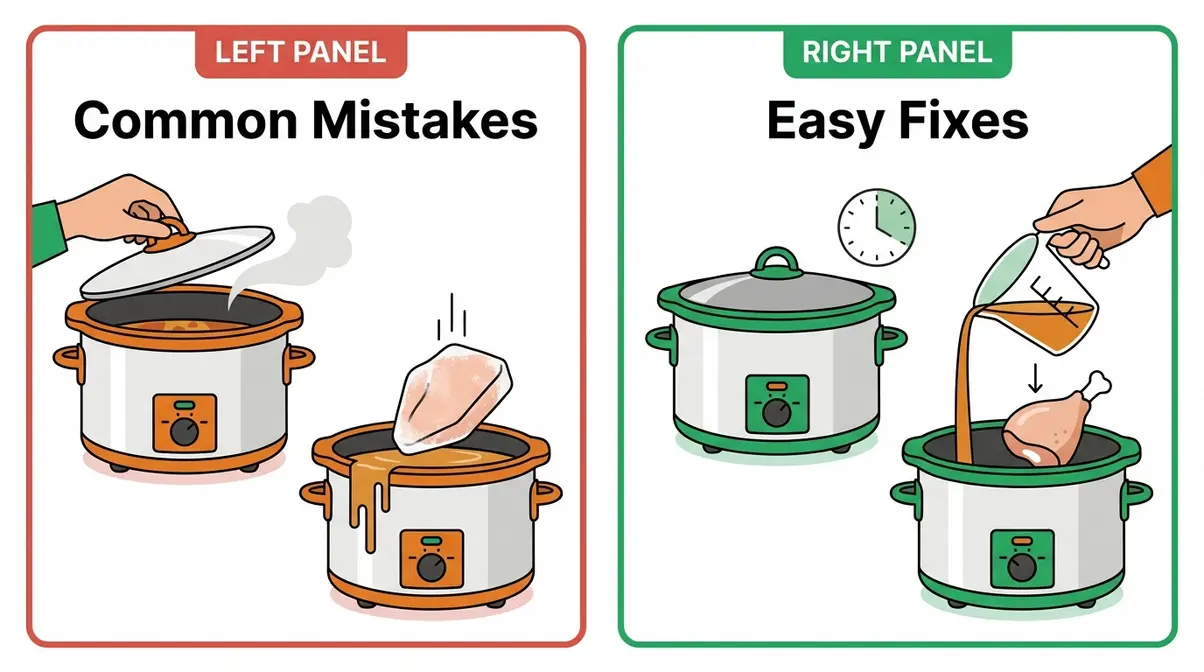
Every slow cooker guide for beginners should warn you about these common pitfalls. Most beginner guides list mistakes without explaining why they happen or what to do about them. This section uses a simple Problem/Why/Fix structure for each mistake so you understand exactly what went wrong — and how to prevent it next time. The Slow Cooker Safety Triangle connects directly to several of these mistakes, so look for those references.
What Are Some Common Mistakes to Avoid?
Before you start cooking, reviewing these five frequent errors will save you from ruined dinners and wasted ingredients.
Mistake #1: Lifting the Lid
Problem: You’re curious (or anxious) about how things are progressing, so you lift the lid to take a peek or give things a stir.
Why it matters: Every time you lift the lid, the internal temperature drops by approximately 10–15°F, according to guidance from the University of Minnesota Extension. That temperature drop can add up to 30 minutes of additional cook time per opening, especially if you do it in the first few hours when the cooker is still building heat. Frequent lid-lifting significantly delays your meal.
Fix: Trust the process. Slow cookers are designed to cook without intervention. Only lift the lid when your recipe specifically instructs it — usually to add a late ingredient. If you need to check doneness, do it once, near the end of the stated cook time, using a meat thermometer through the lid’s steam vent if possible. One quick check near the end of cooking has minimal impact; it’s repeated early lifting that derails your meal.
Mistake #2: Adding Too Much Liquid
Problem: You end up with watery soup instead of a rich, thick stew or roast.
Why it matters: Slow cookers trap steam inside the sealed pot, so liquid does not evaporate the way it does on the stovetop. Meat and vegetables also release significant additional liquid during cooking. If you start with too much liquid, it only increases — producing a thin, diluted dish with no depth of flavor.
Fix: Apply the liquid ratio from The Slow Cooker Safety Triangle: ½ to 1 cup of liquid per pound of meat. If you’re adapting a stovetop or oven recipe, reduce the liquid by one-third. If your dish still turns out watery, fix it with a cornstarch slurry: mix 1 tablespoon of cornstarch with 1 tablespoon of cold water until smooth, stir it into the hot cooking liquid in the last 15–20 minutes, and switch to High. The sauce will thicken as it simmers.
Mistake #3: Not Layering Correctly
Problem: Your potatoes and carrots are still hard when the meat is fully cooked, or your vegetables turn to mush before the meat is done.
Why it matters: Different ingredients cook at different rates. Root vegetables are dense and need the most heat — which comes from the base of the slow cooker. If they’re not in direct contact with the base, they won’t cook through in time. Delicate ingredients placed at the bottom overcook and disintegrate.
Fix: Follow the layering blueprint from The Slow Cooker Safety Triangle: hard root vegetables on the bottom, meat in the middle, softer vegetables on top, and delicate ingredients added in the last 30 minutes. This single change fixes the most common texture complaints from beginners.
Mistake #4: Adding Dairy Too Early
Problem: Your sauce is curdled and grainy, your fresh herbs have turned grey and flavorless, or — more seriously — your dried kidney beans have made someone ill.
Why it matters: Dairy proteins (in milk, cream, sour cream, and cheese) break down and curdle under sustained heat. Fresh herbs lose their volatile oils and turn bitter after hours of cooking. And dried kidney beans contain a naturally occurring toxin called phytohaemagglutinin (PHA) — raw kidney beans can contain 20,000–70,000 hemagglutinating units (hau) of this toxin, which drops to a safe 200–400 hau only after a full boil at 212°F (Kansas State University Extension, 2026). Slow cookers typically reach only 170°F–200°F — well below the boiling point needed to neutralize PHA. At 80°C (176°F), slow cooker temperatures can actually increase PHA toxicity rather than reduce it (Illinois Extension, 2026).
- Fix:
- Add dairy products in the last 15–30 minutes of cooking.
- Add fresh herbs in the last 10–15 minutes; use dried herbs at the start.
- Never add raw or only-soaked dried kidney beans directly to a slow cooker. The safe process: soak dried kidney beans for at least 5 hours, discard the soaking water, then boil in fresh water at a rolling boil for at least 10 minutes (30 minutes is recommended for a full safety margin). Only after boiling are they safe to add to the slow cooker. Canned kidney beans are pre-cooked and safe to use directly.
Mistake #5: Using Frozen Meat
Problem: You pull chicken thighs straight from the freezer and add them to the slow cooker to save time.
Why it matters: This is the mistake that most directly violates The Slow Cooker Safety Triangle. Frozen meat keeps the interior of the cooker in the 40°F–140°F danger zone for an extended period during startup — far longer than thawed meat would. According to USDA FSIS, this extended time in the danger zone creates conditions where harmful bacteria can multiply to unsafe levels before the food ever reaches a safe cooking temperature (USDA FSIS, 2026).
Fix: Thaw all meat completely in the refrigerator before cooking — never on the counter, and never directly from the freezer into the slow cooker. For a quick thaw, use the cold-water method: seal the meat in a watertight bag and submerge in cold water, changing the water every 30 minutes. Cook immediately after thawing. If you forgot to thaw and need dinner tonight, cook the meat by a conventional method (stovetop, oven) instead.
Bonus Mistake: Spices That Become Overpowering
Delicate spices like paprika, cumin, and dried chili flakes intensify over long cook times and can become overwhelming by hour eight. Add robust spices (bay leaves, thyme, rosemary) at the start. Add delicate spices in the last 30–60 minutes to preserve their intended flavor level. Taste before serving and adjust seasoning then.
Your First 4 Foolproof Slow Cooker Recipes
These four recipes were selected specifically for beginners: they use the “dump & go” method, they are forgiving of small timing variations, and they demonstrate the liquid ratio and layering principles from The Slow Cooker Safety Triangle. Start with the pot roast — it is the most classic beginner slow cooker recipe for a reason.
For more inspiration on beginner-friendly meals, trying an easy slow cooker rice recipe is a great next step after you’ve mastered these four.
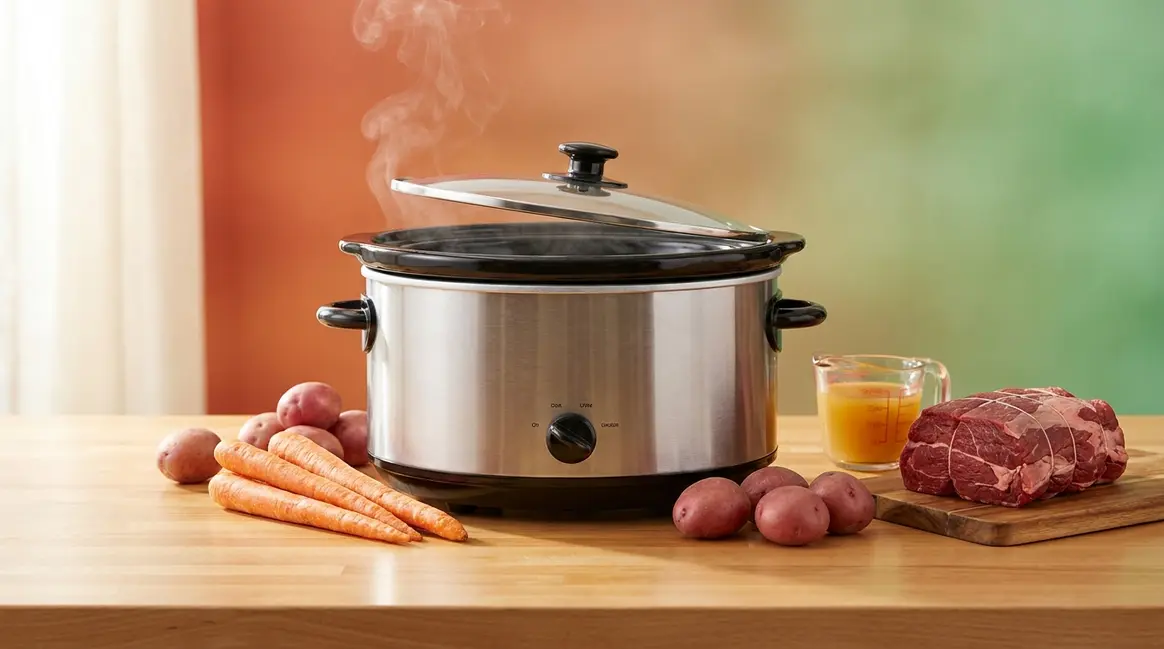
Recipe 1: Classic Slow Cooker Pot Roast
Serves: 4–6 | Prep time: 10 minutes | Cook time: 8–10 hours on Low or 4–5 hours on High
This is the quintessential beginner slow cooker recipe. The chuck roast is an inexpensive, tough cut that becomes fall-off-the-bone tender after a long, slow cook. It demonstrates the layering principle perfectly — and it practically cooks itself.
Ingredients:
- 3 lbs chuck roast
- 4 medium carrots, cut into 2-inch pieces
- 4 medium potatoes, quartered
- 1 medium onion, roughly chopped
- 3 garlic cloves, minced
- 1½ cups beef broth
- 1 tablespoon Worcestershire sauce
- 1 teaspoon dried thyme
- 1 teaspoon dried rosemary
- Salt and pepper to taste
Steps:
- Season the chuck roast generously on all sides with salt and pepper.
- Place the carrots, potatoes, and onion in the bottom of the insert — this is the hard root vegetable layer.
- Place the seasoned chuck roast on top of the vegetables.
- Scatter the minced garlic over the roast.
- In a small bowl or measuring cup, combine the beef broth and Worcestershire sauce. Pour this liquid over the roast — this is your ½ cup per pound of meat.
- Sprinkle the thyme and rosemary over everything.
- Place the lid on the slow cooker. Set to Low for 8–10 hours or High for 4–5 hours.
- Before serving, insert a meat thermometer into the thickest part of the roast. It should read at least 145°F for safe eating. At 8 hours on Low, it will likely be 190°F+ and fully fall-apart tender.
- Remove the roast, slice or shred with two forks, and serve over the vegetables with the cooking juices spooned over the top.
Why this works for beginners: The chuck roast is almost impossible to overcook in a slow cooker. An extra hour on Low makes it more tender, not less. The vegetables act as a natural rack, keeping the meat elevated and moist.
Serving Suggestions: Serve this hearty roast alongside crusty bread to soak up the rich gravy. A side of steamed green beans or a crisp garden salad provides a fresh contrast to the savory beef.
Storage Tips: Store leftovers in an airtight container in the refrigerator for up to 4 days. The flavors often deepen overnight, making it even better the next day.
Recipe 2: Slow Cooker Pulled Chicken
Serves: 4 | Prep time: 5 minutes | Cook time: 6–8 hours on Low or 3–4 hours on High
Pulled chicken is the ultimate “dump & go” slow cooker meal. Five minutes of prep produces tender, shreddable chicken that works in sandwiches, tacos, rice bowls, or salads. It is the most forgiving recipe a beginner can start with.
Ingredients:
- 2 lbs boneless, skinless chicken thighs (thighs stay moister than breasts)
- 1 cup chicken broth
- ½ cup barbecue sauce (your favorite store-bought variety)
- 1 tablespoon garlic powder
- 1 tablespoon onion powder
- 1 teaspoon smoked paprika
- Salt and pepper to taste
Steps:
- Season the chicken thighs on both sides with garlic powder, onion powder, smoked paprika, salt, and pepper.
- Place the seasoned chicken thighs in the insert in a single layer if possible.
- In a small bowl, mix the chicken broth and barbecue sauce together. Pour over the chicken.
- Place the lid on the slow cooker. Set to Low for 6–8 hours or High for 3–4 hours.
- Before serving, insert a meat thermometer into the thickest piece of chicken. It must read at least 165°F — this is the USDA minimum safe internal temperature for poultry (CSU Extension, 2026).
- Use two forks to shred the chicken directly in the insert. Stir the shredded chicken through the cooking juices to coat.
- Serve on toasted buns, over rice, or in warm tortillas.
Why this works for beginners: Chicken thighs contain more fat than breasts, making them naturally more forgiving — they stay moist even if you cook them an extra hour. The liquid ratio here (½ cup broth per pound of chicken) demonstrates the formula in action.
Serving Suggestions: Pile high on brioche buns with a scoop of crunchy coleslaw. Alternatively, use it as a filling for baked potatoes, quesadillas, or a protein-packed salad topping.
Storage Tips: Keep refrigerated for up to 4 days. This chicken freezes exceptionally well; store in freezer-safe bags for up to 3 months and thaw overnight in the fridge before reheating.
Recipe 3: Easy Slow Cooker Chili
Serves: 6 | Prep time: 10 minutes | Cook time: 6–8 hours on Low or 3–4 hours on High
Chili is the perfect slow cooker beginner recipe because it requires almost no technique. Everything goes in the pot, the slow cooker does the work, and the result is a deeply flavored, hearty meal. This recipe uses canned kidney beans — never dried — for safety reasons explained in the Mistakes section.
Ingredients:
- 1.5 lbs ground beef or ground turkey
- 1 can (15 oz) red kidney beans, drained and rinsed — canned only, never raw dried
- 1 can (15 oz) black beans, drained and rinsed
- 1 can (28 oz) crushed tomatoes
- 1 can (14 oz) diced tomatoes
- 1 cup beef broth
- 1 medium onion, diced
- 3 garlic cloves, minced
- 2 tablespoons chili powder
- 1 teaspoon cumin
- 1 teaspoon smoked paprika
- Salt and pepper to taste
Steps:
- Brown the ground beef in a skillet over medium-high heat, breaking it up as it cooks. Drain any excess fat. (Browning first creates deeper flavor through the Maillard reaction — optional but strongly recommended.)
- Add the browned meat to the insert.
- Add the diced onion, minced garlic, both cans of beans, crushed tomatoes, diced tomatoes, and beef broth.
- Add the chili powder, cumin, and smoked paprika. Stir everything together.
- Place the lid on the slow cooker. Set to Low for 6–8 hours or High for 3–4 hours.
- Taste and adjust seasoning in the last 30 minutes — add more chili powder if you want more heat, or a pinch of sugar to balance acidity.
- Serve with cornbread, shredded cheese, sour cream, or fresh cilantro added at the table.
Why this works for beginners: Ground meat is already cooked before it enters the slow cooker, eliminating any raw meat safety concerns. Canned beans are pre-cooked and safe. The crushed tomatoes provide a significant portion of the liquid, so you only need 1 cup of added broth — demonstrating that ingredient liquid content counts toward your total.
Serving Suggestions: Create a chili bar with bowls of shredded cheddar cheese, diced red onions, jalapeño slices, and sour cream. Serve with warm tortilla chips or freshly baked cornbread.
Storage Tips: Chili is the ultimate make-ahead meal. Store in the fridge for up to 5 days, or freeze in individual portions for quick weeknight dinners over the next 3 months.
Recipe 4: Beginner-Friendly Vegetable Stew
Serves: 4–6 | Prep time: 15 minutes | Cook time: 6–8 hours on Low
If you want a meatless option that is virtually impossible to mess up, this vegetable stew is the perfect starting point. It requires minimal prep and delivers maximum comfort.
Ingredients:
- 1 medium butternut squash, peeled and cubed
- 3 large carrots, sliced into rounds
- 2 medium potatoes, diced
- 1 can (15 oz) chickpeas, drained and rinsed
- 1 can (14 oz) diced tomatoes, undrained
- 2 cups vegetable broth
- 1 medium onion, diced
- 2 cloves garlic, minced
- 1 tablespoon Italian seasoning
- Salt and pepper to taste
Steps:
- Place the cubed butternut squash, carrots, and potatoes at the bottom of the slow cooker insert.
- Add the diced onion, minced garlic, and chickpeas on top of the root vegetables.
- Pour in the diced tomatoes (with their juices) and the vegetable broth.
- Sprinkle the Italian seasoning, salt, and pepper evenly over the top. Stir gently to combine.
- Cover and cook on Low for 6–8 hours, or until the root vegetables are completely fork-tender.
- Taste the broth before serving and adjust the salt and pepper if necessary.
Why this works for beginners: Vegetables are incredibly forgiving and won’t overcook easily on the Low setting. The chickpeas add satisfying protein without the food safety concerns associated with handling raw meat.
Serving Suggestions: Serve steaming hot with a sprinkle of grated Parmesan cheese (or a vegan alternative) and a thick slice of garlic toast for dipping.
Storage Tips: Refrigerate for up to 4 days. The starchy vegetables will naturally thicken the broth as it sits in the fridge, creating an even richer texture upon reheating.
Oven-to-Slow-Cooker Recipe Conversion Guide
One of the most powerful beginner slow cooker tips is learning to adapt your existing favorite oven recipes. Most casseroles, braises, and stews convert easily — you just need two simple rules.
The two conversion rules:
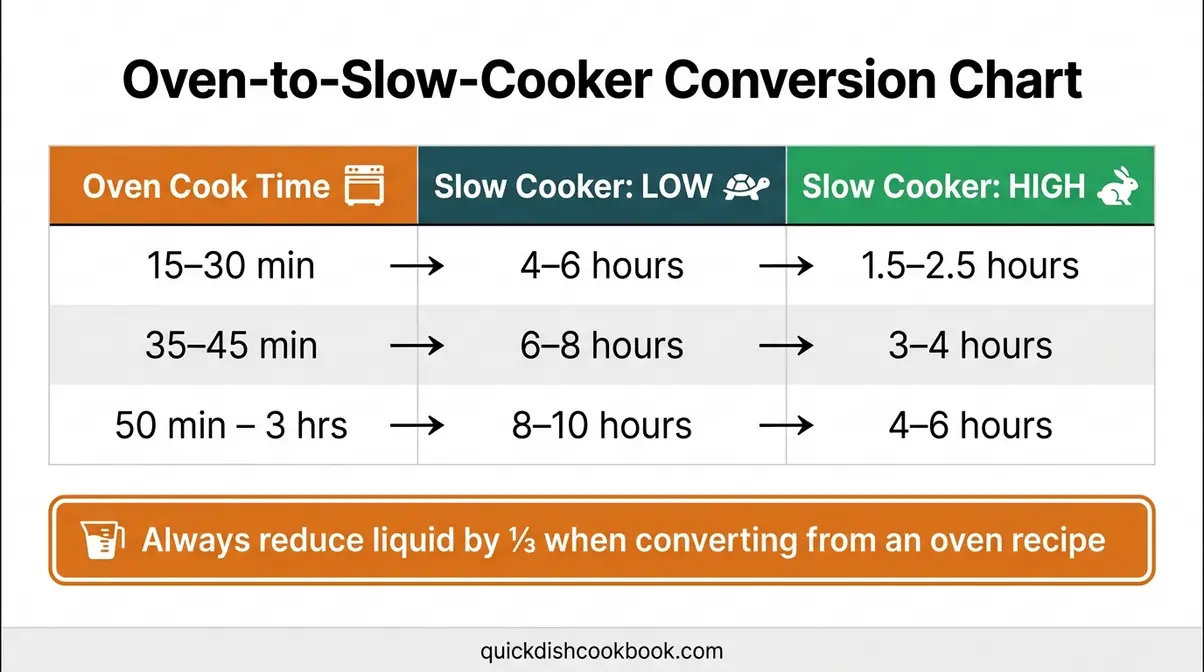
- For the Low setting: divide the oven cooking time by 4, then use a 325°F oven as your benchmark. An oven recipe that takes 2 hours at 325°F converts to approximately 8 hours on Low.
- For the High setting: divide the oven cooking time by 2. That same 2-hour oven recipe converts to approximately 4 hours on High.
Always reduce liquid by one-third when converting from an oven recipe. Oven dishes lose significant liquid to evaporation; slow cookers lose almost none (BBC Good Food, 2026).
Here is the full conversion chart, based on Pillsbury’s tested conversion guidelines (Pillsbury, 2026):
| Oven Cook Time | Slow Cooker: Low | Slow Cooker: High |
|---|---|---|
| 15–30 minutes | 4–6 hours | 1.5–2.5 hours |
| 35–45 minutes | 6–8 hours | 3–4 hours |
| 50 minutes–3 hours | 8–10 hours | 4–6 hours |
Practical conversion notes:
- Soups and stews convert almost perfectly. Use the chart above and reduce liquid by a third.
- Baked goods (cakes, breads) do not convert well — the sealed moisture environment produces a steamed rather than baked texture.
- Pasta and rice should be added in the last 30–45 minutes of cooking to prevent mushiness.
- Whole chicken converts well — 6–8 hours on Low for a 4-lb bird, elevated on a bed of root vegetables.
The conversion formula is not a rigid law — it’s a starting point. The first time you adapt a recipe, check doneness 30 minutes before the converted end time. Every slow cooker runs slightly differently, and your insert size affects cook times as well.
Troubleshooting: When Slow Cooker Meals Go Wrong
Even with The Slow Cooker Safety Triangle in place, things occasionally go sideways. Here are the five most common problems beginners encounter — and exactly how to fix them.
Problem 1: My Sauce Is Too Watery
What happened: Too much liquid was added at the start, or the ingredients released more liquid than expected during cooking.
Fix: Mix 1 tablespoon of cornstarch with 1 tablespoon of cold water until smooth to make a slurry. Stir the slurry into the hot cooking liquid in the last 15–20 minutes of cooking. Switch to High and leave the lid slightly ajar to allow some steam to escape. The sauce will thicken within 15–20 minutes. For a thicker result, repeat with a second tablespoon of slurry. Alternatively, remove the lid and cook on High for the final 30 minutes to reduce the liquid naturally.
Problem 2: Power Outages
What happened: You came home to a slow cooker that had been off for an unknown period of time.
Fix: According to USDA FSIS, if you were not home during the entire cooking process and the power went out at any point, throw away the food — even if it looks done (USDA FSIS, 2026). You cannot determine how long the food sat in the danger zone (40°F–140°F). If you were home when the power went out and the food was still raw or partially cooked, immediately transfer it to a gas stove, outdoor grill, or another location with power to finish cooking. If the food was already fully cooked before the outage, it is safe for approximately 2 hours in the unpowered slow cooker before it must be discarded.
Problem 3: My Dairy Sauce Curdled
What happened: Cream, milk, sour cream, or cheese was added at the start of the cook and broke down under the sustained heat.
Fix: Unfortunately, curdled dairy cannot be fully reversed. For next time, add all dairy products in the last 15–30 minutes of cooking on Low. If you want a creamy sauce, stir in room-temperature sour cream or heavy cream after turning the slow cooker off — residual heat is enough to warm and incorporate dairy without curdling it.
Problem 4: Meat Is Tough
What happened: The meat didn’t cook long enough, or the wrong cut was used.
Fix: Tough meat in a slow cooker almost always means more time is needed. Add another 1–2 hours on Low and check again. This is the opposite of oven cooking — more time in the slow cooker makes tough cuts more tender, not less. If you’re using a naturally lean cut (chicken breast, pork loin), switch to chicken thighs or pork shoulder next time. Lean cuts have less connective tissue to dissolve and can dry out in a slow cooker even when cooked correctly.
Problem 5: My Food Tastes Bland
What happened: The long cook time muted the spices, or insufficient seasoning was added at the start.
Fix: Always taste and adjust seasoning in the last 30 minutes. Add salt, pepper, and a splash of acid (a squeeze of lemon juice or a dash of vinegar) to brighten flavors that have become flat. For next time: season the meat before it goes in, use a flavorful liquid (stock rather than water), and consider browning the meat first — the Maillard reaction adds a depth of flavor that slow cooking alone cannot replicate. Robust dried herbs (thyme, rosemary, bay leaves) added at the start perform well; delicate spices (paprika, cumin) should be added in the last hour.
Frequently Asked Questions
What should I cook in a slow cooker as a beginner?
Start with pot roast, pulled chicken, or chili — these three recipes are the most forgiving for beginners. Tough, inexpensive cuts like chuck roast and chicken thighs perform best because their connective tissue breaks down beautifully over long, slow heat. Soups, stews, and braised meats are ideal starting points. Avoid delicate fish, pasta (add in the last 30 minutes), and dairy-heavy sauces until you’re comfortable with the basics. Community consensus from r/slowcooking consistently identifies pot roast and pulled chicken as the best first slow cooker meals.
What are the most common slow cooker mistakes to avoid?
The five most common mistakes are: (1) lifting the lid during cooking — this drops the internal temperature by 10–15°F and can add up to 30 minutes per opening (University of Minnesota Extension); (2) adding too much liquid — use ½ to 1 cup per pound of meat; (3) incorrect layering — root vegetables on the bottom, meat in the middle; (4) adding dairy or dried beans too early — both need special timing; and (5) cooking from frozen — always thaw meat completely in the refrigerator first (USDA FSIS, 2026). Avoiding these five mistakes eliminates the vast majority of beginner problems.
What liquid should I put in a slow cooker?
Use ½ to 1 cup of stock, broth, or water per pound of meat — that is the foundational liquid ratio. Chicken broth, beef broth, vegetable broth, and water all work well. Wine and tomato juice add excellent flavor and also count as liquid. Do not use dairy (milk, cream) as your primary liquid — it will curdle. Do not overfill: the sealed lid traps steam, so liquid does not evaporate the way it does in an oven. Fill the insert ½ to ¾ full of food, with liquid added on top of the food layer, never exceeding ¾ full total (Consumer Reports, 2026).
What should you never put in a slow cooker?
Never add frozen meat, raw dried kidney beans, or excess dairy for a full cook. Frozen meat extends the time food spends in the 40°F–140°F danger zone, risking bacterial growth (USDA FSIS, 2026). Raw dried kidney beans contain phytohaemagglutinin (PHA), a toxin that slow cookers cannot neutralize — boil them for at least 10 minutes first, or use canned beans (Kansas State University Extension, 2026). Dairy curdles under sustained heat; add it in the last 15–30 minutes. Also avoid delicate seafood (overcooks quickly), fresh herbs at the start (lose all flavor), and pasta added too early (turns to mush).
Can you put raw meat straight into a slow cooker?
Yes — raw meat is safe in a slow cooker because the sustained heat of 170°F–280°F thoroughly cooks it over the recipe’s duration. Always ensure the meat reaches a minimum safe internal temperature: 165°F for poultry and 145°F for beef and pork, verified with a meat thermometer (CSU Extension, 2026). However, searing raw meat in a hot pan for 2–3 minutes per side before adding it to the slow cooker significantly improves flavor through the Maillard reaction. Searing is optional for safety but recommended for taste.
Can you slow cook on a Weber grill?
Weber grills can approximate slow cooking using the indirect heat method — place coals on one side, food on the other, and maintain a temperature of 225°F–275°F with the lid closed. This mimics the low, slow heat of a slow cooker for large cuts like brisket and pork shoulder. However, it requires active temperature monitoring and charcoal management throughout the cook, which is the opposite of the “set-and-forget” experience a countertop slow cooker provides. For beginners, a dedicated slow cooker appliance is far simpler.
Can you use a Zojirushi rice cooker as a slow cooker?
Some Zojirushi models include a “slow cook” or “porridge” setting that operates at low temperatures for extended periods, which can approximate slow cooker results for certain recipes. However, most Zojirushi rice cooker inserts are smaller than a dedicated slow cooker, and the temperature control is less precise. For dedicated slow cooker recipes — especially large cuts of meat — a purpose-built slow cooker will deliver more reliable results. Check your specific Zojirushi model’s manual for slow cook temperature settings before attempting.
Common Pitfalls and When to Get Help
Common Pitfalls
Pitfall 1: Starting on “Warm” instead of “Low” or “High.” If your dish is still raw after several hours, check whether the cooker was accidentally left on the Warm setting. Warm only holds already-cooked food above 140°F — it cannot bring raw food to a safe temperature. Always start cooking on Low or High.
Pitfall 2: Halving a recipe without adjusting liquid. When you halve a recipe for one or two servings, do not simply halve the liquid. A smaller amount of food in a large insert loses more moisture proportionally. Start with ¾ of the original liquid, then adjust next time. Also ensure the insert is at least one-third full — too little food in a large insert cooks too quickly and dries out.
Pitfall 3: Adding pasta or rice at the beginning. This produces a gluey, starchy mush. Pasta should be added in the last 20–30 minutes; rice in the last 30–45 minutes. Alternatively, cook grains separately and serve the slow cooker contents over them.
Pitfall 4: Overcrowding the insert. Filling the insert more than ¾ full prevents even heat circulation and can cause the lid to leak. The food needs room to expand and for steam to circulate. If you have too many ingredients, split into two batches or use a larger insert.
Pitfall 5: Skipping the meat thermometer check. Cook times in recipes are guidelines, not guarantees. Every slow cooker runs slightly differently. Always verify safe internal temperatures with a thermometer — especially for poultry, which must reach 165°F (CSU Extension, 2026).
When to Choose an Alternative Method
For delicate fish and seafood: A slow cooker is the wrong tool. The prolonged heat overcooks most fish to a dry, crumbly texture. Use the stovetop or oven instead for a 10–15 minute cook.
For crispy results: Slow cookers produce moist, braised results — not crispy skin or caramelized crusts. For crispy chicken skin or roasted vegetables with color, finish the slow cooker result under a broiler for 3–5 minutes after cooking.
For very small quantities (under 1 lb of meat): A small amount of food in a standard 6-quart slow cooker can overcook quickly. Use a stovetop or a smaller 1.5–2 quart slow cooker instead.
When to Seek Help
If you are cooking for someone who is immunocompromised, pregnant, elderly, or very young, always verify internal temperatures with a calibrated thermometer and follow USDA guidelines strictly — do not rely on recipe times alone. For questions about specific food safety scenarios, the USDA Meat and Poultry Hotline (1-888-674-6854) provides free guidance Monday through Friday.
Frequently Asked Questions (continued)
(See the FAQ section above for answers to the five core PAA questions.)
Your Slow Cooker Journey Starts Today
For anyone who has stared at a slow cooker in their kitchen and felt overwhelmed, here is the bottom line: this is the most forgiving cooking appliance you will ever own. This slow cooker guide for beginners has given you the tools to succeed. Slow cookers cook safely between 170°F and 280°F, require no active monitoring, and transform inexpensive cuts of meat into tender, flavorful meals. The key is applying three evidence-backed principles — the liquid ratio of ½ to 1 cup per pound of meat, the correct layering order with root vegetables at the base, and verified safe internal temperatures using a meat thermometer (USDA FSIS, 2026; CSU Extension, 2026).
The Slow Cooker Safety Triangle — right liquid, correct layers, verified temperature — removes the guesswork that makes beginners anxious. It is not a rigid recipe; it is a framework you apply to every meal you make. Once you’ve internalized these three points, you can adapt almost any recipe with confidence. The troubleshooting section covers the edge cases, and the conversion chart handles your existing favorites.
Your next step is simple: pick one recipe from this guide and cook it this week. Start with the pot roast or pulled chicken — both are genuinely “dump & go,” and both demonstrate every principle covered here. Trial the recipe once before committing it to a dinner party or a weeknight when time is tight. After one successful cook, the anxiety disappears and the convenience takes over. Welcome to the world of set-and-forget cooking.

quickdishcook
Recipe developer and writer at Quick Dish Cookbook.