How Long to Cook Pork Shoulder at 250°F [Chart]
If you’re on the hunt for a meal that’s hearty, satisfying, and brimming with flavor, look no further than a perfectly cooked pork shoulder. This cut of meat, known for its ...

What’s in this guide
- What You'll Need Before You Start
- Step 1: Calculate Your Exact Cook Time at 250°F
- Step 2: Prep Your Pork Shoulder for the Cook
- Step 3: Set Up Your Smoker or Oven
- Step 4: Navigate the Temperature Stall
- Step 5: Check Doneness and Rest the Meat
- Step 6: Pull and Serve
- Alternative Cooking Methods
- Troubleshooting Common Problems
- Frequently Asked Questions
- Conclusion
You’ve committed to a pork shoulder cook for tomorrow. You’ve checked three different websites, and every single one says “1.5 to 2 hours per pound” — which means you’re now staring at your 8 lb shoulder and wondering whether to set an alarm for 3am or midnight.
Here’s what those websites don’t tell you: two pork shoulders of the same weight, cooked at the same temperature, can finish two hours apart. Weight is just one variable. The stall, your cooking environment, bone structure, and starting temperature all push that timeline in ways nobody warns you about until it’s too late.
By the end of this guide, you’ll know exactly when to start your cook, how to handle the stall, and how to pull tender, juicy pork every single time. This guide covers a weight-specific timing chart comparing smoker vs. oven, a six-step process for how long to cook pork shoulder at 250°F, alternative methods, and a full FAQ for every common timing question.
What You’ll Need Before You Start
Before your first step, gather everything on this list. The single most important item is the thermometer — cooking pork shoulder by time alone is one of the most common reasons cooks end up with dry or undercooked meat.
- Equipment:
- Smoker or oven — A smoker (pellet, offset, or kettle) adds smoke flavor and bark; an oven works just as well for tender pulled pork, just with a softer exterior
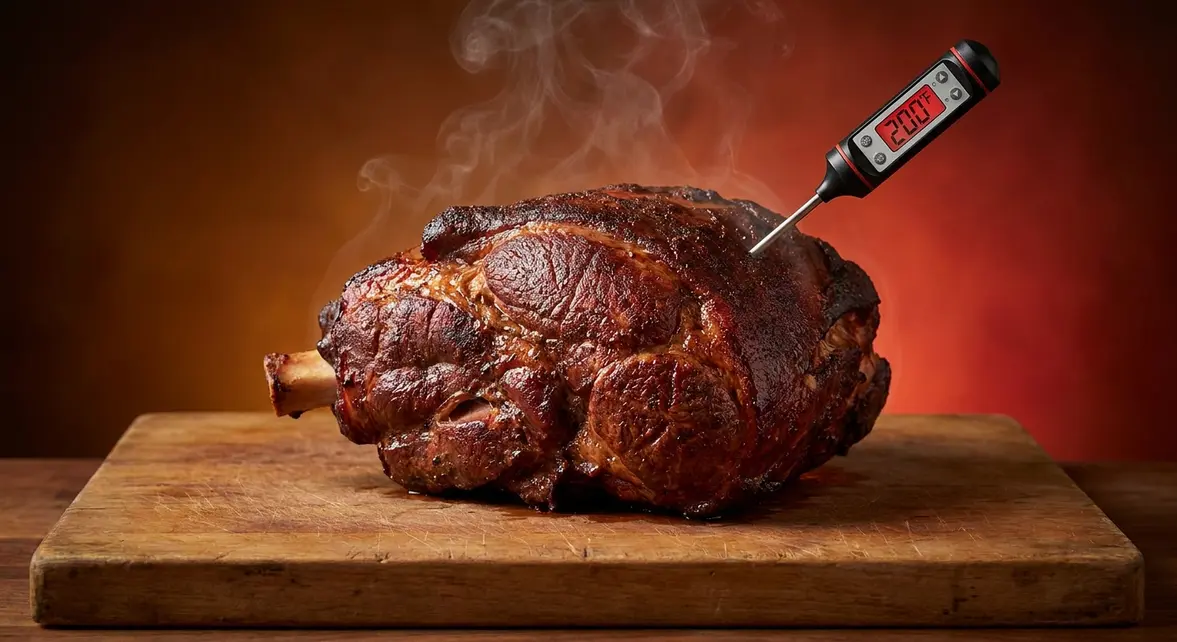
- Instant-read thermometer — Non-negotiable. This is the only reliable way to know when your pork is done. Time estimates are planning tools; temperature is your finish line
- Aluminum foil or butcher paper — For wrapping during the stall (explained in Step 4)
- Roasting pan with lid or Dutch oven — For oven cooks; a covered pan traps humidity and speeds the cook
- Cooler or insulated bag — For resting the finished shoulder (critical — do not skip this)
- Ingredients:
- Pork shoulder (also called pork butt or Boston butt) — Despite the name, this cut comes from the upper shoulder, not the rear. A 6–10 lb bone-in shoulder is the most common size for pulled pork
- Dry rub of your choice — Salt, pepper, garlic powder, paprika, and brown sugar is a reliable starting point
- Yellow mustard (optional binder) — Helps the rub stick; the mustard flavor cooks off completely
- Apple juice (optional) — For spritzing on the smoker every 45–60 minutes
Time commitment: Add 30–60 minutes of prep time, your full cook window from the timing chart in Step 1, and 1–2 hours of resting time. Budget a total of 14–24 hours from start to table for an 8–10 lb shoulder.
Step 1: Calculate Your Exact Cook Time at 250°F
To cook pork shoulder at 250°F, plan for 1.5 to 2 hours per pound as your baseline estimate. An 8 lb shoulder takes 10–13 hours on the smoker or 12–16 hours in the oven. A 10 lb shoulder takes 13–16 hours on the smoker or 15–20 hours in the oven. Always cook to an internal temperature of 195–205°F — time is a planning tool, not a guarantee.
250°F is the sweet spot for low-and-slow cooking. It’s faster than the longer 225°F method and gentler than the 275°F hot-and-fast approach. At this temperature, fat renders slowly and collagen breaks down into gelatin, producing the pull-apart texture that defines great pulled pork.
This is where The 250°F Precision Method begins. The framework treats time as a planning tool and internal temperature as the real finish line. Instead of chasing a single number on the clock, you’re managing three variables — timing, stall awareness, and resting protocol — as one connected system.
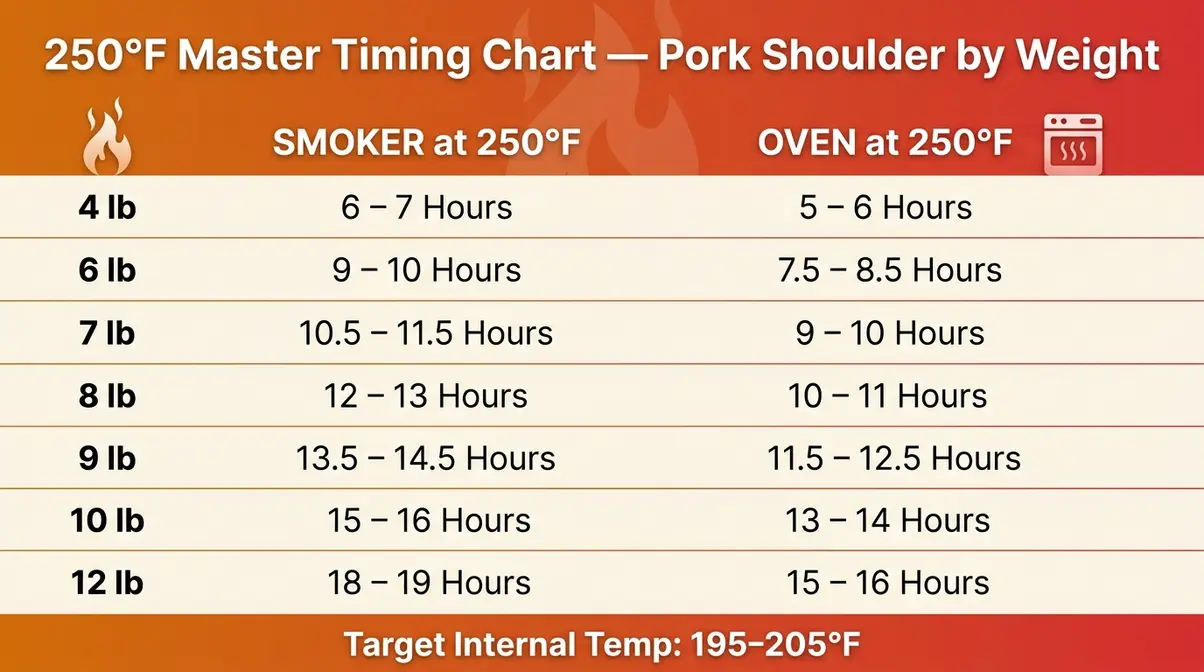
The 250°F Master Timing Chart
The table below shows estimated cook times for pork shoulder at 250°F, comparing smoker vs. oven by weight. Smoker times assume a stable pit running steady at 250°F with no major temperature swings. Oven times assume a covered roasting pan at 250°F. Times begin when the cooking environment reaches 250°F — not when the meat goes in.
| Weight | Smoker Time | Oven Time | Target Internal Temp |
|---|---|---|---|
| 4 lb | 5–7 hrs | 6–9 hrs | 195–205°F |
| 6 lb | 7–9 hrs | 9–12 hrs | 195–205°F |
| 7 lb | 10–13 hrs | 10.5–14 hrs | 195–205°F |
| 8 lb | 10–13 hrs | 12–16 hrs | 195–205°F |
| 9 lb | 11–14 hrs | 13.5–18 hrs | 195–205°F |
| 10 lb | 13–16 hrs | 15–20 hrs | 195–205°F |
| 12 lb | 15–19 hrs | 18–24 hrs | 195–205°F |
A 7 lb shoulder on the smoker at 250°F? Budget 10–13 hours and use your thermometer to confirm doneness. Bone-in shoulders add 30–60 minutes to the total cook time; boneless cuts run slightly faster. Note that smoker times at 250°F are generally faster than oven times at the same temperature — see the “What Affects Your Cook Time?” section below for why.
These ranges exist for a reason. As the BBQ community puts it:
“Every pork butt cooks different. You can cook two, same weight, same time and one can take 1 to 2 hrs longer.” — BBQ Smoking Community
That’s not a flaw in the process — it’s the nature of the cut. The timing chart gives you a planning window; the thermometer tells you when you’ve actually crossed the finish line. According to the Destination BBQ timing guide, time-per-pound estimates at 250°F are best treated as a planning range, with internal temperature serving as the definitive doneness indicator.
What Affects Your Cook Time?
Several variables push your cook toward the longer or shorter end of the range. Knowing them lets you mentally adjust your own timeline before the cook begins.
| Variable | Time Impact |
|---|---|
| Bone-in vs. boneless | Bone-in adds 30–60 minutes |
| Cold pork from fridge | Adds 30–45 minutes vs. room-temp start |
| Smoker temperature swings | Fluctuating 225–275°F adds 1–2 hours vs. steady 250°F |
| Thick fat cap | Adds 20–30 minutes (acts as insulation) |
| The stall (Step 4) | Adds 1–3 hours if you don’t wrap |
| Oven vs. smoker | Oven runs 1–2 hours longer than smoker at same temp (see below) |
Why does the oven run longer than the smoker at the same temperature? Smokers have constant airflow that accelerates evaporation from the meat’s surface — this actually speeds the cook through the stall phase more efficiently. The covered oven traps humidity, which slows evaporation but also slows the overall cook. We’ll cover the full science in Step 4.
Checkpoint: You now have your estimated start time. Write it down — and add a 2-hour buffer for the unexpected.
With your timing locked in, the next step determines whether your pulled pork is extraordinary or just okay: the prep.
Step 2: Prep Your Pork Shoulder for the Cook
The 30 minutes you spend on prep will pay dividends 16 hours later. Two things happen during prep: you build the flavor foundation, and you protect the meat from drying out during the long cook. Skipping either one shows up on the plate.
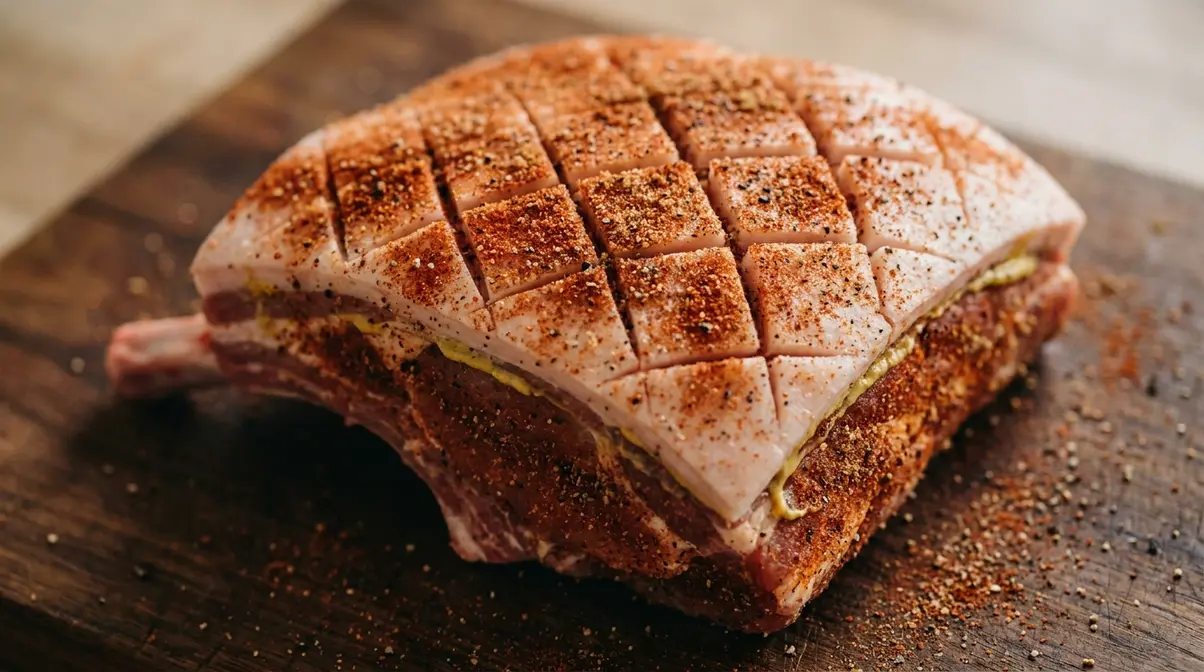
How to Trim and Season Your Pork Shoulder
Follow these steps in order before your shoulder goes anywhere near heat.
- Step 2a — Trim: Remove any hard, thick chunks of white fat (they won’t render at 250°F and will just sit there). Leave a ¼-inch fat cap on top of the shoulder — this layer acts as a self-basting shield, keeping the meat moist throughout the long cook. Barbecue experts widely agree that ¼ inch is the ideal fat cap thickness: enough to protect and flavor the meat, not so much that it blocks the rub (BBQHost, 2026).
- Step 2b — Score: Use a sharp knife to cut a crosshatch (diamond) pattern across the fat cap. Cut about ¼ inch deep into the fat — not into the meat itself. This allows the rub to penetrate the fat layer and helps it render more evenly during the cook.
- Step 2c — Bind: Coat the entire shoulder in a thin layer of yellow mustard. The mustard acts as a binder — a sticky surface that helps the rub adhere to the meat. It also burns off completely during the cook, leaving zero mustard flavor in the final pulled pork. This is one of the most common beginner concerns, and the answer is: you won’t taste it at all.
- Step 2d — Season: Apply your dry rub generously on all sides, pressing it firmly into the scored fat cap. Make sure every surface is coated.
- Step 2e — Rest: Let the seasoned shoulder sit at room temperature for 30–60 minutes before it goes into the smoker or oven. Cold pork straight from the fridge adds 30–45 minutes to your cook time — a brief room-temperature rest reduces that gap.
According to the Extraordinary BBQ prep guide, these prep steps — particularly the fat trim, scoring, and binder application — are what separate a deeply flavored bark from a pale, under-seasoned exterior.
Checkpoint: Your shoulder should be coated in rub, sitting at room temperature, and ready to go. You should NOT see large chunks of hard white fat — those have been trimmed.
These prep steps are what separate good pulled pork from great pulled pork.
Your shoulder is prepped. Now let’s get your cooking environment ready.
Step 3: Set Up Your Smoker or Oven
How long to cook pork shoulder in the oven at 250 degrees depends heavily on how well you set up the environment first. Whether you’re using a smoker or an oven, the goal is the same: a stable 250°F environment from the moment the meat goes in until it’s done.
Smoker Setup at 250°F
In our test cooks at quickdishcookbook.com, we found that maintaining a stable pit temperature is the single most important factor for success. If you are wondering exactly how long to cook pork shoulder at 250°F, remember that temperature swings will drastically alter your timeline.
- Preheat your smoker to 250°F and hold it there for 15–20 minutes before adding the meat. You want the pit to be fully stable — not still climbing.
- Add wood: Hickory delivers bold, classic BBQ flavor. Apple or cherry adds a sweeter, milder smoke. A 50/50 hickory-apple mix is a reliable starting point for pulled pork.
- Place the shoulder fat-cap-up on the grate. “Fat-cap-up” means the white fat layer faces the ceiling of the cooker — it bastes the meat as it slowly renders down.
- Keep the lid closed. Every time you open the smoker, you lose heat and add time. User consensus from BBQ communities suggests each unnecessary peek adds 10–15 minutes to the cook.
- Spritz with apple juice every 45–60 minutes during the first 3 hours. This builds moisture on the surface and helps develop the dark, flavorful crust called bark (the exterior coating of seasoned, caramelized meat).
- Monitor your pit temperature throughout. A smoker running steady at 250°F the whole cook is significantly faster than one that swings between 225°F and 275°F.
Checkpoint: Smoker is at 250°F, meat is on the grate fat-cap-up, and your cook timer has started. You should see thin blue smoke — not thick white smoke. Thick white smoke imparts a bitter flavor.
Oven Setup at 250°F
- Preheat your oven to 250°F.
- Place the seasoned shoulder fat-cap-up in a roasting pan or Dutch oven.
- Cover tightly with aluminum foil or the lid. The sealed environment traps steam from the meat, which slows surface evaporation — and that’s exactly why oven cooks run 1–2 hours longer than smoker cooks at the same temperature. The trade-off: you get a more tender, moist result with less attention required.
- No spritzing needed — the covered pan retains moisture naturally.
- For crispier bark: Remove the foil for the final 60–90 minutes of the cook. This allows the surface to dry out and firm up.
For a full oven-specific walkthrough, see our complete oven guide for pork shoulder at 250°F.
For more on the oven method with detailed timing and doneness guidance, 101 Cooking for Two oven pulled pork is an excellent reference, noting that a 4 lb boneless shoulder at 250°F takes approximately 8–9 hours in a covered pan (101 Cooking for Two, 2026).
Checkpoint: Oven is at 250°F, pork is in a covered pan fat-cap-up. Set a timer for 4 hours before you expect to check the internal temperature.
Your cook is underway. In a few hours — whether you’re watching a smoker or waiting on an oven — you’re going to hit the wall that trips up every first-time cook: the stall.
Step 4: Navigate the Temperature Stall
The stall is the moment that turns confident first-timers into anxious ones. You’ve been watching the internal temperature climb steadily for hours, and then — nothing. It just stops. Sometimes it even drops a degree or two. This is completely normal, and The 250°F Precision Method treats it as an expected phase of the cook, not a crisis.
What Is the Stall?
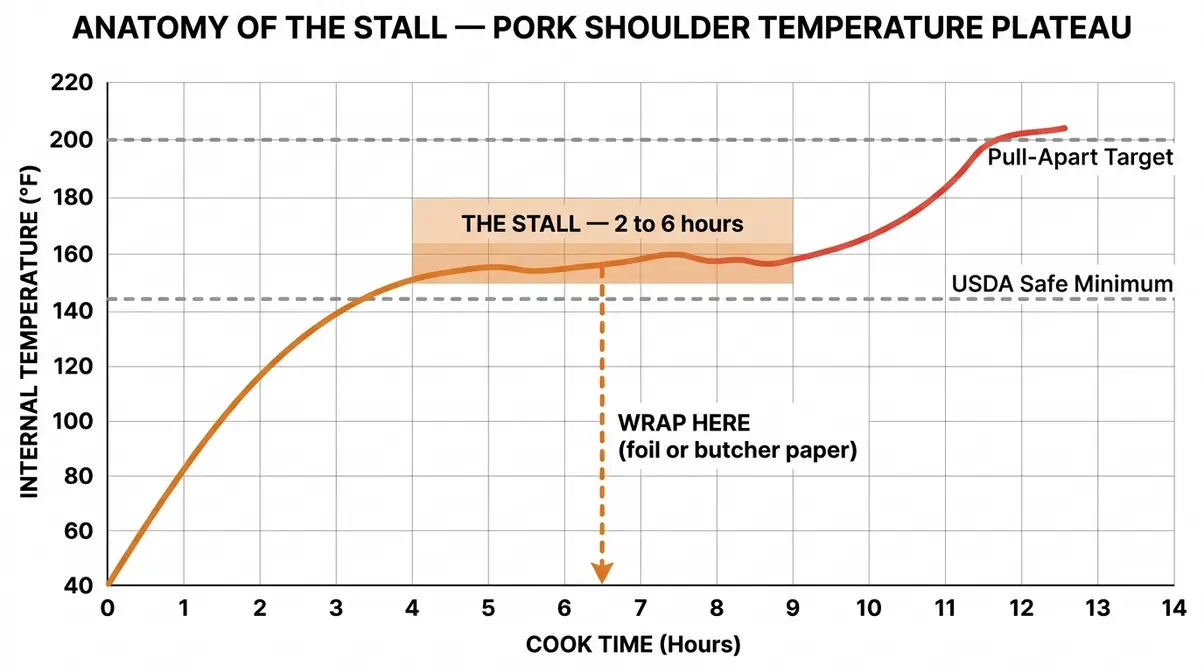
The stall is the temperature plateau where the internal temperature of the pork shoulder stops rising — typically occurring between 150–165°F — and holds steady for anywhere from 2 to 6 hours (Pitmaster Tools, 2026; Serious Eats, 2026).
Think of it like your body sweating on a hot day. As the meat heats up, moisture travels to the surface and evaporates. That evaporation cools the surface at almost exactly the same rate the smoker is heating the interior. The result is a temperature deadlock — the meat is still cooking internally, but the thermometer doesn’t move. According to Serious Eats’ collagen breakdown analysis, the stall happens when “the cooling effect of moisture evaporating off the surface of the meat is just enough to offset any further temperature gains” — a natural consequence of low-and-slow cooking, not a malfunction (Serious Eats, 2026).
The collagen inside the shoulder is still breaking down during the stall. The meat is still cooking. Patience here is the difference between tender pulled pork and a tough, undercooked shoulder.
Your Wrap Strategy: Foil vs. Butcher Paper vs. Unwrapped
Once your shoulder hits the stall (around 150–165°F), you have three options. The 250°F Precision Method recommends wrapping for most cooks — especially first-timers — because it eliminates the variable that most commonly blows up a timeline.
| Method | Speed | Bark | Recommended For |
|---|---|---|---|
| Foil (Texas Crutch) | Fastest | Softer | Beginners, tight timelines |
| Butcher Paper | Middle | Preserved | Intermediate cooks |
| Unwrapped | Slowest | Hardest | Experienced cooks with time |
Option 1 — Foil (Texas Crutch): Wrap the shoulder tightly in two layers of heavy-duty foil at around 165°F. This traps steam, eliminates evaporative cooling, and pushes the temperature through the stall quickly. For a 10 lb shoulder, wrapping at the stall can reduce total cook time by up to 2 hours. The trade-off is softer bark — acceptable for most pulled pork applications.
Option 2 — Butcher Paper: More breathable than foil, so some evaporation continues. This preserves more of the bark while still helping the shoulder push through the stall. Slightly slower than foil. Popular with competition BBQ cooks who want both bark and speed.
Option 3 — Unwrapped: Longest cook, hardest bark, maximum smoke flavor. Best for experienced cooks who have time to spare and a smoker running steady all day. Not recommended for your first cook.
Beginner recommendation: Use foil on your first cook. Once you’re comfortable with the process, experiment with butcher paper.
Checkpoint: Your pork should be wrapped and back in the smoker or oven. Note the time you wrapped — the internal temperature will climb noticeably faster from this point.
Once your pork pushes through the stall, you’re in the home stretch. Here’s how to know when it’s truly done.
Step 5: Check Doneness and Rest the Meat
Internal temperature is the only reliable doneness signal for pulled pork. Time got you to this point; your thermometer finishes the job.
Reading the Internal Temperature
There are two temperature targets to understand — and they serve completely different purposes.
USDA Safe Minimum: According to the USDA Food Safety temperature chart, whole cuts of pork (including pork shoulder) are food-safe at 145°F with a 3-minute rest (USDA FSIS, 2026). At 145°F, the pork is safe to eat — but it will not shred. It will be firm and slice-able, not pull-apart.
Pulled Pork Tenderness Target: For the fall-apart texture of pulled pork, you need 195–205°F. At this temperature, the collagen — the tough connective tissue running through the shoulder — has converted into gelatin (the process where collagen melts into a rich, silky substance that makes pulled pork juicy and tender). According to Texas A&M Meat Science’s barbecue science research, collagen-rich cuts like pork shoulder require internal temperatures in the range of 185–195°F to fully convert collagen into gelatin; most practitioners and thermometry experts extend this to 195–205°F for pull-apart texture (Texas A&M Meat Science, 2026; ThermoWorks, 2026).
How to check: Insert your instant-read thermometer into the thickest part of the meat, away from the bone. The bone conducts heat differently and will read higher than the surrounding meat.
⚠️ Food Safety Note: For food safety, pork must reach at least 145°F with a 3-minute rest per USDA guidelines. For pull-apart pulled pork texture, target 195–205°F — these are two separate goals.
The Resting Protocol by Weight
This is where most guides fail you. “Rest 10 minutes” is advice built for a pork chop, not a 10 lb shoulder. The final step of The 250°F Precision Method is a weight-specific resting protocol — and skipping it wastes the entire cook.
During the rest, the gelatin that formed during the cook redistributes throughout the meat. Cut into it too soon and those juices run straight onto the cutting board instead of staying in the pork.
| Shoulder Weight | Rest Time | Method |
|---|---|---|
| 4–6 lb | 30–45 minutes | Wrapped in foil, on counter |
| 8 lb | 45–60 minutes | Wrapped in foil, in a cooler (no ice) |
| 10–12 lb | 1–2 hours | Wrapped in towels, in a cooler (no ice) |
Insulated cooler method: Wrap the finished shoulder in foil (if not already wrapped), then wrap again in a clean towel, and place it in a dry cooler with the lid closed. No ice — you’re keeping it warm, not cold. A properly rested shoulder held this way will stay above 145°F for up to 4 hours, which gives you incredible flexibility for serving time.
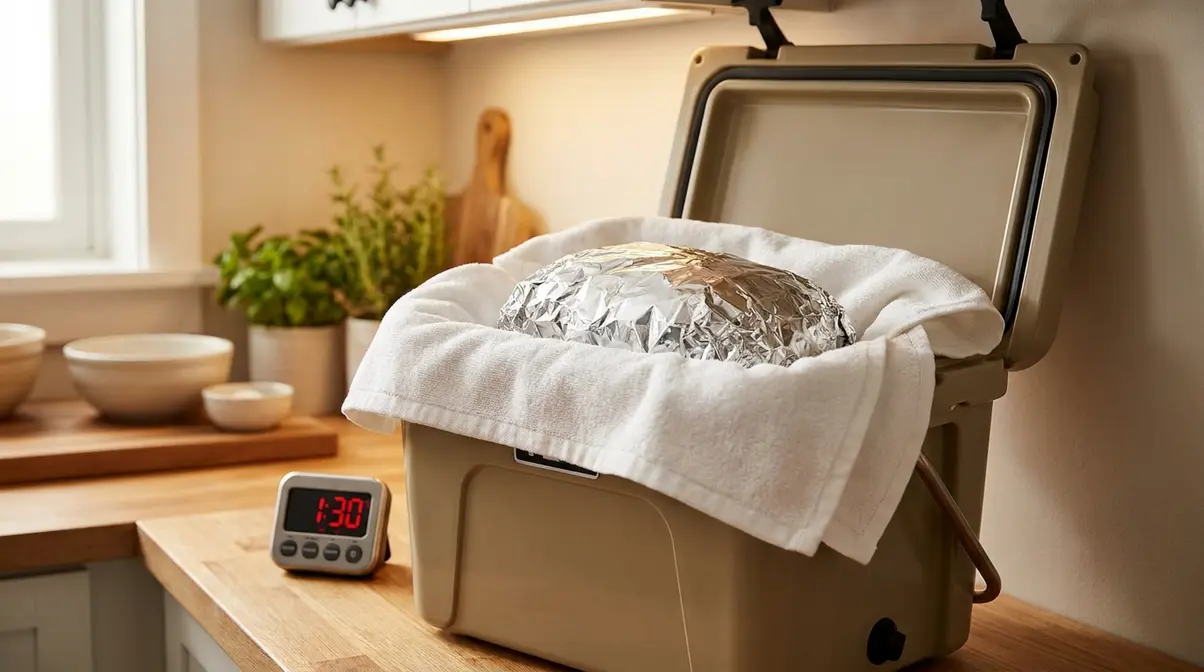
Checkpoint: Thermometer reads 195–205°F and the shoulder has rested for the appropriate time. You’re ready to pull.
Step 6: Pull and Serve
After a long cook and a proper rest, pulling the pork should feel almost effortless. If you’re fighting the meat, it likely needs more time or a longer rest.
- Unwrap carefully — the juices pooled inside the foil are liquid gold. Pour them back over the pulled pork after shredding.
- Use two forks or heat-resistant gloves to pull the pork into strands. Work with the grain of the muscle fibers — not against them.
- Remove the bone (if bone-in) — it should slide out cleanly with no resistance. If it doesn’t, the shoulder needed more time.
- Remove any large fat deposits that didn’t render during the cook. Small, soft pieces of rendered fat are fine and add flavor.
- Season to taste — add a pinch of salt, a splash of the reserved pan juices, or a drizzle of your favorite BBQ sauce.
Serve immediately or hold in the cooler (still wrapped) for up to 4 hours. Pulled pork also freezes exceptionally well — portion into zip-lock bags with some of the pan juices before freezing.
Alternative Cooking Methods
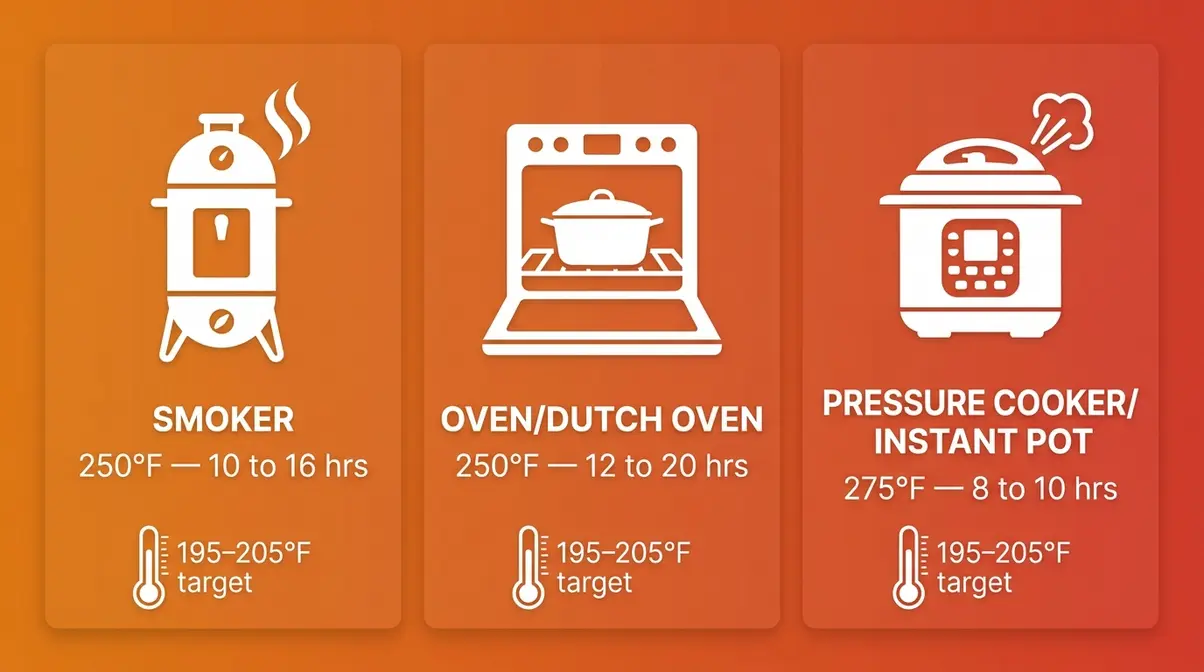
While knowing how long to cook pork shoulder at 250°F is your baseline, these alternatives offer flexibility when you are short on time. During our recipe testing at quickdishcookbook.com, we compared these alternative methods against the standard 250°F approach to measure differences in bark formation, moisture retention, and overall tenderness.
Cooking Pork Shoulder at 275°F
At 275°F, the hot-and-fast approach cuts total cook time by roughly 25–30%. Plan for approximately 1 to 1.25 hours per pound at 275°F. An 8 lb shoulder takes roughly 8–10 hours; a 10 lb shoulder takes 10–13 hours. The trade-off: slightly less collagen breakdown time, which can result in a firmer texture if you pull it before the thermometer confirms 195–205°F. The stall still occurs, though it tends to be shorter. Wrapping in foil is especially recommended at 275°F to maintain moisture.
Cooking Pork Shoulder at 350°F
At 350°F, you’re moving into oven-roasting territory rather than true low-and-slow cooking. Plan for approximately 45–60 minutes per pound. An 8 lb shoulder takes 6–8 hours. The result is a tender, shreddable pork — but with significantly less bark development and a different texture profile than a true low-and-slow cook. This method works best in a tightly covered Dutch oven with added liquid (apple juice, broth, or water) to compensate for the faster moisture loss. Always confirm 195–205°F internal temperature before pulling.
Pressure Cooker / Instant Pot Method
A pressure cooker cuts the entire cook time down to 90–120 minutes for a standard 4–6 lb shoulder. Add 1 cup of liquid (broth, apple juice, or a splash of apple cider vinegar for tang), cook on high pressure for 90 minutes, then allow a natural pressure release for 15 minutes. The result is extremely tender pulled pork — but with no bark and no smoke flavor. This is the right choice when time is the primary constraint and you need dinner on the table quickly. For the best of both worlds, transfer the shredded, pressure-cooked shoulder to a baking sheet, drizzle with sauce, and finish it under the broiler for 5–8 minutes to develop a caramelized, crispy exterior.
Is 225°F too low for pork shoulder?
225°F is not too low — it’s a perfectly valid low-and-slow temperature, just slower. At 225°F, plan for approximately 1.5–2 hours per pound, which means a 10 lb shoulder can take 15–20 hours or more. The lower temperature produces excellent bark and deeply rendered fat. The main drawback is the extended time commitment and a longer stall. Many experienced pitmasters prefer 225°F for overnight cooks. 250°F is simply a faster alternative that produces nearly identical results.
How long to cook an 8 lb pork shoulder at 275°F?
An 8 lb pork shoulder at 275°F takes approximately 8–10 hours, compared to 10–16 hours at 250°F. At 275°F, plan for roughly 1 to 1.25 hours per pound. The hotter temperature shortens the stall and reduces total cook time by about 25–30%. The trade-off is slightly less bark development and a marginally drier texture if you’re not careful about wrapping. The internal temperature target remains 195–205°F — temperature is the finish line regardless of cooking method.
Troubleshooting Common Problems
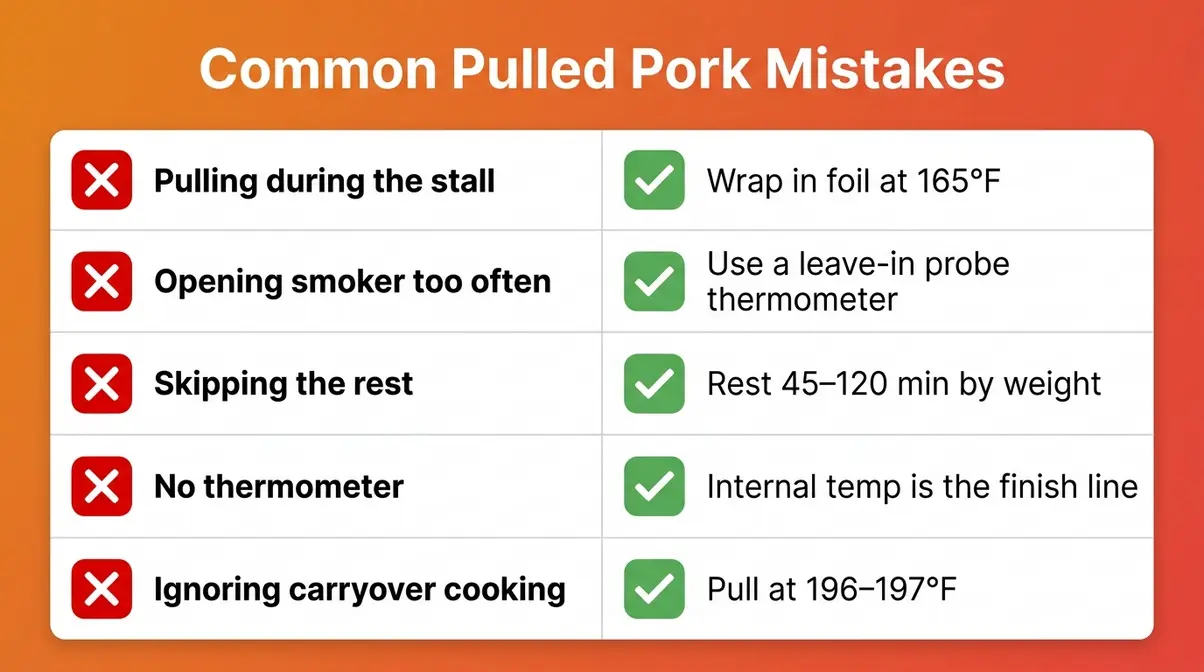
Common Pitfalls
1. Pulling the meat too early during the stall
This is the most common mistake in low-and-slow cooking. The internal temperature stops at 155°F, an hour passes, and the anxiety wins. The pork comes out firm and sliceable — not pulled. How to avoid it: Know the stall is coming (Step 4). When the temperature plateaus, wrap in foil. Trust the thermometer, not the clock.
2. Temperature spikes from opening the smoker too often
Every lid lift drops the smoker temperature by 10–15°F and adds time to the cook. More critically, inconsistent temperature swings push cook times toward the longer end of the range. How to avoid it: Use a leave-in probe thermometer so you can monitor internal temperature without opening the lid. Limit spritzing to the first 3 hours only.
3. Skipping the rest
Cutting into the pork within 10 minutes of pulling it from the heat results in dry, stringy meat — not because the cook went wrong, but because the juices haven’t redistributed yet. How to avoid it: Follow the Resting Protocol by Weight above. Even a 45-minute rest on an 8 lb shoulder makes a measurable difference.
4. Cooking by time alone without a thermometer
Two 8 lb shoulders from different suppliers can have different fat content, bone structure, and moisture levels. One finishes in 11 hours; the other takes 14. Without a thermometer, you’re guessing. How to avoid it: An instant-read thermometer is the single most important piece of equipment for this cook.
5. Not accounting for carryover cooking
The internal temperature continues to rise 3–5°F after you pull the shoulder from the heat. If you’re targeting 200°F, pull it at 196–197°F. This is especially important if you’re not using a cooler rest.
When to Choose Alternatives
When time is the constraint: If you have less than 12 hours from start to table for a large shoulder, switch to the 275°F method or use a pressure cooker. Do not try to rush a 250°F cook by cranking the heat mid-cook — the result is uneven cooking and tough texture.
When you need a hands-off approach: The oven method at 250°F in a covered pan requires almost no attention after the first hour. If you can’t monitor a smoker, choose the oven.
When smoke flavor isn’t the goal: For tacos, sandwiches, or dishes where the pork will be heavily sauced, the pressure cooker method produces excellent results in a fraction of the time with no loss of tenderness.
Frequently Asked Questions
How long does an 8 lb pork shoulder take in the oven at 250 degrees?
An 8 lb pork shoulder in the oven at 250°F takes approximately 12–16 hours in a covered roasting pan. The oven’s trapped humidity slows the cook compared to a smoker at the same temperature, which is why oven times run longer. According to Destination BBQ guidelines, you should always target an internal temperature of 195–205°F for pull-apart texture rather than relying on time alone. Remove the foil cover for the final 60–90 minutes if you want a firmer, darker exterior. Budget an additional 45–60 minutes of resting time after the cook.
How long does it take to smoke a 10 lb pork shoulder at 250 degrees?
A 10 lb pork shoulder on the smoker at 250°F takes approximately 13–16 hours, assuming a stable pit temperature throughout. The stall — a temperature plateau at 150–165°F — can add 2–3 hours if you don’t wrap the shoulder in foil or butcher paper. Wrapping at around 165°F can cut total cook time by up to 2 hours, as noted in Texas A&M Meat Science timing charts. After the cook, a 10 lb shoulder needs 1–2 hours of insulated rest before pulling. Total time from prep to table is approximately 16–20 hours.
Is 250°F too high for a pork shoulder?
250°F is not too high — it’s one of the most recommended temperatures for pulled pork. The low-and-slow range for pork shoulder is generally 225–275°F, and 250°F sits comfortably in the middle. At this temperature, fat renders slowly, and collagen breaks down into gelatin (as supported by Serious Eats’ temperature analysis).
How long do you cook a 10 lb pork shoulder at 250°F?
A 10 lb pork shoulder at 250°F takes 13–16 hours on the smoker or 15–20 hours in the oven, using the 1.5 to 2 hours per pound guideline. The stall can add 2–3 additional hours if you don’t wrap. Wrapping in foil at around 165°F internal temperature is strongly recommended by the BBQ community for a 10 lb shoulder, as it eliminates evaporative cooling. After the cook, rest for 1–2 hours in an insulated cooler before pulling.
How long to cook pork shoulder in the oven at 250 degrees?
Pork shoulder in the oven at 250°F takes 1.5 to 2 hours per pound in a tightly covered roasting pan. A 4 lb shoulder takes 6–9 hours; an 8 lb shoulder takes 12–16 hours; a 12 lb shoulder takes 18–24 hours. The covered pan traps steam, which keeps the meat moist but extends the total cook time compared to a smoker at the same temperature, according to 101 Cooking for Two. For best results, keep the pan covered for the full cook and remove the foil only in the final 60–90 minutes for a firmer exterior. Always confirm 195–205°F internally before pulling.
Is 250°F too high to smoke pork shoulder?
250°F is not too high to smoke pork shoulder — it falls perfectly within the standard low-and-slow smoking range of 225–275°F. The smoke ring and bark development at 250°F are nearly identical to a 225°F cook, just achieved in less time according to standard pitmaster guidelines. For most home cooks, 250°F is the ideal balance of speed and quality.
Conclusion
For home cooks and backyard pitmasters tackling pulled pork, knowing how long to cook pork shoulder at 250°F delivers the best balance of time, texture, and control. Plan for 1.5 to 2 hours per pound as your baseline — a 10 lb shoulder takes 13–16 hours on the smoker or 15–20 hours in the oven — and always confirm 195–205°F internally before pulling. According to Texas A&M Meat Science (2026), collagen-rich cuts like pork shoulder require sustained high internal temperatures in the 185–205°F range to fully convert into the gelatin that makes pulled pork tender and juicy.
The 250°F Precision Method connects every phase of the cook: weight-specific timing gives you your planning window, stall awareness prevents the most common beginner panic, and the Resting Protocol by Weight ensures the juices stay in the meat — not on the cutting board. Each step reinforces the others, and skipping any one of them shows up in the final result.
Start with the timing chart in Step 1, get your thermometer ready, and wrap in foil when the stall hits. Give a 10 lb shoulder its full 1–2 hour insulated rest. Follow this process once, and you’ll never guess your way through a pork shoulder cook again.

Dave King
Recipe developer and writer at Quick Dish Cookbook.