How Long to Cook Balut: Exact Boiling Times + Safe Method

What’s in this guide
- How to Cook Balut: Step-by-Step Boiling Guide
- Cooking Times for Different Types of Balut
- Pro Tips: How to Tell If Balut Is Done (and Prevent Mistakes)
- How to Eat Balut: The Traditional Step-by-Step Way
- Balut Health Facts, Safety, and Storage Guide
- Making Balut at Home: Incubation Basics
- Common Mistakes When Cooking Balut (And How to Fix Them)
- Frequently Asked Questions About Cooking and Eating Balut
- Conclusion
- 📌 Quick Reference: The 30-Minute Rule
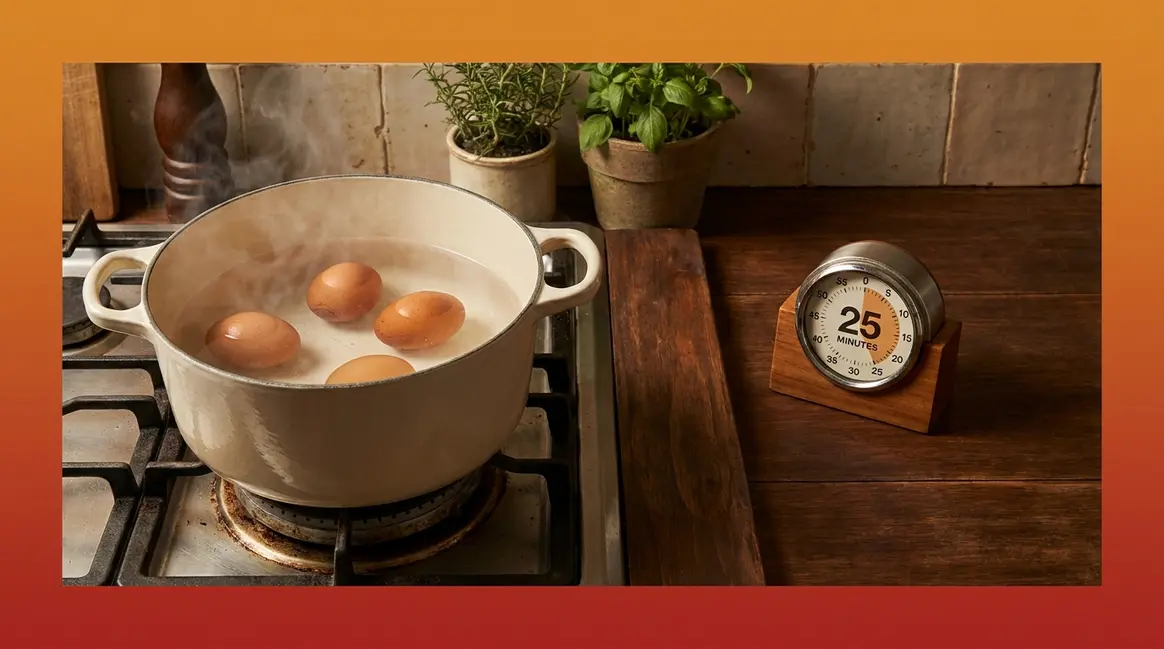
You’re holding a balut — a fertilized duck egg popular in the Philippines and Vietnam — and you have one question: how long to cook balut so it’s safe, flavorful, and not rubbery? The answer is simpler than you think: 20 to 30 minutes total, with one small extra step that makes all the difference.
Undercook it and you risk food safety. Overcook it and you lose the rich, savory broth that makes balut worth eating. Most guides online give you a number and stop there — leaving you to figure out the rest on your own.
In this guide, you’ll learn the exact boiling time, a foolproof step-by-step method, and how to adjust for duck, chicken, and quail eggs — so you get it right the first time. We’ll also cover how to eat balut the traditional way, how to store leftovers safely, and answer the most common health questions.
How to Cook Balut: Step-by-Step Boiling Guide
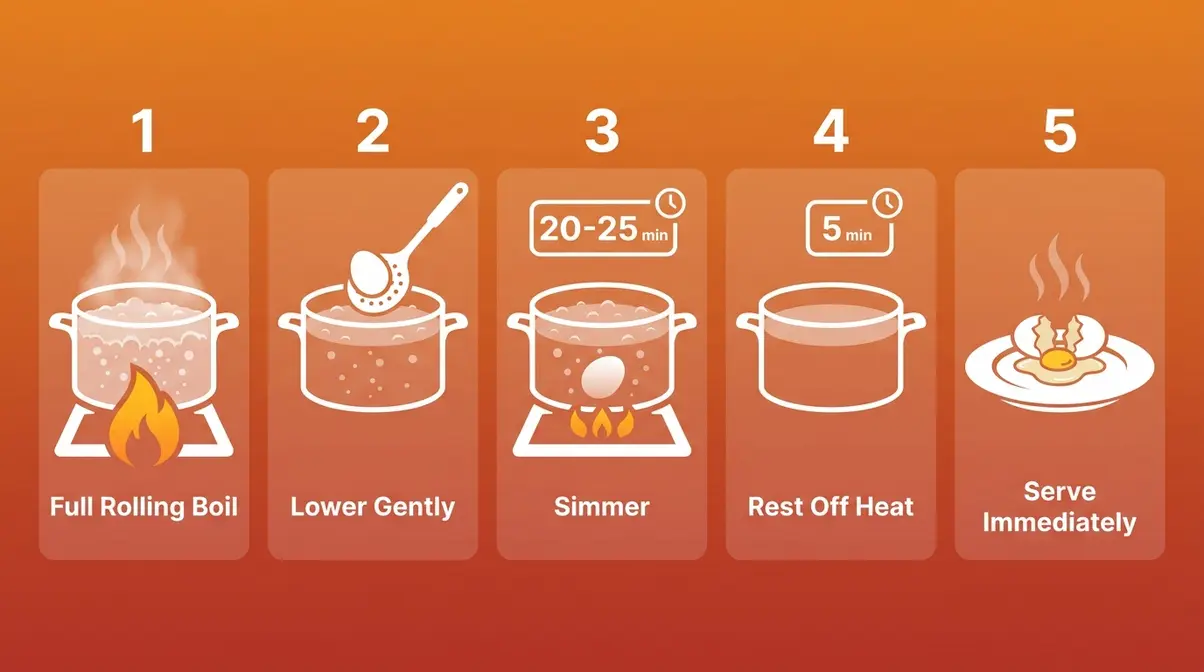
Balut takes 20 to 30 minutes to cook using the boiling method — the only method recommended for both food safety and flavor. The process involves 5 simple steps and takes about 35 minutes total, including a 5-minute resting period. Here’s exactly how to do it.
What Is Balut? (A Quick Intro for First-Timers)
Balut is a fertilized duck egg that has been incubated for 14 to 21 days, making it a popular street food in the Philippines and Vietnam. According to Wikipedia’s entry on balut), the egg contains a partially developed embryo, a rich savory broth, a cooked yolk, and a firm white — all inside a single shell. This is precisely why timing matters more than with a regular egg: there’s significantly more to cook through.
Undercooking leaves the embryo unsafe to eat (a real food safety risk). Overcooking makes the yolk chalky and the broth watery and thin. Think of it like a hard-boiled egg, but with more to cook inside — which is why it needs more time and a gentler hand.
The most common type is duck balut, and that’s the default throughout this guide. Chicken and quail versions also exist and cook slightly faster — we cover those timing differences in the next section.
Now that you know what balut is, let’s make sure you have everything ready before you start cooking.
What You’ll Need Before You Start
Gathering your tools first makes the whole process smoother. Here’s what you need:
- Equipment:
- Medium to large pot (big enough for eggs to sit in a single layer)
- Enough water to cover eggs by 1–2 inches
- Slotted spoon or ladle (for gently lowering eggs into the water)
- Kitchen timer
- Tongs or spoon for removing eggs
- Ingredients:
- Balut eggs (duck, chicken, or quail — purchased from an Asian grocery store or specialty market)
- Optional: 1 teaspoon of salt added to the boiling water to season the water and make the broth extra flavorful
- Serving condiments: salt, black pepper, vinegar, chili — have these ready before you begin
Pre-cook prep tip: Let refrigerated balut sit at room temperature for 15–20 minutes before boiling. This is the single most important tip for preventing shell cracks. Cold eggs dropped into boiling water experience thermal shock — the sudden temperature difference causes the shell to fracture. If your eggs are still cold from the fridge, set them on the counter while you bring the water to a boil — the timing works out perfectly.
Once you have everything ready, here’s the complete step-by-step process.
Step 1: Fill Your Pot and Bring Water to a Full Boil
Fill the pot with enough cold water to cover the eggs by at least 1–2 inches. Place it on the stove over high heat and bring it to a full rolling boil.
Why this matters: Starting with a vigorous, full rolling boil — not just steaming or gently simmering water — ensures the eggs begin cooking immediately and evenly from the moment they enter the pot. A weak simmer at the start can lead to uneven cooking throughout the egg.
Checkpoint: You should see large, vigorous bubbles covering the entire surface of the water — not just a few bubbles rising from the bottom. That’s your signal to move to Step 2.
Optional: Add 1 teaspoon of salt to the water now if you want the broth inside each egg to be extra flavorful when you crack it open.
Once your water is at a full rolling boil, it’s time to add the eggs — carefully.
Step 2: Gently Lower the Eggs Into the Boiling Water
Use a slotted spoon or ladle to gently lower each egg into the boiling water one at a time. Do not drop them in. Lower each egg slowly until it touches the bottom of the pot, then release. As community cooking wisdom puts it:
“Gently put balut in the boiling water then cook for 30 minutes. Turn off heat source and wait 5 minutes to continue cooking while in hot water.”
— Community cooking wisdom, Filipino food forums
Why this matters: Dropping eggs causes two problems at once — thermal shock from sudden full contact with boiling water, and physical impact from hitting the bottom of the pot. Both crack shells. Lowering them slowly eliminates both risks, which is exactly how to cook balut without cracking the shell.
Checkpoint: All eggs should be fully submerged. If any are floating, add more water until they’re covered by at least 1 inch.
With the eggs safely in the water, now comes the most important part: the timing.
Step 3: Reduce Heat and Simmer for 20 to 25 Minutes
Once the eggs are in the pot, reduce the heat to medium — you want a steady, gentle simmer, not a rolling boil. Set your timer for 20 minutes for standard duck balut.
Why this matters: A gentle simmer prevents shells from cracking due to the violent movement of a hard boil. It also cooks the egg evenly from the outside in, giving the embryo, yolk, and broth time to reach a safe internal temperature without overcooking the outer white. The FDA recommends cooking eggs to an internal temperature of at least 160°F (71°C) to eliminate harmful bacteria — and a 20–25 minute simmer achieves this consistently for duck balut.
- Timing guide for this step:
- Duck balut: 20–25 minutes
- Chicken balut: 18–22 minutes
- Quail balut: 12–15 minutes
Checkpoint: The water should be bubbling gently — small, steady bubbles rather than the vigorous rolling boil from Step 1. If the boil gets too aggressive, lower the heat slightly.
Step 4: Turn Off the Heat and Rest for 5 Minutes
When your timer goes off, turn off the heat source and leave the eggs in the hot water for exactly 5 more minutes. Do not remove them yet.
Why this matters — and why most beginners skip this step: This is the heart of The 30-Minute Rule. The residual heat in the water continues cooking the interior of the egg gently after the burner is off. This extra 5 minutes does two things: it pushes the core temperature past the FDA’s 160°F safety threshold, and it allows the natural broth inside the egg to concentrate and develop a richer, deeper flavor. Balut cooked without this rest step often has a watery, thin broth. Balut cooked with it has the thick, savory broth that Filipino and Vietnamese food communities consistently describe as the best part of the experience.
The 5-minute rest is the single most commonly skipped step in beginner recipes — and it’s the step that transforms the dish.
Step 5: Remove, Season, and Serve Immediately
After the 5-minute rest, use tongs or a slotted spoon to remove the eggs from the hot water. Place them on a plate or in a bowl. Serve immediately — balut is best eaten hot, within a few minutes of cooking.
How to serve: Crack on one side of the wider end of the egg with a spoon, peel back a small opening, and sip the warm broth first. Then peel away more shell to access the solid white part, the yolk, and the embryo. Season each bite with salt, pepper, vinegar, or chili to taste.
Checkpoint — How to verify doneness: The solid white part (the albumen) should be firm and fully set — not jiggly or translucent. The yolk should be fully cooked through with no liquid center. If either part looks underdone, return the egg to simmering water for an additional 3–5 minutes.
Cooking Times for Different Types of Balut
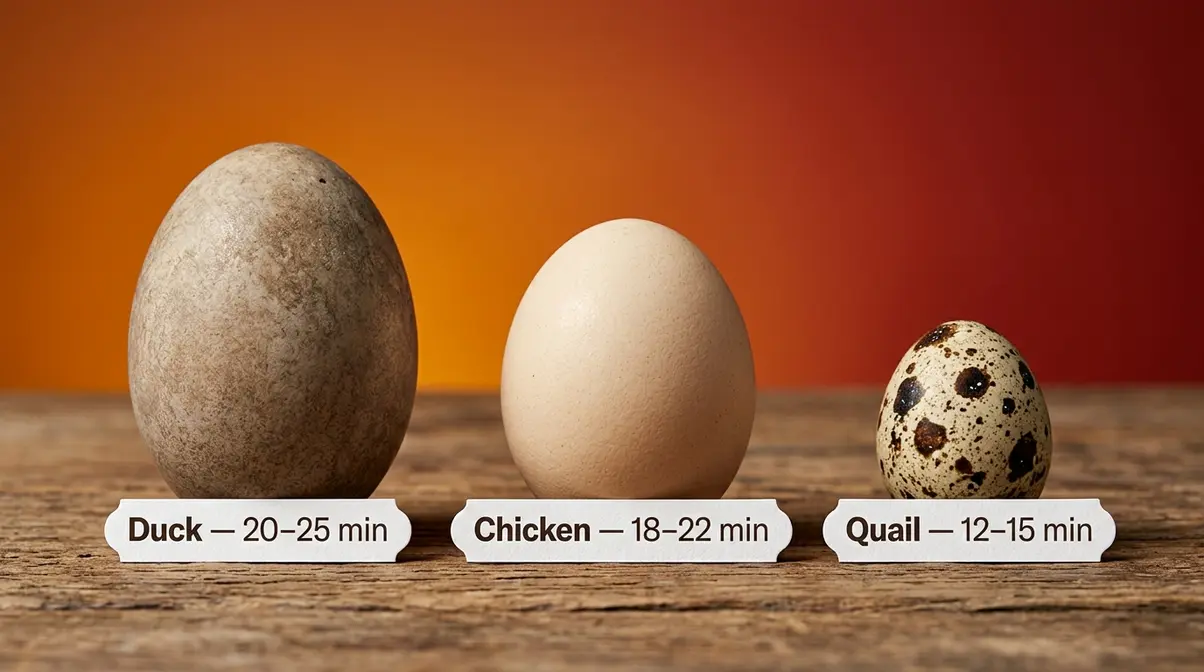
Not all balut cooks the same way. Duck, chicken, and quail eggs differ in size and shell thickness — and those differences affect how long they need to simmer. Getting the timing right for each type is the key to a perfectly cooked result.
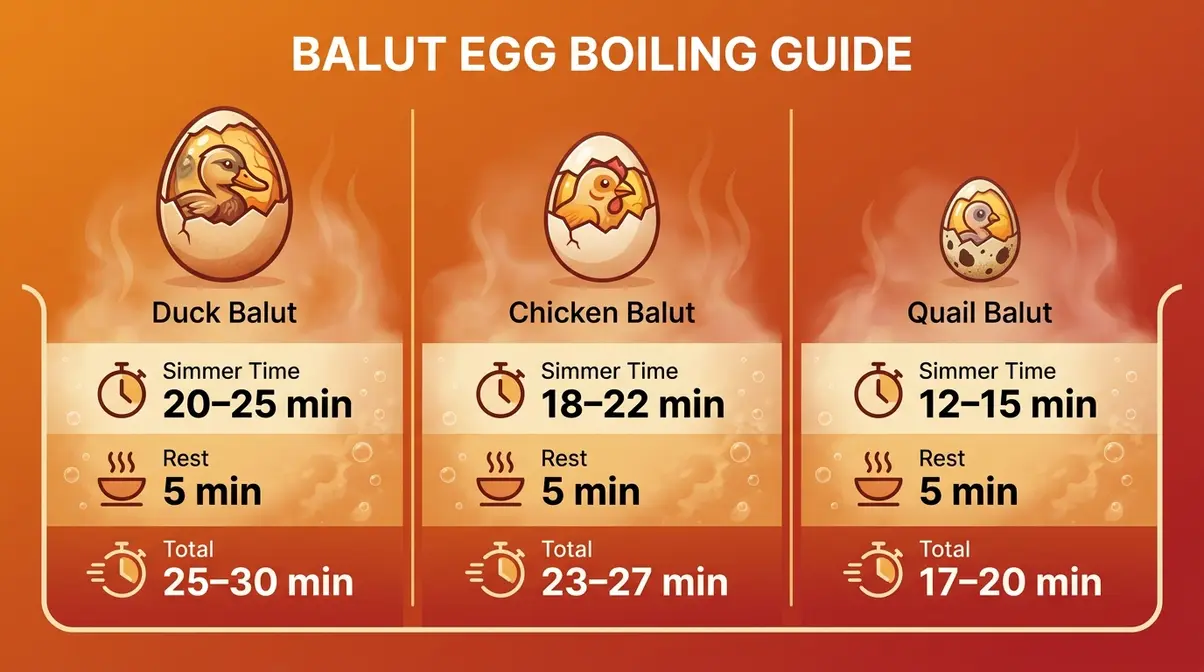
Balut Cooking Time Comparison Table:
| Balut Type | Simmer Time | Rest Time | Total Time | Notes |
|---|---|---|---|---|
| Duck Balut | 20–25 minutes | 5 minutes | 25–30 minutes | Most common; default for this guide |
| Chicken Balut | 18–22 minutes | 5 minutes | 23–27 minutes | Smaller egg; slightly shorter cook |
| Quail Balut | 12–15 minutes | 5 minutes | 17–20 minutes | Smallest; quickest cook; monitor closely |
Duck Balut: The Classic (20–25 Minutes)
Duck balut is the most widely available type and the default when a recipe simply says “balut.” According to Jeanelle Eats’ guide to cooking balut, the standard preparation calls for 20 to 30 minutes of boiling, and community consensus across Filipino cooking forums consistently confirms this range. For The 30-Minute Rule, use the lower end: 20–25 minutes of simmering followed by the 5-minute hot water rest.
Duck eggs have a thicker shell and a larger interior than chicken or quail eggs, which is why they need the longest cook time. The embryo inside a 17–18 day incubated duck balut is more developed and requires thorough heat penetration to reach the FDA’s recommended 160°F internal temperature.
Doneness test: The solid white part should be fully firm. The yolk should show no liquid center when you break it open.
Where duck balut is the Filipino classic, chicken balut takes a slightly different approach — and a shorter clock.
Chicken Balut: Slightly Shorter (18–22 Minutes)
Chicken balut is less common than duck balut but available at many Asian grocery stores. Because the egg is smaller and the shell is thinner, it cooks faster — 18 to 22 minutes of simmering, followed by the same 5-minute rest.
The flavor profile is milder than duck balut. The embryo inside is also slightly smaller, and the broth is less rich. For beginners who find duck balut intimidating, chicken balut is often recommended as a gentler introduction to the experience.
Key adjustment: Watch the simmer closely. Because the shell is thinner, chicken balut is slightly more prone to cracking if the heat is too high. Keep it at a gentle, steady simmer throughout.
For the smallest and quickest-cooking type, quail balut requires an entirely different approach to timing.
Quail Balut: The Quickest Cook (12–15 Minutes)
Quail balut is a specialty item found primarily at Vietnamese and Filipino specialty markets. Its small size means it cooks significantly faster — 12 to 15 minutes of simmering, followed by the standard 5-minute rest.
Because of the shorter cook time, quail balut requires closer attention. Set your timer for 12 minutes and check doneness at that point. The solid white part should be firm to the touch, and the yolk should show no liquid center. If either is underdone, continue cooking in 2-minute increments.
Flavor note: Quail balut has a more delicate, subtle flavor than duck balut. The embryo is smaller and less visually pronounced, making it a popular choice for first-timers who want to try balut without the full visual impact of a duck egg.
Pro Tips: How to Tell If Balut Is Done (and Prevent Mistakes)
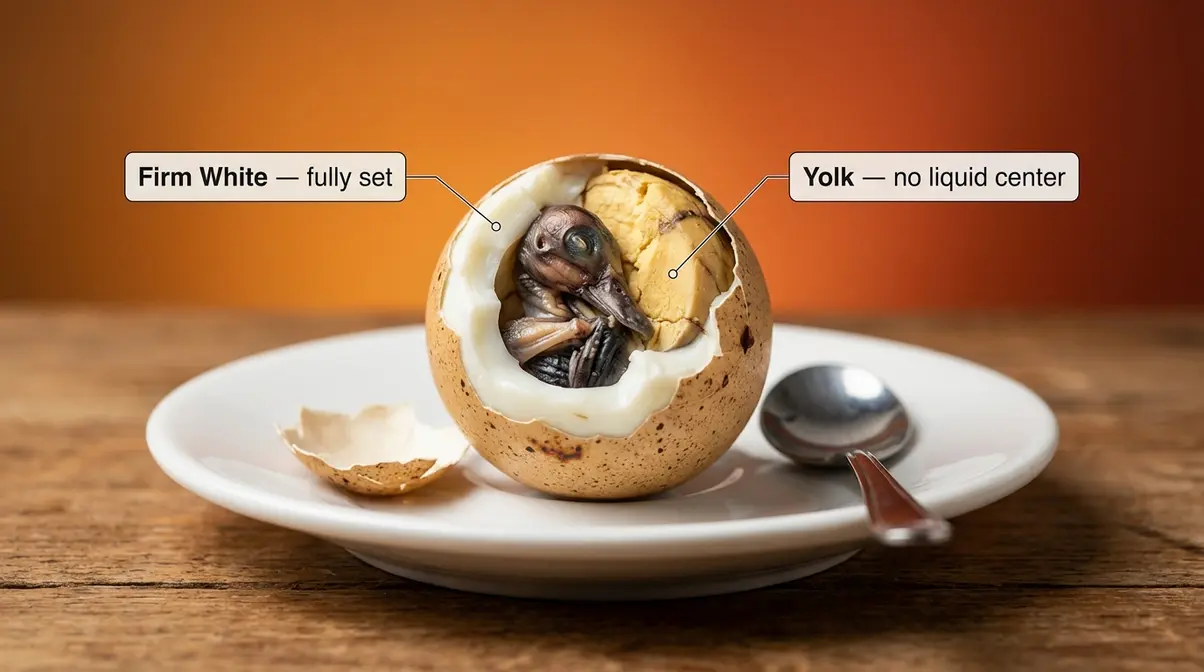
Knowing the right cooking time is only half the equation. The other half is being able to verify doneness visually and tactilely — and knowing how to avoid the most common beginner mistakes before they happen.
How to Tell If Your Balut Is Fully Cooked
A properly cooked balut shows three clear signs — check all three before eating:
- The solid white part is fully firm. When you peel back the shell, the albumen (the white surrounding the embryo) should be completely set and opaque — not jiggly, not translucent, not soft in the center. It should feel like a hard-boiled egg white.
- The yolk shows no liquid center. Break the yolk with a spoon. A fully cooked yolk crumbles or breaks cleanly — it does not ooze. Any liquid at the center means the egg needs more time.
- The broth is hot, not lukewarm. When you crack the top and sip the broth, it should be genuinely hot — a sign the interior reached cooking temperature throughout.
The 30-Minute Rule exists precisely because the 5-minute rest step is what consistently pushes the interior temperature past the FDA’s recommended 160°F threshold. Across Filipino cooking communities, the consistent advice is: if in doubt, rest longer — 7 minutes instead of 5 — rather than returning the egg to boiling water, which risks overcooking the outer white.
If the egg is underdone: Return it to a pot of simmering (not boiling) water for 3–5 minutes, then rest again for 2 minutes.
How to Cook Balut Without Cracking the Shell
Shell cracks are the most common beginner frustration — and almost always preventable. The three main causes are thermal shock, physical impact, and too-vigorous boiling.
- Prevention checklist:
- Bring eggs to room temperature first (15–20 minutes out of the fridge before cooking)
- Lower eggs gently using a slotted spoon — never drop them
- Simmer, don’t boil hard — reduce to medium heat once eggs are in the pot
- Don’t overcrowd the pot — eggs that knock against each other crack
If a crack does appear during cooking, it doesn’t ruin the egg — but the broth will leak into the water. You can still eat the egg; just know the broth will be gone. Vicky Pham’s Vietnamese balut guide notes that a small hairline crack is common and acceptable, but a large fracture means you lost the broth.
What Is Penoy? (And How It Cooks Differently)
Penoy is an unfertilized duck egg that has been incubated for the same number of days as balut — but because it was never fertilized, there is no embryo inside. The result is an egg with a fully intact yolk and white, plus the same rich, savory broth found in balut. It looks like a hard-boiled egg on the inside but tastes noticeably richer.
Penoy cooks slightly faster than balut because there is no embryo tissue to cook through. A standard penoy needs 18–20 minutes of simmering plus the same 5-minute rest. The doneness checks are the same: firm white, set yolk, hot broth.
Penoy is often sold alongside balut at Filipino and Vietnamese markets and is considered a gentler introduction for people who want the flavor experience without the embryo.
How to Add Flavor While Cooking (Filipino-Style)
The simplest way to season the water and make balut extra flavorful is to add 1 teaspoon of salt per quart of water before bringing it to a boil. The salt infuses into the egg through the shell during cooking, enhancing the natural richness of the broth.
Some Filipino home cooks also add a small piece of ginger or a few pandan leaves to the water for a subtle aromatic note — a practice documented in Whiskey and Booch’s guide to Vietnamese hot vit lon. This is entirely optional but worth trying once you’re comfortable with the basic method.
What NOT to add: Avoid vinegar or acidic ingredients in the boiling water — acid can weaken the shell and increase the risk of cracking.
How to Eat Balut: The Traditional Step-by-Step Way
Cooking balut correctly is only half the experience. Knowing how to open and eat it the traditional way ensures you don’t miss any part of the flavor — especially the savory broth, which is often the first thing to go if you’re not careful.
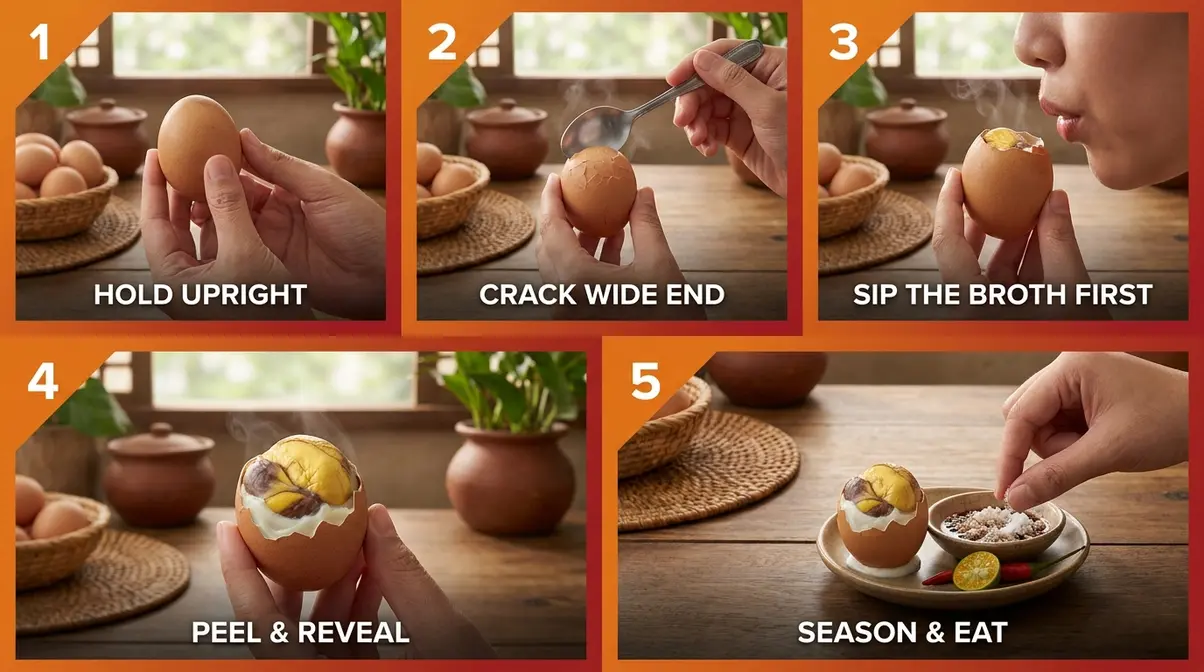
Opening and Eating Balut (5 Simple Steps)
- Hold the egg upright with the wider end (the air pocket end) facing up. This is where the broth collects.
- Tap and crack on one side of the wider end with a spoon — make a small opening about the size of a nickel. Don’t peel the whole shell yet.
- Sip the broth first. Tilt the egg to your lips and drink the warm broth directly from the shell. This is considered the best part by most balut lovers — don’t skip it or pour it out.
- Peel back more shell to expose the interior. You’ll see the solid white part (albumen) around the outside, the yolk, and the embryo in the center.
- Season and eat. Add a pinch of salt, a crack of black pepper, or a small splash of vinegar directly onto the egg. Eat in small bites, alternating between the embryo, yolk, and white.
As Mama’s Now Cooks explains in their guide to eating balut the Vietnamese way, the broth-first approach is universal across both Filipino and Vietnamese traditions — it’s not just cultural preference, it’s practical: once you peel the shell further, the broth spills.
Traditional Seasonings and Dipping Sauces
The most common seasoning across both Filipino and Vietnamese traditions is salt and black pepper — just a small pinch applied directly to the egg after cracking. Simple and effective.
Vietnamese preparation (hot vit lon) often adds rau ram (Vietnamese coriander/laksa leaf), a fresh herb with a slightly peppery, citrusy flavor that complements the richness of the egg. A small squeeze of fresh lime juice is also common.
Filipino preparation frequently uses spiced vinegar (sukang maanghang) — a sharp, spicy dipping sauce made with white vinegar, chili, garlic, and salt. Some vendors also serve balut with a simple dip of salt, pepper, and lime mixed together.
- Quick dipping sauce recipe:
- 2 tablespoons white vinegar
- 1 small red chili, sliced thin
- 1 small garlic clove, minced
- Pinch of salt
Mix and serve alongside the egg. A small dish of straight salt is always the backup option.
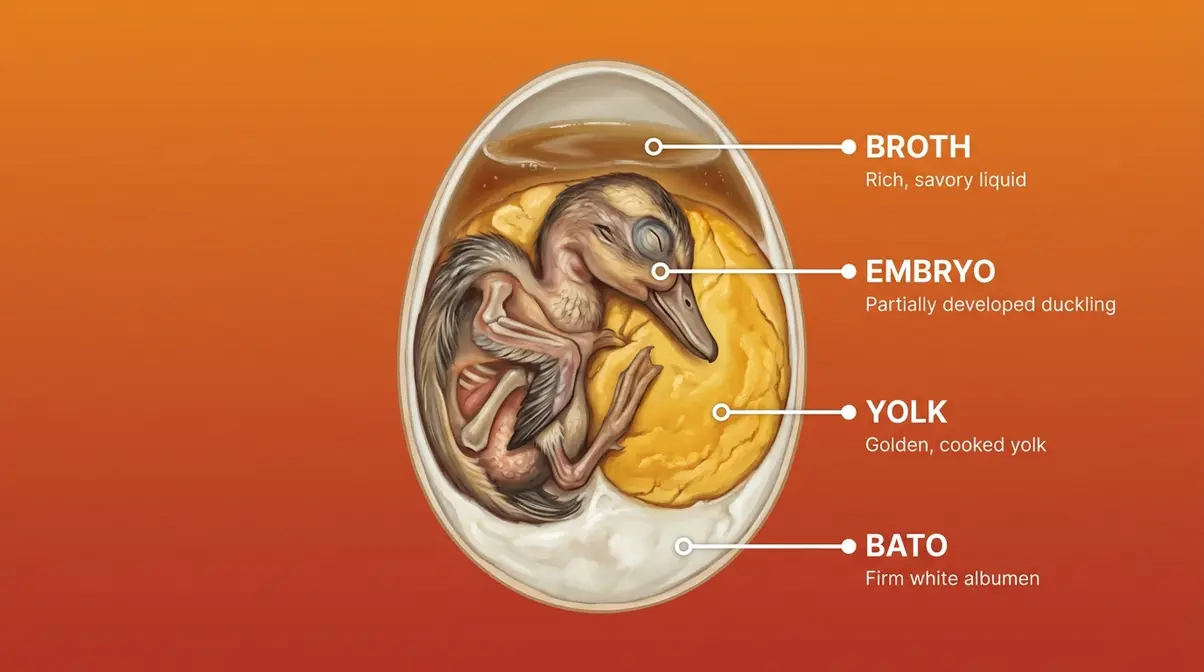
Understanding the Parts of Balut
Balut has four distinct parts, and knowing what each one is helps you enjoy the experience rather than feel surprised:
| Part | What It Is | Texture | Flavor |
|---|---|---|---|
| Broth | Liquid inside the air pocket | Warm, liquid | Rich, savory, umami |
| Embryo | The partially developed duckling | Soft, tender | Mild, slightly gamey |
| Yolk | The egg yolk, fully cooked | Firm, crumbly | Rich, fatty, egg-forward |
| Bato (white) | The solid white/albumen | Firm, chewy | Neutral, mild |
The bato (the hard, fully solidified white at the base of the egg) is the least flavorful part and is sometimes left uneaten — it’s chewy and dense. Everything else is considered the good stuff.
Balut Health Facts, Safety, and Storage Guide
Balut is nutritious, culturally significant, and enjoyed safely by millions of people — but it does come with specific health considerations worth knowing before you make it a regular part of your diet. This section covers the nutrition facts, cholesterol limits, and food safety storage rules you need.
Is Balut Healthy? Nutritional Breakdown
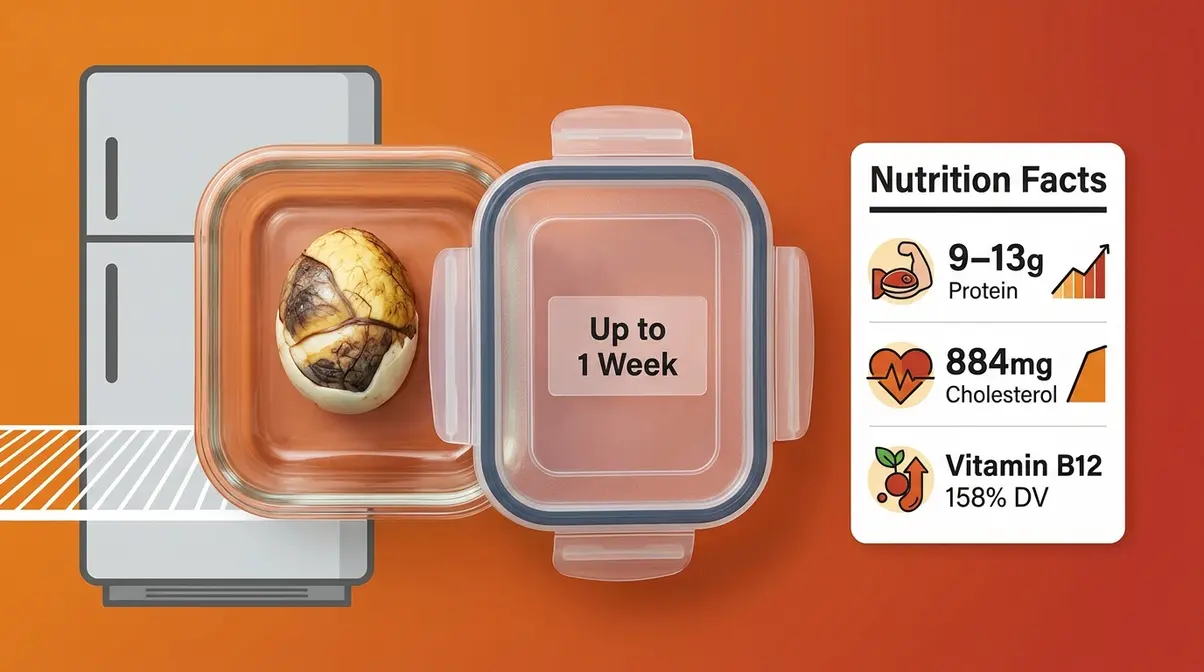
Balut is a genuinely nutrient-dense food — high in protein, iron, calcium, and B vitamins. According to USDA FoodData Central data on duck eggs, a single duck egg (approximately 70g) provides roughly 9 grams of protein, significant amounts of vitamin B12, selenium, and choline, plus meaningful quantities of iron and calcium that support bone and blood health.
The embryo adds additional protein and amino acids beyond what a regular egg provides. Traditional Filipino and Vietnamese communities have eaten balut as a high-protein snack and energy food for generations — the Food and Agriculture Organization (FAO, 2003) documents balut as an important protein source in Southeast Asian food culture.
Nutritional snapshot (per duck balut, approximate):
| Nutrient | Amount | % Daily Value (approx.) |
|---|---|---|
| Protein | 9–13g | 18–26% |
| Total Fat | 9–10g | 12–13% |
| Cholesterol | ~844–884mg | 281–295% |
| Iron | ~3mg | 17% |
| Calcium | ~45mg | 3% |
| Vitamin B12 | ~3.8mcg | 158% |
The nutritional benefits are real — but so is the cholesterol number, which leads directly to the most important health consideration.
How Much Balut Can You Eat Per Day? (Cholesterol Warning)
One duck balut contains approximately 884 mg of cholesterol per 100g serving, according to USDA FoodData Central data. The American Heart Association and CDC guidelines recommend that people with elevated cardiovascular risk keep dietary cholesterol in check — and a single balut already exceeds the 300mg daily cholesterol threshold that many health guidelines have historically referenced.
The practical answer: For most healthy adults, 1 balut per day is a reasonable limit. Eating 3 or 4 balut in a single day (a common question) delivers 2,500–3,500 mg of dietary cholesterol — far beyond what the CDC recommends for heart-healthy eating. The CDC’s cholesterol health guidance emphasizes that high dietary cholesterol intake is linked to elevated LDL (“bad”) cholesterol levels and increased cardiovascular risk over time.
- Who should be especially cautious:
- People with existing high cholesterol or heart disease
- People with Type 2 diabetes (elevated cardiovascular risk)
- People on cholesterol-lowering medications (consult your doctor)
For healthy adults without cardiovascular concerns, enjoying 1 balut occasionally — a few times per week — is generally considered safe within a balanced diet. Eating 3 or 4 in a single sitting is not recommended by any health authority.
How to Store Balut Safely (Cooked and Uncooked)
Proper storage matters for both food safety and quality. According to USDA FSIS egg safety guidelines, here’s how to store balut correctly:
- Uncooked balut:
- Store in the refrigerator at 40°F (4°C) or below
- Use within 1–2 weeks of purchase (check the sell-by date from your market)
- Do not store at room temperature for more than 2 hours
- Cooked balut:
- Refrigerate within 2 hours of cooking
- Store in an airtight container in the refrigerator
- Safe to eat for up to 1 week (USDA FSIS)
- Reheat by placing in simmering water for 5–7 minutes — do not microwave (uneven heating, risk of explosion)
Freezing: Balut can technically be frozen, but the texture of both the embryo and the white degrades significantly after freezing. Traditional preparation wisdom strongly recommends eating balut fresh or refrigerated — not frozen.
Making Balut at Home: Incubation Basics
Most people buy balut pre-incubated from an Asian grocery store. But if you’re curious about where balut actually comes from — or want to try making your own — here’s a straightforward overview of the incubation process.
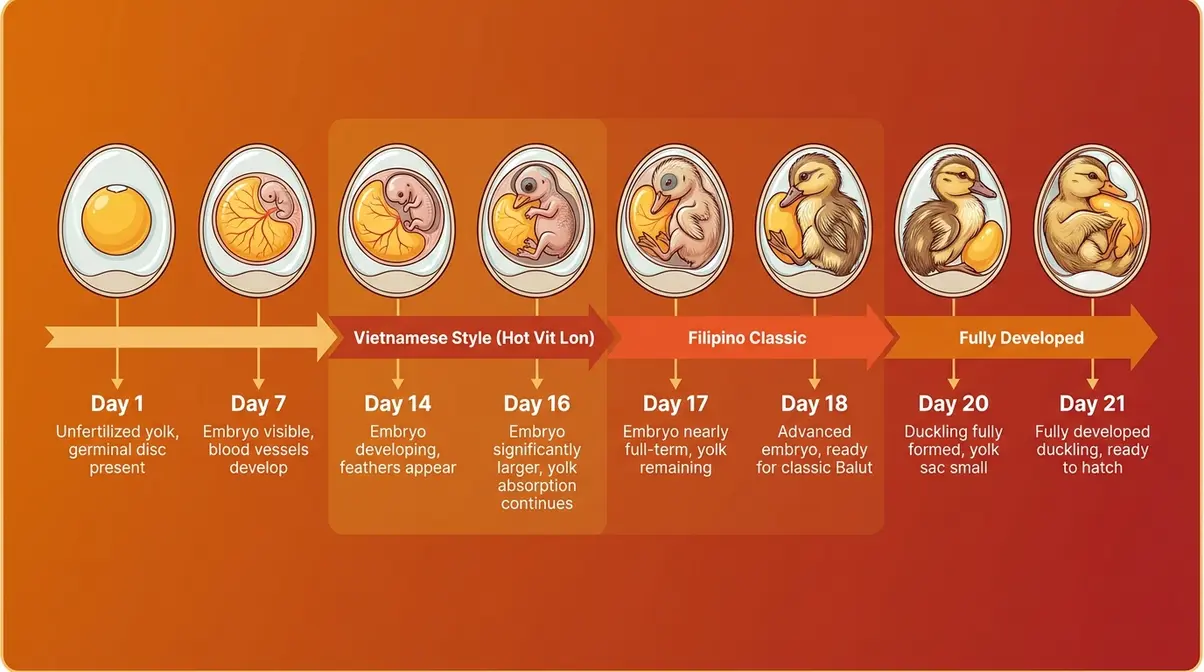
How Long Does It Take to Incubate Balut?
Balut is harvested after 14 to 21 days of incubation, depending on the preferred style. According to the FAO’s documentation of traditional Southeast Asian preparation (FAO, 2003):
- 14–16 days: Younger balut — smaller embryo, softer features, milder flavor. Preferred in Vietnam (hot vit lon).
- 17–18 days: The Filipino standard — the embryo is more developed, with visible features and a richer flavor.
- 20–21 days: Older balut — the embryo is fully developed, the bones are firmer, and the flavor is more intense. Less common but available at specialty markets.
The incubation temperature must be maintained consistently at 99–100°F (37–38°C) throughout the process. Any significant temperature drop can halt development or kill the embryo.
Incubator vs. DIY Methods: A Quick Overview

Using an incubator is the reliable, consistent method for home balut production. A basic egg incubator (available at farm supply stores for $40–$150) maintains the correct temperature and humidity automatically. You simply place fertilized duck eggs inside, set the temperature, and turn the eggs manually 3 times per day (or use an auto-turning incubator).
DIY methods — such as using a warm box, a heat lamp, or a rice husk setup — are documented in traditional Filipino farming communities. These methods work but require constant manual monitoring of temperature and humidity. A small thermometer-hygrometer combo is essential. Without precise temperature control, hatch rates drop significantly.
Practical recommendation: Unless you have access to fertilized duck eggs (from a local farm or hatchery) and are committed to the monitoring process, buying pre-incubated balut from an Asian grocery store is far simpler. Most stores in Filipino and Vietnamese communities stock fresh balut weekly.
Common Mistakes When Cooking Balut (And How to Fix Them)
Even with clear instructions, a few mistakes come up repeatedly in beginner cooking attempts. Knowing them in advance saves a batch.
Common Pitfalls
1. Starting with cold eggs straight from the fridge.
Cold eggs + boiling water = thermal shock = cracked shells, every time. Always let balut sit at room temperature for 15–20 minutes before cooking. This single habit eliminates the most common beginner complaint.
2. Skipping the 5-minute rest step.
This is the step that defines The 30-Minute Rule — and the one most beginners skip because it feels unnecessary. The rest step isn’t optional. Without it, the interior may not reach 160°F, and the broth stays thin. The residual heat does real work in those final 5 minutes.
3. Boiling too hard throughout.
A rolling boil is correct for Step 1 (before the eggs go in). Once the eggs are in the pot, reduce to a medium simmer. A continuous hard boil agitates the eggs, cracks the shells, and can make the white rubbery from rapid, uneven cooking.
4. Overcrowding the pot.
Eggs that knock against each other crack. Use a pot large enough that eggs sit in a single layer with at least half an inch of space between them.
5. Guessing instead of timing.
Balut doesn’t give obvious visual cues while cooking — you can’t see inside the shell. Set a timer every single time. “It looks about right” is not a food safety strategy.
When to Choose Alternatives
If you’re cooking for someone with significant cardiovascular risk or very high cholesterol, balut is not the right choice — the cholesterol load per egg is substantial. Hard-boiled regular eggs or tofu-based dishes deliver comparable protein without the cholesterol burden.
If you’re serving guests who are unfamiliar with balut, consider starting with penoy (the unfertilized incubated egg) — it delivers a similar flavor experience without the embryo, which can be visually off-putting for first-timers.
When to Seek Expert Help
If you’re managing a heart condition, diabetes, or high cholesterol and want to include balut in your diet, speak with a registered dietitian or your doctor before doing so. The cholesterol content is high enough to warrant professional guidance for anyone with cardiovascular risk factors.
Frequently Asked Questions About Cooking and Eating Balut
How long should balut be boiled?
Balut should be boiled (simmered) for 20 to 25 minutes, followed by a 5-minute rest in the hot water off the heat — for a total of 25 to 30 minutes. This is the core of The 30-Minute Rule: the active simmer cooks the egg through, and the rest period pushes the interior temperature past the FDA’s recommended 160°F (71°C) safety threshold. Duck balut takes the full 20–25 minutes; quail balut needs only 12–15 minutes. Always set a timer — guessing the time is the most common cause of undercooked balut (Jeanelle Eats, traditional Filipino preparation guidelines).
How do you tell if balut is done?
Balut is fully cooked when the solid white part (albumen) is completely firm and opaque, the yolk shows no liquid center when broken, and the broth inside is genuinely hot. Crack the wide end, sip the broth — if it’s warm but not hot, the egg likely needs 3–5 more minutes of simmering. A translucent or jiggly white is a clear sign of undercooking. The FAO’s traditional preparation guidelines confirm that 20–30 minutes of boiling consistently achieves full doneness for duck balut. When in doubt, rest the egg an extra 2 minutes rather than returning it to boiling water.
Is eating balut unhealthy?
Balut is not inherently unhealthy, but it is high in cholesterol — approximately 884 mg per 100g of duck egg, according to USDA FoodData Central data. For context, that’s nearly three times the 300 mg daily cholesterol threshold referenced in many dietary guidelines. Balut is also rich in protein (9–13g per egg), vitamin B12, iron, and selenium — making it nutritionally dense. The health risk comes from eating it frequently or in large quantities. For healthy adults without cardiovascular conditions, eating balut occasionally (1–2 times per week, one egg at a time) is generally considered safe within a balanced diet.
How long can you keep cooked balut?
Cooked balut keeps safely in the refrigerator for up to 1 week, according to USDA FSIS egg safety guidelines. Store it in an airtight container within 2 hours of cooking. To reheat, place the egg in simmering water for 5–7 minutes — do not microwave, as uneven heating can cause the egg to burst. Uncooked balut should be refrigerated and used within 1–2 weeks of purchase. Freezing cooked balut is technically possible but not recommended — the texture of the embryo and white degrades significantly after thawing.
Can I eat 3 balut in a day?
Eating 3 balut in a single day is not recommended for most people. Three duck balut eggs deliver approximately 2,500–2,650 mg of cholesterol — far beyond what the CDC’s heart health guidelines consider appropriate for daily dietary intake. The CDC’s cholesterol guidance links high dietary cholesterol to elevated LDL levels and increased cardiovascular risk over time. For healthy adults without heart conditions, 1 balut per day is a more reasonable limit. People with existing high cholesterol, heart disease, or diabetes should consult a doctor before eating balut regularly at all.
Why is balut considered unhealthy by some?
The primary concern with balut is its very high cholesterol content — one egg contains approximately 884 mg of cholesterol per 100g (USDA FoodData Central), which is substantially higher than a regular chicken egg (approximately 372 mg per 100g). Eating multiple balut in a sitting can significantly spike dietary cholesterol intake in a single meal. Additionally, balut contains moderate saturated fat, which is a secondary cardiovascular concern when consumed frequently. The egg is not dangerous in moderation, but it is not a food that can be eaten in large quantities daily without health implications for most people.
Can I eat 4 balut in a day?
Eating 4 balut in a single day is not advisable from a health standpoint. Four duck eggs would deliver roughly 3,500 mg of cholesterol — more than ten times the 300 mg daily threshold that has historically guided dietary recommendations. Even for healthy adults, this level of dietary cholesterol in a single day places significant strain on the body’s cholesterol regulation. The CDC recommends limiting cholesterol-rich foods as part of a heart-healthy diet. One balut per sitting, enjoyed a few times per week at most, is the approach consistent with balanced nutrition.
Why is balut considered good for men?
In Filipino and Vietnamese culture, balut is traditionally believed to boost energy, stamina, and male vitality — a cultural belief, not a clinically proven claim. The cultural association likely stems from balut’s genuine nutritional density: it is high in protein, zinc, vitamin B12, and iron, all of which support energy metabolism and general physical health. Zinc in particular plays a role in testosterone production and reproductive health. However, these are the same nutrients found in other protein-rich foods. The “aphrodisiac” reputation of balut is a cultural belief passed down through generations — it should be understood as tradition, not medical guidance.
Conclusion
For anyone wondering how long to cook balut, the answer is now clear: 20 to 25 minutes of gentle simmering, followed by a 5-minute rest in hot water. This 30-minute total is backed by both traditional Filipino and Vietnamese preparation practices and the FDA’s egg safety standard of 160°F internal temperature. The result is a fully cooked, food-safe balut with rich, concentrated broth — every time.
The 30-Minute Rule is the one framework worth remembering from this guide. It eliminates the guesswork that causes most beginner failures — undercooking from impatience, overcooking from uncertainty, and cracked shells from skipping the room-temperature rest. The rule works for duck, chicken, and quail balut alike (with adjusted simmer times). And the 5-minute rest step — the most commonly skipped part of any balut recipe — is the step that makes the biggest difference in flavor and safety.
Your next step is simple: pick up a few balut from your local Asian grocery store, follow the 5-step boiling guide above, and try The 30-Minute Rule for yourself. Start with one egg. Have your salt, pepper, and vinegar ready. Crack the wide end, sip the broth, and discover why this street food has been a beloved part of Filipino and Vietnamese food culture for generations.
📌 Quick Reference: The 30-Minute Rule
| Step | Action | Time |
|---|---|---|
| Step 1 | Bring water to a full rolling boil | ~5 min |
| Step 2 | Gently lower eggs into water | 0 min |
| Step 3 | Reduce to simmer — cook duck balut | 20–25 min |
| Step 4 | Turn off heat — rest in hot water | 5 min |
| Step 5 | Remove, crack on one side, season, serve | Immediate |
| Total | ~30–35 min |

Dave King
Recipe developer and writer at Quick Dish Cookbook.
![How Long to Cook Pork Shoulder at 250°F [Chart]](https://quickdishcookbook.com/wp-content/uploads/2026/07/pork-shoulder-cook-time-250f-720x450.webp "How Long To Cook Pork Shoulder At 250°F [Chart] 11")