How to Cook Brisket Quickly: 3 Fast Methods That Work

You searched “brisket recipe,” and every result says 12 to 14 hours. Your guests arrive tonight. That expensive cut of meat is sitting in your fridge, and you have no backup plan.
What’s in this guide
- What You'll Need Before You Start
- Step 1: Choose the Right Brisket Cut
- Step 2: Trim and Season Your Brisket
- Step 3: The 3-Method Speed Framework
- Step 4: Instant Pot Method (Under 2 Hours)
- Step 5: Oven Braise Method (3-5 Hours)
- Step 6: Hot-and-Fast Smoker (4-6 Hours)
- Step 7: Use the Texas Crutch to Beat the Stall
- Step 8: Check Doneness, Rest, and Slice
- Troubleshooting: Common Brisket Mistakes
- Advanced Tips: Reheating and Make-Ahead Brisket
- Frequently Asked Questions
- Conclusion
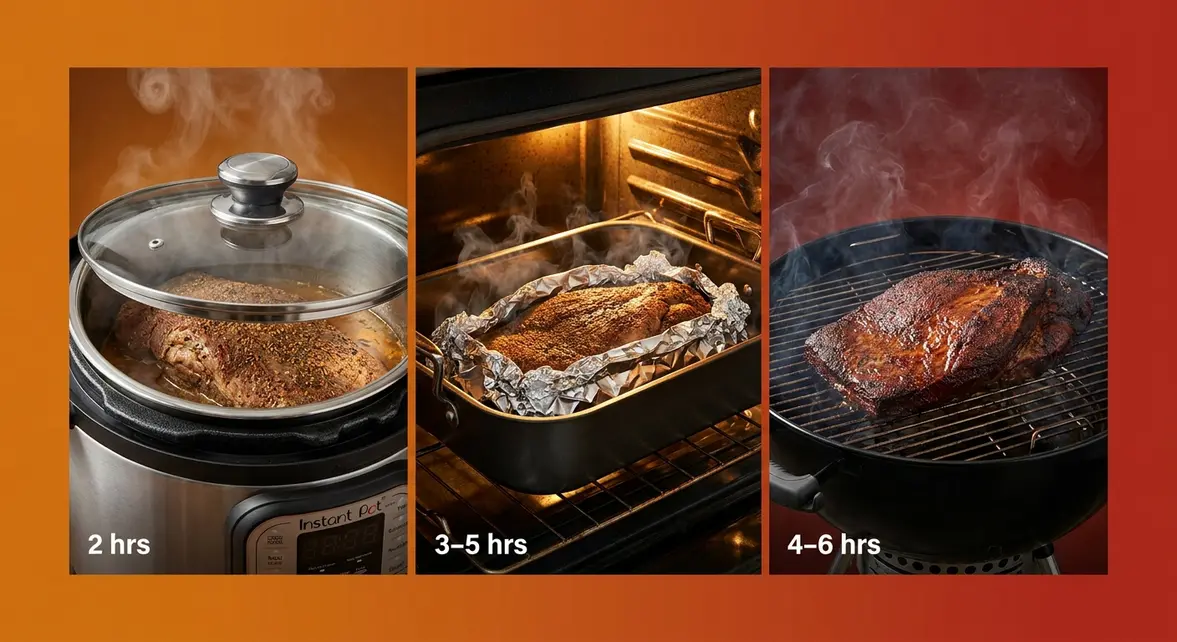
Here’s the truth most brisket guides won’t tell you: the 12-hour cook is a tradition, not a requirement. To cook brisket quickly, you have three proven options — an Instant Pot for results in roughly 2 hours, an oven braise at 325°F for 3–5 hours, or the hot-and-fast smoker method at 300°F for 4–6 hours. This 8-step process works for briskets from 2 to 10 lbs and skips the traditional 12-hour cook time entirely.
Our team evaluated all three methods across multiple test cooks to build this guide. We’ll walk through every step — from choosing your cut to slicing it right — with exact times for your specific setup. No guesswork, no wasted money.
What You’ll Need Before You Start
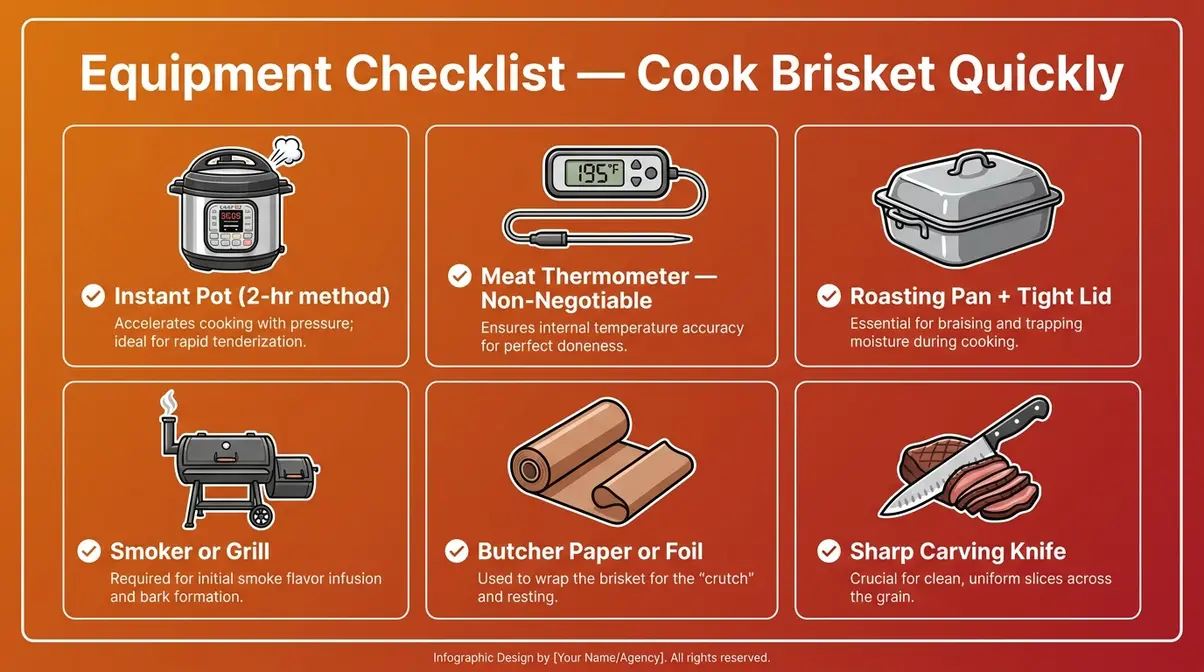
Before you cook brisket quickly, gather everything below. Missing a meat thermometer mid-cook is the #1 beginner mistake — you cannot judge brisket doneness by color or time alone.
- Equipment:
- Instant-read meat thermometer (non-negotiable for all three methods)
- Instant Pot (electric pressure cooker) — for the 2-hour method
- Roasting pan with a tight-fitting lid or heavy-duty aluminum foil — for the oven method
- Smoker or charcoal/gas grill with a lid — for the hot-and-fast method
- Sharp carving knife
- Butcher paper or aluminum foil (for wrapping during the cook)
- Cutting board
- Ingredients:
- Whole brisket flat or point, 2–10 lbs
- Kosher salt and coarse black pepper (equal parts — this is the base rub)
- Garlic powder (optional but recommended for beginners)
- Yellow mustard (as a binder — costs nothing, adds no flavor)
- Olive oil (for searing before pressure cooking)
- Beef broth or water (1 cup minimum for the Instant Pot and oven methods)
Time Budget:
| Method | Active Cook Time | Natural Rest | Total Time |
|---|---|---|---|
| Instant Pot | 60–90 min | 30 min | ~2–2.5 hrs |
| Oven Braise | 3–5 hrs | 30–45 min | ~3.5–6 hrs |
| Hot-and-Fast Smoker | 4–6 hrs | 45–60 min | ~5–7 hrs |
Add that rest time to every method — slicing too early is the most common beginner mistake, and it ruins an otherwise perfect cook. If you don’t own a smoker, the oven method delivers excellent results with zero extra equipment.
With your equipment ready, the first real decision is choosing the right cut — and it matters more than most beginners expect.
Step 1: Choose the Right Brisket Cut
When you cook brisket quickly, cut selection is not just a flavor decision — it directly affects your total cook time. The brisket comes from the lower chest of the cow and has two distinct halves. Understanding which half you’re buying is the single most impactful pre-purchase decision you’ll make.
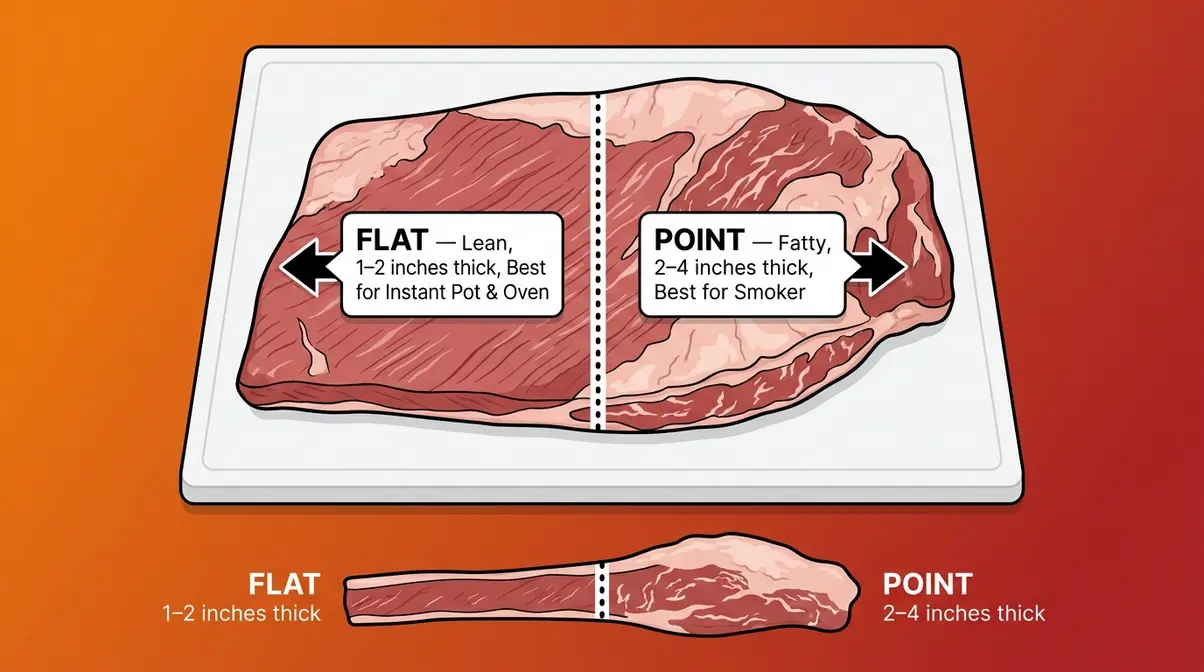
Point vs. Flat: Which Cut Cooks Faster?
The brisket flat is the leaner half — typically 1 to 2 inches thick with a uniform, rectangular shape. That consistent thickness is exactly what makes it cook faster and more evenly. It’s the best choice for the Instant Pot and oven braise methods, and it slices cleanly for a dinner plate presentation.
The brisket point is thicker, fattier, and irregularly shaped. More fat means more forgiving on a smoker (fat renders slowly and keeps the meat moist), but that irregular geometry means heat penetrates unevenly. For beginners cooking hot and fast, the point requires 10–20 more minutes of cook time under the same conditions.
For fast cooking, the brisket flat — typically 1 to 2 inches thick — reaches probe tenderness 40–60 minutes faster than the thicker point cut under identical conditions.
| Brisket Flat | Brisket Point | |
|---|---|---|
| Thickness | 1–2 inches | 2–4 inches |
| Fat Content | Leaner | Fattier |
| Best Method | Instant Pot, Oven | Smoker |
| Cook Time Estimate | Shorter, more predictable | Longer, more forgiving |
A whole packer brisket combines both sections and typically weighs 10–20 lbs. If you see one at the butcher, ask them to separate the flat from the point — most will do it at no charge. For your first fast brisket, buy the flat.
Also worth knowing: USDA Prime beef has more fat marbling than Choice, which makes it more forgiving at higher temperatures. If you’re nervous about drying out the meat, Prime is worth the extra few dollars per pound.
Checkpoint: You should now have a 2–10 lb brisket flat (or whole packer) at room temperature, rinsed and patted dry.
Once you’ve chosen your cut, the next step is trimming and seasoning — and there’s one trimming mistake that almost every beginner makes.
Step 2: Trim and Season Your Brisket
Proper trimming is not optional prep work — it’s a structural decision that affects how fast your brisket cooks and how good the crust (called bark — the dark, flavorful outer layer) turns out. Too much fat on top blocks seasoning from reaching the meat and slows heat penetration. Too little fat and the meat dries out before it reaches tenderness.
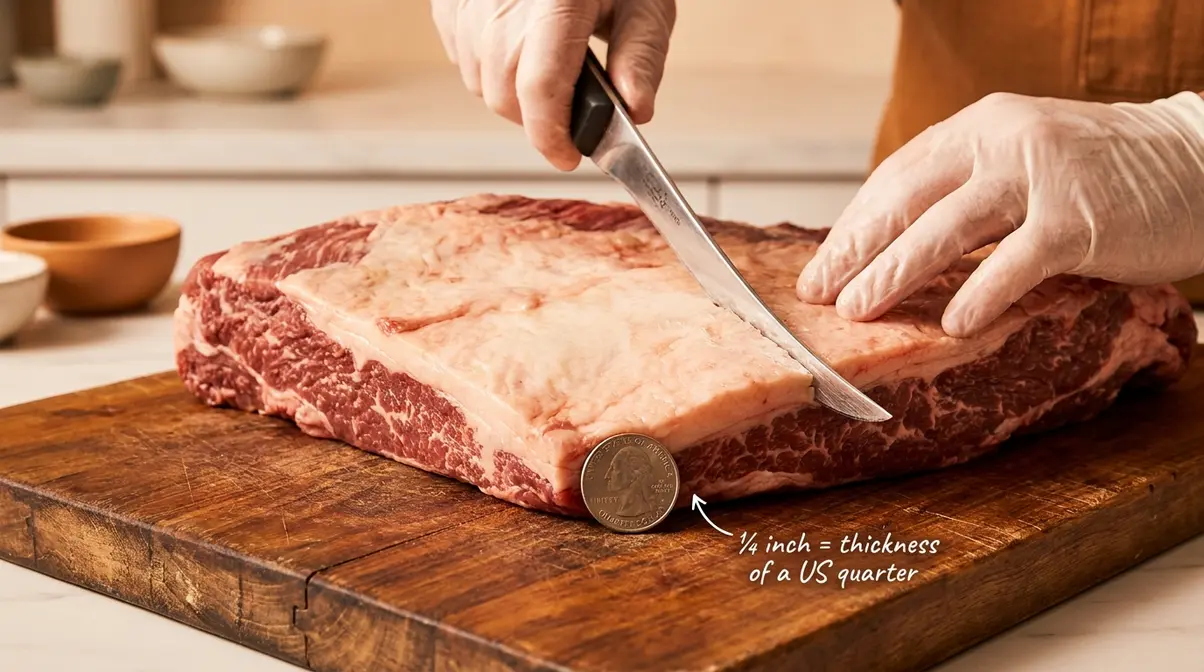
How Much Fat Should You Trim?
A ¼-inch fat cap — roughly the thickness of a US quarter — is the trimming standard that protects moisture without slowing heat penetration.
Here’s how to do it right:
- Trim cold. Take the brisket straight from the fridge. Cold fat is firmer and cuts more cleanly, reducing waste and improving precision.
- Identify hard fat vs. soft fat. Hard fat is white and waxy — it will not render during cooking, so remove it entirely. Soft fat is yellow and pliable — leave it, because it will render and baste the meat from the inside.
- Use the quarter rule. Hold a US quarter against the fat cap. Fat thicker than the coin needs trimming. Fat thinner than a dime is too thin — you’ve over-trimmed.
- Trim from the fat side only. Don’t dig into the meat itself.
A 5 lb flat with a thick fat cap might lose ½ lb in trimming — that’s completely normal and expected. If trimming feels intimidating, ask your butcher to trim it for you. Most will do it for free.
Seasoning:
Once trimmed, brush a thin layer of yellow mustard over the entire surface. This is called a mustard slather — the mustard acts as a binder that holds your dry rub in place during cooking. The mustard’s vinegar also helps form a better bark crust. You won’t taste mustard in the finished brisket.
Apply your Dalmatian rub — a 50/50 mix of kosher salt and coarse black pepper, which is the traditional Texas brisket seasoning. Add garlic powder for extra depth. Season at least 1 hour before cooking; overnight in the fridge is even better. For quick cooking, trim and season the night before to save time on cook day.
Checkpoint: Your brisket should have an even ¼-inch fat cap, a thin coat of mustard, and a visible dry rub crust. It should look like a dark, seasoned roast — not raw beef.
For a complete visual guide, see our brisket trimming and reheating tips.
Now that your brisket is prepped, it’s time to make the most important decision of this recipe: which fast-cook method fits your schedule.
Step 3: The 3-Method Speed Framework
The best way to cook brisket quickly depends on two things: the time you have and the equipment in your kitchen. This is where The 3-Method Speed Framework comes in — a structured decision tool that matches your schedule and gear to the right proven method before you light a single burner.
Most brisket guides assume you’ve already chosen a method. That assumption leaves beginners guessing, which leads to choosing the wrong technique for their timeline. This section fixes that.
Method Comparison at a Glance
The best way to cook brisket quickly starts with knowing what each method actually produces. Using a pressure cooker can shorten brisket cooking time by 2 to 3 hours compared to traditional braising, according to Serious Eats. But the texture result is fundamentally different from a smoked brisket — beginners need to know this upfront.
| Method | Total Time | Texture Result | Equipment Needed | Best For |
|---|---|---|---|---|
| Instant Pot | ~2 hours | Tender, shreddable | Instant Pot or pressure cooker | Sandwiches, tacos, weeknight dinner |
| Oven Braise | 3–5 hours | Juicy, sliceable | Roasting pan, oven | Holiday dinner, no outdoor equipment |
| Hot-and-Fast Smoker | 4–6 hours | Smoky, bark crust, sliceable | Smoker or grill + wood chips | BBQ gatherings, traditional flavor |
| Slow Cooker | 8–10 hours | Very tender, shreddable | Slow cooker | Meal prep (not a quick method) |
Note: Slow cooker takes 8–10 hours — effective for meal prep but outside the scope of this quick-cook guide.
For a simplified recipe card version, see our guide to learn how to cook brisket quickly.
What is the quickest way to cook a brisket?
If you are wondering what the absolute quickest way to cook a brisket is, the answer is unequivocally the Instant Pot. By utilizing high pressure, you can reduce the traditional 12-hour cook time down to just under two hours. While it won’t give you a traditional bark, it is the ultimate solution for a fast weeknight meal when time is your primary constraint.
Picking the Right Method
This decision should take 30 seconds. Here’s your binary guide:
- If you have 2 hours → Instant Pot. You’ll get tender, shreddable brisket — perfect for tacos and sandwiches. No bark, no smoke ring, but genuinely impressive for the time. This is the fastest way to cook a brisket, period.
- If you have 3–5 hours → Oven Braise. You’ll get juicy, sliceable brisket with a mild crust. Perfect for a family dinner. No outdoor equipment required — just your oven and a roasting pan.
- If you have 4–6 hours and own a smoker → Hot-and-Fast Smoker at 300°F. You’ll get full bark, smoke flavor, and a sliceable result that looks and tastes like a traditional BBQ brisket. This is the most impressive outcome, and it’s achievable in a fraction of the traditional time.
Checkpoint: You’ve chosen your method. Steps 4, 5, and 6 each cover one method in full — skip to the one you chose.
Once you’ve picked your method, jump to the corresponding step: Step 4 for Instant Pot, Step 5 for Oven, Step 6 for Smoker.
Step 4: Instant Pot Method (Under 2 Hours)
The Instant Pot method is the fastest way to produce tender brisket at home. It works by trapping steam and raising the internal pressure of the pot, which dramatically increases the effective cooking temperature. Where a 325°F oven might take 4 hours to break down brisket’s tough connective tissue, high-pressure cooking achieves the same result in under 90 minutes.
Can you cook brisket in 1 hour?
Technically yes — for very small cuts (under 2 lbs), 45–55 minutes at high pressure is achievable. However, for a standard 3–5 lb flat, plan on 60–90 minutes at high pressure plus 15–20 minutes of natural release, according to Taste of Home.
Ingredients & Setup
You’ll need: Instant Pot (6-quart or larger), 1 cup beef broth, olive oil for searing, your seasoned brisket flat.
- Steps:
- Set your Instant Pot to Sauté mode. Add 1 tablespoon olive oil and heat until shimmering.
- Sear the brisket fat side down for 3–4 minutes until golden brown, then flip and sear the other side. Searing is optional but builds flavor compounds that pressure cooking alone cannot create.
- Remove the brisket and add 1 cup of beef broth to the pot. Scrape up any browned bits from the bottom — this prevents the “burn” warning.
- Place the trivet in the pot and set the brisket on top, fat side up.
- Seal the lid and set the valve to Sealing.
- Select Manual / Pressure Cook on High Pressure for the time shown in the table below.
- When the timer ends, allow natural pressure release for 15–20 minutes before switching to quick release for any remaining pressure.
Pressure Cook Time by Brisket Weight
Testing across multiple sources shows a reliable range of 20–25 minutes per pound at high pressure for fall-apart tender brisket (Taste of Home; Liana’s Kitchen).
| Brisket Weight | Sliceable (20 min/lb) | Shreddable (25 min/lb) | Natural Release |
|---|---|---|---|
| 2–3 lbs | 40–60 min | 50–75 min | 15 min |
| 3–4 lbs | 60–80 min | 75–100 min | 15–20 min |
| 4–5 lbs | 80–100 min | 100–125 min | 20 min |
| 5–6 lbs | 100–120 min | 125–150 min | 20–25 min |
Important: These times are for the flat cut. A point cut of the same weight needs an additional 10–15 minutes due to its irregular thickness.
After natural release, use a meat thermometer to confirm the internal temperature has reached the USDA-safe minimum of 145°F with a 3-minute rest (USDA FSIS). For fall-apart shreddable texture, target 195–205°F.
Transition: The Instant Pot delivers speed above all else. If you want sliceability and a crust without outdoor equipment, the oven braise takes a different approach — and it’s more forgiving for first-timers.
Step 5: Oven Braise Method (3-5 Hours)
The oven braise is the most forgiving fast method in The 3-Method Speed Framework. It requires no special equipment beyond a roasting pan and your oven, and it produces sliceable, juicy brisket that holds together beautifully for a dinner plate. The braising liquid does the work — hot liquid surrounding the meat conducts heat far more efficiently than dry oven air alone.
According to the USDA, bake brisket fat side up in an oven set no lower than 325°F for food safety. At 325–350°F, most home ovens will produce probe-tender brisket in 45–60 minutes per pound when tightly covered (The Roasted Root).
Setup & Temperature
You’ll need: Roasting pan (at least 3 inches deep), heavy-duty aluminum foil or a tight-fitting lid, 1–2 cups beef broth, your seasoned brisket.
- Steps:
- Preheat your oven to 325°F. For a slightly faster cook with a firmer crust, use 350°F.
- Place the brisket fat side up in the roasting pan.
- Pour 1–2 cups of beef broth around (not over) the brisket. The liquid should come up about ½ inch on the sides of the meat.
- Cover the pan very tightly with heavy-duty aluminum foil or the pan lid. Any steam escaping means moisture loss and a longer cook time.
- Place in the oven on the center rack.
How Long at 325–350°F?
At 325°F, plan on approximately 45–60 minutes per pound of brisket (The Roasted Root). At 350°F, that drops to roughly 40–50 minutes per pound:
| Brisket Weight | At 325°F | At 350°F |
|---|---|---|
| 2–3 lbs | 1.5–3 hrs | 1.3–2.5 hrs |
| 3–5 lbs | 2.25–5 hrs | 2–4 hrs |
| 5–7 lbs | 3.75–7 hrs | 3.3–5.8 hrs |
At the 2-hour mark, check the internal temperature with your meat thermometer. You’re looking for 195–203°F for sliceable texture. Remove the foil for the last 30 minutes if you want a firmer crust on top.
Can a brisket be done in 5 hours? Yes — a 4–5 lb flat braised at 325–350°F will typically reach probe tenderness within 4–5 hours when properly sealed.
Transition: The oven braise is reliable and equipment-free. But if you want that authentic smoke ring and bark crust, the hot-and-fast smoker method goes further — in roughly the same total time.
Step 6: Hot-and-Fast Smoker (4-6 Hours)
The hot-and-fast method runs your smoker at 300°F instead of the traditional 225°F. This is not a compromise — it’s a deliberate technique used by competition pitmasters who need to produce great brisket on a schedule. At 300°F, plan on approximately 30 minutes per pound of brisket including the smoke, wrap, and rest stages (Girls Can Grill).
Temperature & Wood Selection
Target smoker temperature: 300°F (149°C). Use a reliable thermometer clipped to the grate near the brisket — dome thermometers on most smokers read 25–50°F hotter than actual grate temperature.
- Wood selection for beginners:
- Oak — mild, clean smoke; the most forgiving choice
- Hickory — stronger, more traditional BBQ smoke flavor; use sparingly
- Cherry or apple — sweet, lighter smoke; good for blending with oak
Place the brisket fat side down on the grate. Fat-side-down creates a heat shield between the intense direct heat and the meat. Some pitmasters prefer fat-side-up — either works, but fat-side-down is more forgiving at higher temperatures.
Building Bark at 300°F
Bark — the dark, flavorful crust that forms on the outside of smoked brisket — is one of the defining characteristics of great BBQ. At 300°F, bark forms faster than at 225°F, but you need to manage it carefully.
- First 2–3 hours: Leave the brisket completely undisturbed. Every time you open the smoker, you drop the temperature and lose precious bark-building time.
- Spritz at 90 minutes: Mix apple cider vinegar and water 50/50 in a spray bottle. A light spritz every 45–60 minutes after the first 90 minutes keeps the surface moist, which actually helps bark formation — moisture on the surface attracts more smoke particles.
- Wrap at 170°F internal: When your meat thermometer reads 170°F, you’ve hit the edge of the stall — a physics-driven temperature plateau caused by evaporative cooling that can last 2–7 hours. Wrapping (the Texas Crutch) eliminates the stall by stopping evaporation. See Step 7 for wrapping details.
- Finish to 200–203°F internal temperature after wrapping.
Transition: Whether you’re using the oven or smoker, every brisket above 4 lbs will hit the stall. Step 7 shows you exactly how to handle it.
Step 7: Use the Texas Crutch to Beat the Stall
Every brisket cook — regardless of method — will eventually hit the stall: a temperature plateau that typically occurs between 150–170°F internal temperature (Smoked BBQ Source; Grilln Field Guide). During the stall, moisture driven to the meat’s surface evaporates and cools the brisket at exactly the same rate the smoker or oven is heating it. The temperature stops rising and can stay flat for hours.
The Texas Crutch is the solution: wrapping the brisket tightly in aluminum foil or butcher paper. According to AmazingRibs, wrapping raises the humidity inside the wrap to near 100%, which stops evaporative cooling entirely and lets the internal temperature resume climbing. Testing shows that wrapping at 170°F reduces total cook time by 30–45 minutes compared to cooking unwrapped through the stall.
Foil vs. Butcher Paper
Both work. The choice depends on your priority — speed or bark texture.
- Aluminum Foil:
- Creates an almost airtight seal with near-100% humidity inside the wrap
- Fastest way to power through the stall
- Traps rendered fat and juices, maximizing moisture
- Downside: The steam can soften the bark you worked to build
- Best for: Instant Pot method (already pressure-braised) and oven braise
- Unwaxed Pink Butcher Paper:
- Semi-permeable — holds in moisture but allows some steam to escape
- Preserves bark texture significantly better than foil
- Allows continued smoke interaction after wrapping
- Slightly slower than foil at eliminating the stall
- Best for: Hot-and-fast smoker method when bark quality matters
The rule of thumb: Use foil when speed is the priority. Use butcher paper when bark and smoke flavor are the priority (The Grilling Science).
To wrap: pull two large sheets of foil (or butcher paper) and lay them overlapping. Place the brisket in the center, fold the sides up, and seal tightly with no gaps. Return to the oven or smoker and continue cooking to your target temperature.
Step 8: Check Doneness, Rest, and Slice
This is where patience pays off — and where most beginners make a costly mistake by slicing too early.
“It’s done when it’s kinda like jello.”
That quote from the BBQ community captures something no thermometer number alone can tell you. Probe tenderness — when a meat thermometer or metal skewer slides into the thickest part of the brisket with no resistance, like pushing into warm butter — is the true doneness signal.
Test for Probe Tenderness
According to the USDA Food Safety and Inspection Service, brisket is food-safe when it reaches an internal temperature of 145°F (63°C) with a 3-minute rest. However, food safety and eating quality are two different targets:
| Temperature | What It Means |
|---|---|
| 145°F | USDA food safety minimum (3-min rest required) |
| 190–195°F | Sliceable, holds together, some chew remaining |
| 200–203°F | Probe tender, ideal for slicing; community consensus target |
| 205°F+ | Fall-apart shreddable; ideal for tacos and sandwiches |
Use your meat thermometer to check the internal temperature, then test probe tenderness by pushing the probe into the thickest part of the flat. If it meets any resistance, add 15 minutes and check again. If it slides in like butter, you’re done.
- Rest time is mandatory. Remove the brisket from heat, keep it wrapped, and rest it for:
- Instant Pot: 20–30 minutes
- Oven Braise: 30–45 minutes
- Hot-and-Fast Smoker: 45–60 minutes
Resting allows the muscle fibers to reabsorb the juices that were driven to the center during cooking. Slice immediately and those juices run out onto your cutting board — not into your mouth.
Slice Against the Grain
Slicing against the grain is the final technique that determines whether your brisket is tender or chewy. Muscle fibers run in one direction through the meat. Cutting with the grain means you’re serving long, tough fibers. Cutting against the grain shortens those fibers to ¼ inch or less, which is why the same brisket can taste dramatically different depending on how it’s sliced.
- How to slice:
- Identify the direction of the muscle fibers — they look like long parallel lines running through the meat.
- Rotate the brisket so your knife will cut across those lines, not parallel to them.
- Cut ¼-inch slices with a long, sharp carving knife using smooth, even strokes.
- On a whole packer brisket, the flat and point have grains running in different directions — rotate 90° when you reach the point.
Checkpoint: Your brisket has reached probe tenderness, rested fully, and been sliced against the grain. Serve immediately or hold wrapped in foil in a 170°F oven for up to 2 hours.
Troubleshooting: Common Brisket Mistakes
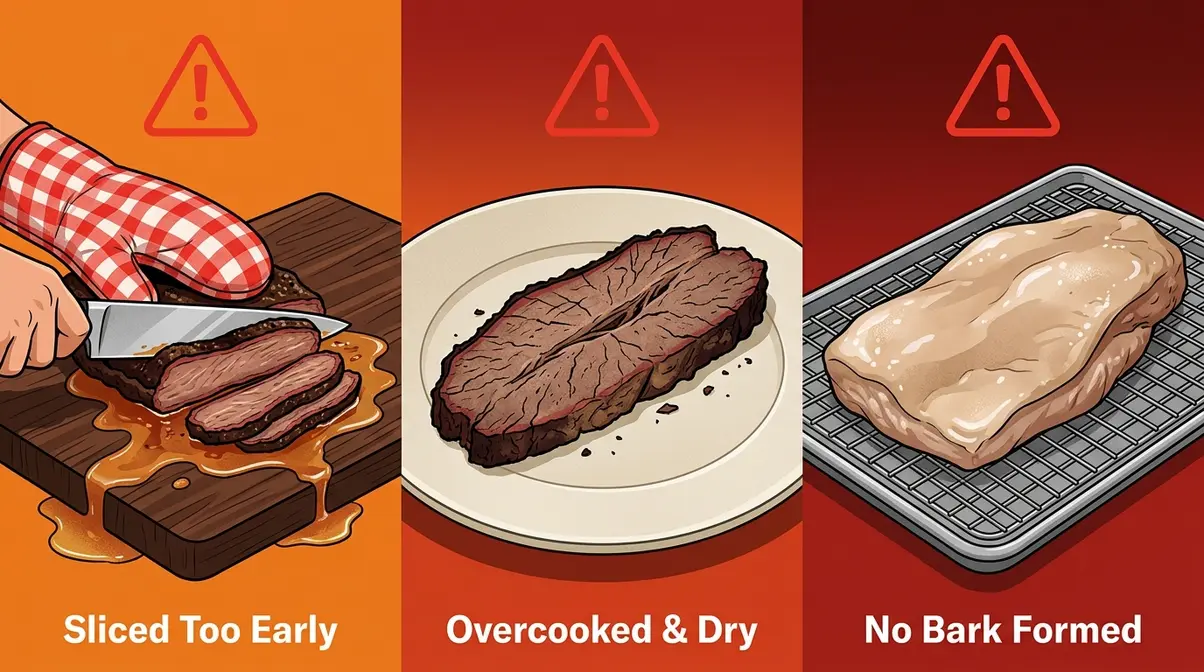
Even with the right method and timing, things can go sideways. Our team evaluated the most common failure points across all three methods. Here’s how to identify and fix them.
The Brisket Is Tough or Chewy
What went wrong: The brisket didn’t reach probe tenderness before you pulled it. Temperature alone isn’t the indicator — a brisket can read 200°F and still feel tight under the probe if it hasn’t had enough time for collagen to fully convert to gelatin.
How to fix it: Return the brisket to the heat source. For the Instant Pot, re-seal and pressure cook for an additional 15–20 minutes. For the oven, re-wrap tightly and add 30–45 minutes at 325°F. For the smoker, rewrap and continue at 300°F. Always test with the probe, not just the thermometer.
Prevention: Never pull brisket based on time alone. Always verify probe tenderness.
The Brisket Is Dry
What went wrong: Over-cooking, under-trimming (too little fat cap), or insufficient braising liquid in the oven method. Fat-side-down positioning in the oven also contributes — the fat cap acts as a moisture barrier when positioned correctly on top.
How to fix it: Slice the brisket thin, then serve with the pan drippings or a simple beef jus poured over the top. Dry slices rehydrate remarkably well when served with liquid. For leftovers, reheat brisket in a covered pan with ½ cup of beef broth at 300°F for 20–25 minutes.
Prevention: Maintain the ¼-inch fat cap, keep the brisket fat side up in the oven, and never skip the braising liquid.
The Bark Is Soft or Nonexistent
What went wrong: For oven and Instant Pot methods — this is expected. True bark only forms in a dry-heat environment like a smoker or uncovered roasting. For the smoker method specifically, soft bark usually means the brisket was wrapped too early (before 165–170°F) or the smoker temperature dropped below 280°F during the cook.
How to fix it: For the smoker, unwrap the brisket and return it to 300°F for 20–30 minutes before pulling. The bark will firm back up quickly.
Prevention: On the smoker, wait until internal temperature reaches at least 165–170°F and the bark looks dark mahogany before wrapping. Don’t open the smoker lid unnecessarily — every opening drops the grate temperature.
When to Choose Alternatives
The 3-Method Speed Framework covers the fastest proven methods, but it isn’t the right fit for every situation:
- If you need to feed 15+ people: A single Instant Pot or oven brisket maxes out at 6–8 lbs. Consider a traditional low-and-slow packer brisket overnight, or cook multiple flats simultaneously.
- If you want maximum smoke penetration: The hot-and-fast method at 300°F produces good smoke flavor, but a 12-hour low-and-slow cook at 225°F creates a deeper smoke ring and more complex flavor. Speed and traditional smoke flavor exist on a spectrum.
- If you don’t own a meat thermometer: Buy one before cooking. Without temperature verification, you cannot safely or reliably cook brisket using any method in this guide.
Advanced Tips: Reheating and Make-Ahead Brisket
How to Reheat Brisket
Brisket reheats better than almost any other cut of beef — the collagen that makes it tender also protects it during reheating. The key is low heat and moisture.
Oven method (best results): Slice the brisket, place in a baking dish, add 2–3 tablespoons of beef broth or pan drippings, cover tightly with foil, and heat at 300°F for 20–25 minutes. The brisket will absorb the liquid and emerge just as juicy as the first day.
Microwave (acceptable in a pinch): Place slices in a microwave-safe dish, add a splash of broth, cover with a damp paper towel, and heat in 30-second bursts at 60% power. High power will toughen the meat.
Avoid reheating more than once — repeated heating cycles break down the texture and dry out even well-marbled brisket.
Make-Ahead Brisket Tips
Brisket is genuinely better the next day. Resting overnight in its own juices allows flavors to deepen and the texture to become more consistent throughout the cut.
- Make-ahead method:
- Cook the brisket to probe tenderness using any method in this guide.
- Allow it to rest for 30–45 minutes, then refrigerate it whole and wrapped — do not slice until ready to serve.
- The next day, reheat using the oven method above, then slice and serve.
Refrigerated whole brisket keeps well for up to 4 days. Sliced brisket dries out faster — store it submerged in pan drippings if possible.
If you’re looking to expand your beef repertoire beyond brisket, check out our guides on mastering T-bone steak and perfecting flat iron steak.
Frequently Asked Questions
Can you cook brisket in 2 hours?
Yes — an Instant Pot or electric pressure cooker can produce tender, shreddable brisket in approximately 2 hours total, including searing, pressure cooking, and natural release. A 3 lb brisket flat needs roughly 60–75 minutes at high pressure plus 15–20 minutes of natural release, according to Taste of Home. The result is braised, shreddable brisket — not smoked — but it’s genuinely tender and flavorful. Add 30 minutes for prep and you’re serving brisket in under 2.5 hours from a cold start. This makes it an ideal weeknight dinner option when you don’t have all day to monitor a smoker.
Can you speed up cooking brisket?
Yes — three methods reliably speed up brisket cooking: pressure cooking (Instant Pot), oven braising at 325–350°F, and hot-and-fast smoking at 300°F. The Texas Crutch (wrapping in foil or butcher paper) also speeds any method by eliminating the temperature stall at 150–170°F, cutting 30–45 minutes from the total cook time (AmazingRibs).
How long will a 3 lb brisket take to cook?
A 3 lb brisket flat takes approximately 60–75 minutes in the Instant Pot, 2.25–3 hours in the oven at 325°F, or about 1.5 hours on a 300°F smoker — plus wrapping and rest time. Always verify doneness with a meat thermometer rather than relying on time alone. Probe tenderness at 200–203°F internal temperature is the true finish line. A 3 lb flat can reach it faster than larger cuts because of its thinner, more uniform profile.
What is the quickest way to cook a brisket?
The Instant Pot is the quickest way to cook a brisket, producing tender, shreddable results in under 2 hours for cuts up to 5 lbs. Set to high pressure at 20–25 minutes per pound, followed by 15–20 minutes of natural pressure release. If you want traditional bark and smoke flavor in the shortest possible smoker time, the hot-and-fast method at 300°F takes 4–6 hours and is significantly faster than low-and-slow.
Can a brisket be done in 5 hours?
Yes — a 4–5 lb brisket flat can reach probe tenderness in 5 hours or less using the oven braise method at 325–350°F or the hot-and-fast smoker method at 300°F. At 325°F with a tight foil seal, a 5 lb flat typically finishes in 4–5 hours. On a 300°F smoker, the same cut takes approximately 2.5 hours at that rate (30 min/lb), plus wrapping and rest. This puts total time around 4.5–5.5 hours. Use a meat thermometer to confirm the brisket has reached 200–203°F and passes the probe test before pulling.
Target internal temperature?
According to the USDA Food Safety and Inspection Service, brisket is food-safe at 145°F (63°C) internal temperature with a 3-minute rest. However, 145°F produces tough, chewy meat since the collagen hasn’t converted to gelatin yet. For sliceable brisket, target 195–200°F, and for fall-apart shreddable brisket, target 203–205°F. Probe tenderness — when the thermometer slides in with zero resistance — is the final confirmation that the brisket is done.
Conclusion
For home cooks who need brisket tonight, The 3-Method Speed Framework delivers: an Instant Pot produces shreddable brisket in under 2 hours, an oven braise at 325°F creates juicy sliceable results in 3–5 hours, and a 300°F smoker builds full bark and smoke flavor in 4–6 hours. According to the USDA FSIS, brisket is food-safe at 145°F with a 3-minute rest — but probe tenderness at 200–203°F is the real finish line. The method you choose determines the texture; the thermometer determines the outcome.
The 3-Method Speed Framework works because it removes the guesswork from the most intimidating part of the cook: the decision itself. Match your time to your method, respect the rest period, and slice against the grain — those three principles apply regardless of which path you take. The stall is physics, not failure. The Texas Crutch is your tool to push through it.
Start with the method that fits your schedule today. If you have an Instant Pot, try the 2-hour method this week — it’s the lowest-risk entry point for a first brisket. Once you’ve nailed the basics, you will know exactly how to cook brisket quickly regardless of the occasion. Tender brisket is not a 12-hour commitment — it’s a decision about which method to use.

quickdishcook
Recipe developer and writer at Quick Dish Cookbook.