Pickled okra offers a delightful tangy crunch. It’s a versatile snack or side dish.
This quick pickled okra recipe combines ease and flavor, perfect for those who love homemade treats. You don’t need to be an expert cook to pickle okra. With simple ingredients and a little time, you can create a delicious jar of pickled goodness.
Pickled okra is not only tasty, but it also adds a unique twist to salads and sandwiches. The process is straightforward, making it ideal for busy kitchens. Whether you’re preserving a summer harvest or simply trying something new, this recipe is a great choice. Dive into the world of pickling and discover a refreshing way to enjoy okra all year round.

Also Read: Watermelon Moonshine Recipe: Refreshing Summer Delight
Ingredients Needed
Quick Pickled Okra is a delightful addition to any meal. This easy recipe transforms fresh okra into a tangy treat. Homemade pickles are a great way to enjoy the benefits of fresh vegetables all year round. With the right ingredients, you can create a delicious Southern pickled okra that will impress your family and friends. Below, we outline the essential ingredients needed for this okra pickle recipe.
Fresh Okra
Fresh okra is the star of this quick pickled okra recipe. Choosing the right okra is crucial for the best pickled vegetables. Look for small to medium-sized pods. They should be bright green, firm, and free of blemishes. Larger pods can become tough and woody, which is less desirable.
Fresh okra benefits include being low in calories and rich in nutrients. It’s a great source of fiber, vitamin C, and folate. These nutrients are essential for a healthy diet and help in okra preservation. When preparing fresh okra for pickling, wash the pods thoroughly. Trim the stems without cutting into the pods to maintain their integrity.
Here’s a quick checklist for selecting fresh okra:
- Choose small to medium-sized pods.
- Look for bright green color and firm texture.
- Avoid pods with spots or blemishes.
Vinegar Options
Vinegar for pickling is a key component in preserving the okra. It adds the tangy flavor that makes pickled okra so delicious. There are several vinegar options to consider. Each gives the pickles a unique taste profile.
White vinegar is the most common choice. It provides a strong, clean flavor to the okra pickle recipe. Apple cider vinegar offers a milder taste with a hint of sweetness. It’s perfect for those who prefer less acidity. Rice vinegar can be used for a subtle, delicate flavor.
Here’s a simple table summarizing vinegar options:
| Vinegar Type | Flavor Profile |
|---|---|
| White Vinegar | Strong, clean, classic |
| Apple Cider Vinegar | Mild, slightly sweet |
| Rice Vinegar | Subtle, delicate |
Spices And Seasonings
Spices and seasonings elevate the flavor of your spicy pickled okra. Pickling spices add depth and complexity to the okra pickle recipe. Common choices include garlic, dill, mustard seeds, and peppercorns.
Garlic brings a pungent and savory note to the pickled vegetables. Dill adds a fresh, herby flavor that pairs well with okra. Mustard seeds introduce a hint of spice and texture. Peppercorns provide a subtle heat without overpowering the okra.
Consider this list of popular pickling spices:
- Garlic cloves for pungency.
- Fresh dill for herbal notes.
- Mustard seeds for spice.
- Peppercorns for mild heat.
Experimenting with different seasonings can create a unique pickled okra profile. Adjust the spices to suit your taste and enjoy the delightful flavors.
Preparation Steps
Quick Pickled Okra is a delightful treat. It adds a crunchy and tangy flavor to meals. This guide will show you the preparation steps. Let’s get started on preserving vegetables with this simple recipe.

Cleaning The Okra
Cleaning the okra is a vital step. Fresh and clean okra results in better pickles. Follow these steps for the best results:
- Start with fresh okra pods. Select those without blemishes.
- Rinse the okra under cold water. Use a colander for convenience.
- Pat the okra dry with a clean towel. Remove any excess moisture.
- Trim the stems slightly. Do not cut into the pod itself.
Once the okra is clean, it’s ready for the next step. This ensures no dirt or debris contaminates the brine. Clean okra leads to crunchy okra pickles.
Read Also: Quick And Easy Scalloped Potatoes Recipe Without Cheese
Preparing The Brine
The brine gives the okra its flavor. A well-made brine is crucial for tasty pickles. Here’s how to prepare the okra brine:
| Ingredient | Quantity |
|---|---|
| Water | 1 cup |
| Vinegar | 1 cup |
| Salt | 1 tablespoon |
| Sugar | 1 tablespoon |
| Pickling Spices | 1 tablespoon |
Combine all ingredients in a pot. Bring to a boil, stirring until salt and sugar dissolve. Remove from heat and let it cool. This mixture is now ready for vinegar pickling.
Packing The Jar
Packing the jar is the final step. It ensures the okra is preserved properly. Follow these steps for the best results:
- Place the cleaned okra in sterilized jars. Pack tightly but leave space at the top.
- Add garlic, dill, or other spices if desired. These enhance the flavor.
- Pour the cooled brine over the okra. Ensure the okra is fully submerged.
- Seal the jars with lids. Make sure they are tight and secure.
- Store the jars in the refrigerator. Let them sit for at least 24 hours before eating.
Refrigerator pickles like these are easy to make. They are a perfect addition to southern recipes. Enjoy your homemade pickles and share with friends!
Pickling Process

Making Quick Pickled Okra at home is a fun and easy way to enjoy this Southern vegetable. The pickling process enhances the flavor and preserves the okra, giving you delicious and crunchy okra all year round. Using simple ingredients and easy steps, you can create Refrigerator Pickles that are perfect as a snack or a side dish. Let’s dive into the pickling process and create some Homemade Pickles!
Heating The Brine
Heating the brine is the first step in making Quick Pickled Okra. The brine consists of a mixture of vinegar, water, and salt. You will also need some sugar and Pickling Spices. A Vinegar Brine is essential for preserving the okra and giving it a tangy flavor. To prepare the brine, follow these steps:
- Combine 2 cups of water and 2 cups of vinegar in a pot.
- Add 2 tablespoons of salt and 1 tablespoon of sugar.
- Include 1 tablespoon of Pickling Spices for extra flavor.
- Bring the mixture to a boil over medium heat.
Stir the brine occasionally to ensure all the salt and sugar dissolve completely. Once the brine reaches a boil, reduce the heat and let it simmer for a few minutes. This will allow the flavors to meld together. Heating the brine properly is crucial for the Vegetable Pickling process. Make sure the brine is hot before moving to the next step.
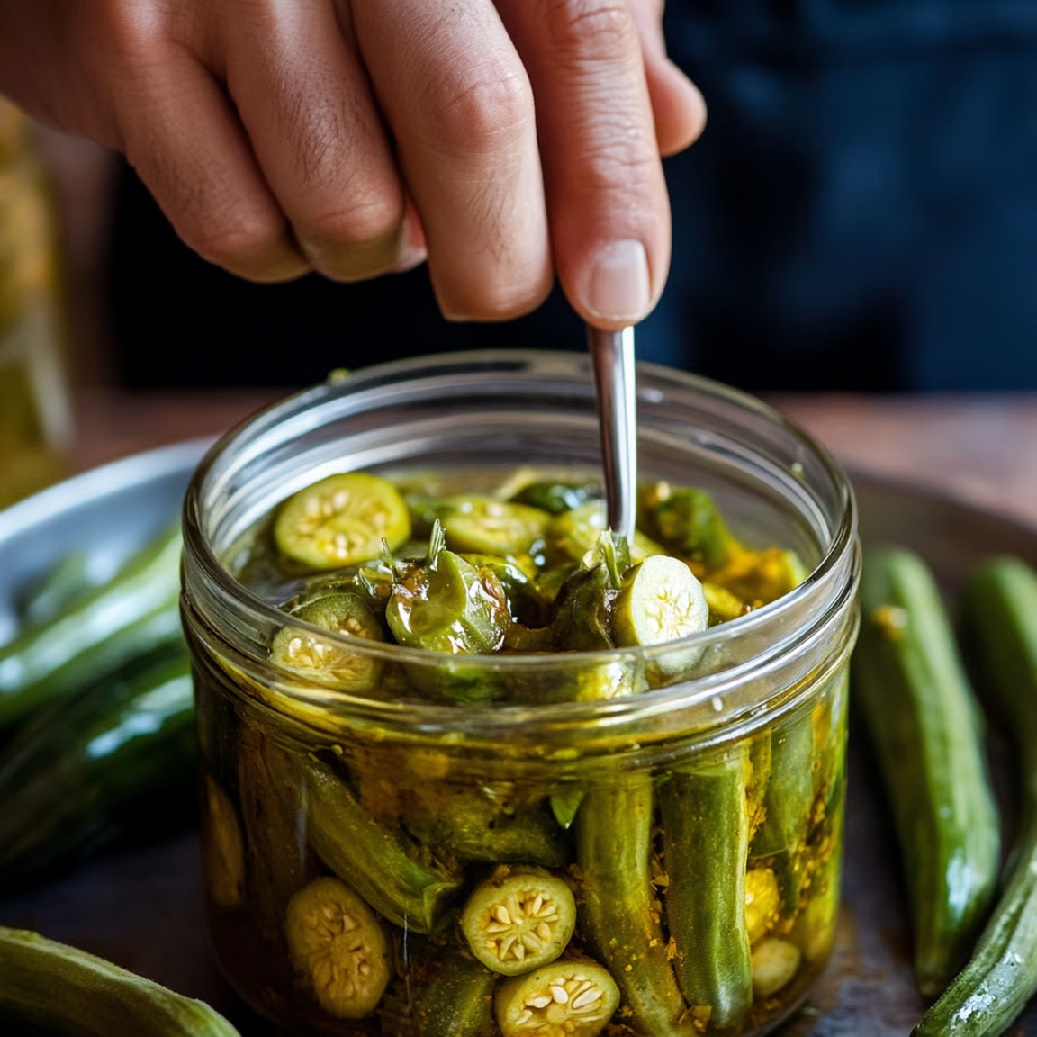
Pouring Over Okra
After heating the brine, the next step is pouring it over the okra. Prepare your okra by washing it thoroughly. Trim the stems, but do not cut them off completely. This helps keep the okra crunchy. Place the okra in a clean jar. You can add garlic cloves, dill, or other spices to the jar for additional flavor.
Carefully pour the hot brine over the okra, ensuring all the pieces are submerged. It’s important to leave some space at the top of the jar. This space allows for expansion as the okra absorbs the brine. Pouring the brine over the okra while it is still hot helps in preserving the okra and enhancing its flavor. The Vinegar Brine will start the pickling process, and the okra will begin to soften slightly.
Use a spoon or a small spatula to remove any air bubbles trapped in the jar. Gently press the okra down to ensure it is fully covered by the brine. This step is important for the Canning Methods and ensures the okra is preserved properly. Once the okra is submerged and the air bubbles are removed, you are ready to seal the jar.
Sealing The Jar
Sealing the jar is the final step in the pickling process. Place the lid on the jar and screw it on tightly. This creates an airtight seal, which is crucial for Okra Preservation. An airtight seal prevents bacteria from entering the jar, ensuring the okra stays fresh and safe to eat. After sealing the jar, let it cool to room temperature.
Once the jar has cooled, store it in the refrigerator. Refrigerator Pickles should be kept in the fridge to maintain their freshness and crunchiness. The okra will need some time to absorb the flavors of the brine. For best results, let the pickles sit for at least 24 hours before eating. This allows the flavors to develop fully.
Sealing the jar properly ensures that your Quick Pickled Okra stays fresh and delicious. These Homemade Pickles can be enjoyed as a snack, added to salads, or served alongside your favorite Southern Recipes. The process is simple, and the results are delightful. Enjoy your Crunchy Okra!
Serving Suggestions
Quick Pickled Okra is a delightful treat, offering a taste of Southern Cuisine. This recipe provides a tangy and crunchy experience. It suits many occasions and culinary needs. Perfect for Healthy Appetizers or as part of a meal. The Easy Pickling Method ensures you enjoy homemade pickles in no time. Let’s explore some serving suggestions that can elevate your Quick Pickled Okra experience.
Snack Ideas
Quick Pickled Okra makes for great Crunchy Snacks. The tangy flavor is refreshing and unique. Here are some snack ideas:
- Enjoy on its own as a light snack.
- Serve with cheese and crackers for a simple platter.
- Add to a charcuterie board for a Southern twist.
These snacks are perfect for parties or casual gatherings. The Okra Benefits include low calories and high fiber. It’s a guilt-free choice for Healthy Appetizers. The Pickling Spices enhance the natural flavor of okra. This combination makes it irresistible.
Salad Additions
Quick Pickled Okra can transform your salad game. It brings a unique texture and flavor. Consider these Okra Salad Recipes:
- Toss with greens, tomatoes, and onions for a refreshing mix.
- Add to a grain salad with quinoa or couscous.
- Mix with beans and corn for a hearty option.
The pickled okra adds zest to any salad. Its crunch complements softer ingredients well. These salads are nutritious and full of flavor.
Pairing With Dishes
Quick Pickled Okra pairs well with many Vegetable Side Dishes. It can enhance your meal with its bold flavor. Here are some pairing ideas:
- Serve alongside grilled meats for a tangy contrast.
- Pair with rice dishes to add a crunchy element.
- Include in sandwiches for an added bite.
These pairings offer variety in your meals. They bring a Southern Cuisine flair to everyday dishes. Quick Pickled Okra is versatile and delicious.
Frequently Asked Questions
How To Easily Pickle Okra?
To pickle okra, wash and trim the stems. Pack okra in sterilized jars. Boil vinegar, water, salt, and spices. Pour the hot brine over the okra, leaving space at the top. Seal jars tightly. Store in a cool, dark place for at least two weeks before enjoying.
How Long Does It Take For Pickled Okra To Be Ready To Eat?
Pickled okra typically takes about 2 to 3 weeks to be ready to eat. Ensure the jar is sealed tightly. Store it in a cool, dark place for optimal results. This allows flavors to fully develop, providing a tangy and delicious treat.
Enjoy your homemade pickled okra once it’s perfectly cured.
How To Pickle Okra Without It Being Slimy?
Use young, tender okra for pickling. Wash and dry them thoroughly to remove excess moisture. Add vinegar, salt, and spices to the brine. Avoid overcooking; heat just enough to seal jars. Store in a cool place to prevent sliminess and enhance flavor.
How Much Vinegar Do You Soak Okra In?
Use 1 cup of vinegar for every 2 cups of okra. Soak for 30 minutes before cooking. This helps reduce slime and enhances flavor. After soaking, rinse the okra thoroughly with water. Enjoy a more pleasant texture in your dishes.
Conclusion
This quick pickled okra recipe is easy and delicious. Try it today. Your taste buds will love the tangy, crunchy flavor. Perfect for snacks or adding to meals. Quick pickling saves time and effort. Fresh and flavorful in every bite.
Enjoy making and eating this simple recipe. Share it with friends and family. Happy pickling!
