Quick Way to Cook Corn on the Cob: 6 Methods & Exact Times

What’s in this guide
- What You'll Need Before You Start
- Step 1: Choose the Right Cooking Method for Your Needs
- Step 2: Cook Corn on the Cob in the Microwave (3–4 Minutes)
- Step 3: Boil Corn on the Cob (10-15 Minutes)
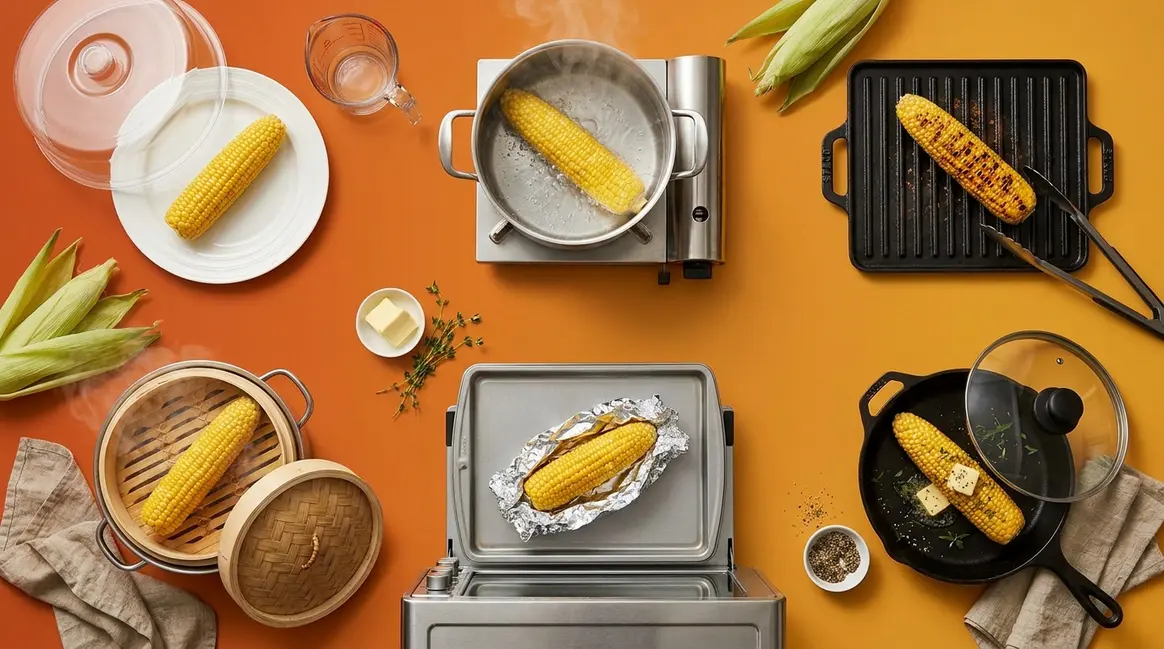
- Step 4: Steam, Grill, and Roast Corn (Alternative Methods)
- Step 5: Pro Tips and Special Cases
- Step 6: Store, Freeze, and Reheat Corn on the Cob
- Troubleshooting: Common Corn Cooking Mistakes
- FAQ: Your Top Corn Cooking Questions Answered
- The Corn Cooking Decision Matrix Works - Here's Your Next Step
Quick Answer: The fastest quick way to cook corn on the cob is in the microwave. Place one ear (husk on) on a microwave-safe plate and cook on HIGH for 3–4 minutes. This guide covers all 6 methods — microwave, boiling, steaming, grilling, oven roasting, and skillet-steam — with exact timing charts so you never guess again. Total active prep time: under 5 minutes for the fastest method.
You’re standing in your kitchen, corn in hand, staring at a large pot and wondering: do I fill this thing, or just use the microwave? You’ve been there before — you filled the pot, waited for the water to boil, and ended up with mushy, flavorless kernels that nobody wanted a second bite of.
That’s the real problem with most corn recipes. They give you a time range like “5 to 10 minutes” and leave you guessing. Overcooked corn is rubbery and bland. Undercooked corn is starchy and tough. Neither is what you wanted when you grabbed those ears at the farmers’ market.
By the end of this guide, you’ll know the exact method, timing, and trick for perfect corn every time — no guesswork required. We cover 6 methods from fastest to slowest, with university-backed timing charts and a foolproof doneness test. We cover everything from the fastest way to cook corn on the cob (microwave, 3–4 minutes) to low-and-slow oven roasting for caramelized, sweet kernels.
What You’ll Need Before You Start
Before you start cooking, take 2 minutes to gather what you need. The right prep makes all the difference — especially for beginners.
How to pick fresh corn: Look for bright green, tightly wrapped husks. The silk at the top should be golden-brown and slightly moist, not dry or black. Press through the husk with your thumb — you should feel firm, evenly spaced kernels with no soft spots. According to Iowa State University Extension, fresh corn should be used as soon as possible after purchase, since sugars begin converting to starch once the ear is picked (Iowa State University Extension).
Tools by method:
- Microwave: Microwave-safe plate, sharp knife, oven mitts; optional damp paper towel for husk-off method
- Boiling: Large pot (big enough for ears to be fully submerged), tongs, lid
- Steaming: Large pot with a steamer basket or a tight-fitting lid, tongs
- Grilling: Outdoor grill or grill pan, tongs, optional foil
- Oven roasting: Baking sheet, oven, tongs
- Skillet-steam: Large skillet with a lid, tongs, splash of water
Time estimates at a glance:
- Microwave: ~3–5 minutes active
- Boiling: ~10–15 minutes total (including wait for the rolling boil)
- Steaming: ~8–12 minutes total
- Grilling: ~10–15 minutes total
- Oven roasting: ~25–30 minutes total
- Skillet-steam: ~5–8 minutes total
Optional but helpful: Butter, salt, lime wedges, cotija cheese, and chili powder for Mexican street corn (elote). A damp paper towel is useful for the husk-off microwave method.
Now let’s get into the methods — starting with the absolute fastest.
Step 1: Choose the Right Cooking Method for Your Needs
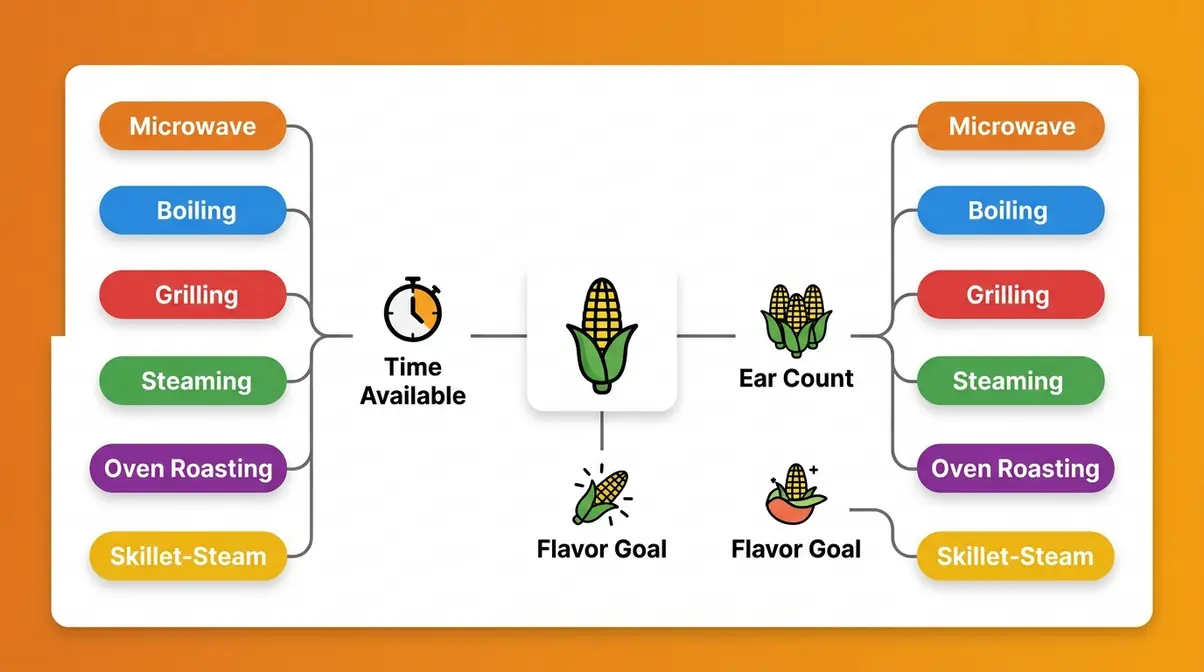
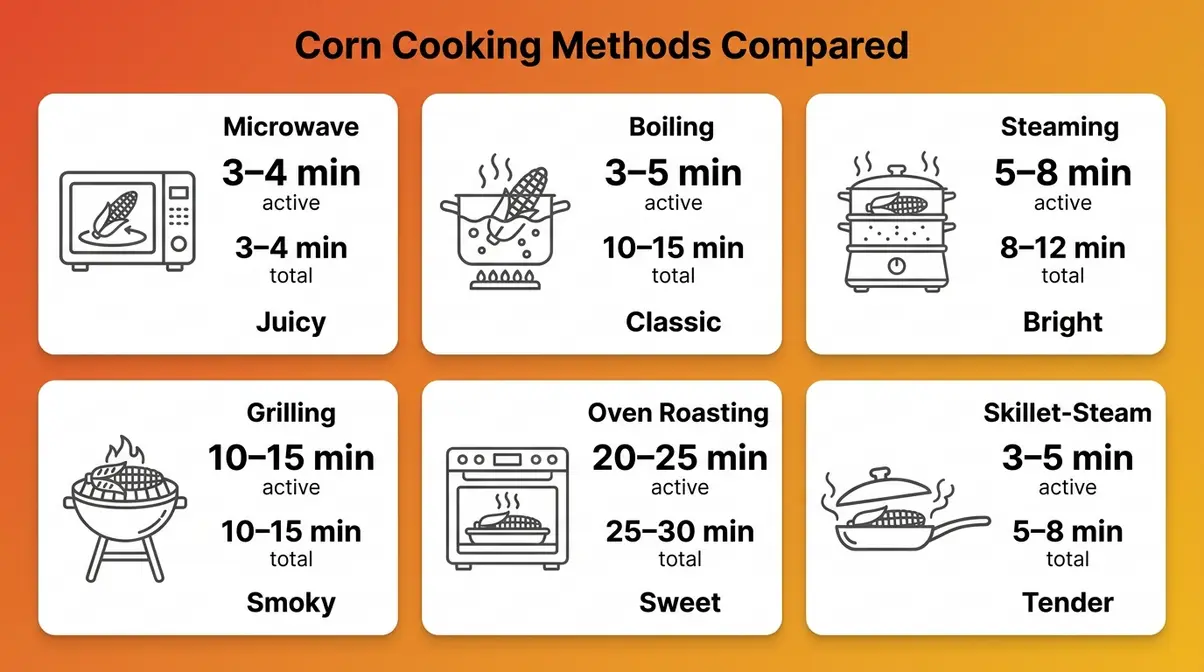
The best way to cook corn on the cob depends on three things — not just how hungry you are. Microwaving is the fastest way to cook corn on the cob at 3–4 minutes per ear, but it’s not always the right call. Use The Corn Cooking Decision Matrix — a three-factor framework matching time available, ear count, and flavor goal — to pick your method before you even turn on the stove.
Which Corn Cooking Method Is Fastest?
The best way to cook corn on the cob starts with understanding what each method actually costs you in time. Active time means how long you’re actually doing something. Total time includes waiting for water to boil or an oven to preheat — time that adds up fast on a weeknight.
Our research into university extension guidelines and expert cooking resources identified a consistent gap: most top-ranked guides fail to provide exact scaling times for more than one ear, or separate active time from total time. The table below fills that gap.
| Method | Active Time | Total Time | Best For | Flavor | Difficulty |
|---|---|---|---|---|---|
| Microwave | 3–4 min | 3–4 min | 1–2 ears, no cleanup | Steamed, juicy | Beginner |
| Boiling | 3–5 min | 10–15 min | Large batches (4–8 ears) | Classic, tender | Beginner |
| Steaming | 5–8 min | 8–12 min | Flavor without boiling | Bright, fresh | Beginner |
| Grilling | 10–15 min | 10–15 min | BBQ flavor, outdoor cooking | Smoky, charred | Intermediate |
| Oven Roasting | 20–25 min | 25–30 min | Hands-off cooking | Caramelized, sweet | Beginner |
| Skillet-Steam | 3–5 min | 5–8 min | No microwave, fast stovetop | Fresh, tender | Beginner |
Active time = hands-on cooking time. Total time includes heating the oven or bringing water to a rolling boil.
A few plain-English notes on when each method wins:
Boiling is the classic choice when you’re cooking for four or more people. It provides consistent heat penetration, ensuring every ear is perfectly tender. It’s the best option when flavor consistency matters more than speed.
Grilling is worth the extra time when you want smoky, slightly charred kernels with real depth. The direct heat caramelizes the natural sugars, making it perfect for summer barbecues and pairing with heavy meats.
Oven roasting is the hands-off winner — you set it and walk away. Roasting concentrates the corn’s sweetness without waterlogging the kernels, making it ideal for Sunday dinners when the oven is already in use.
Skillet-steam is the underrated method that delivers nearly microwave-level speed without any specialized equipment. It’s perfect for 1-2 ears when you want fresh, tender corn but don’t own a microwave.
Microwaving corn in the husk takes just 3–4 minutes per ear and requires no pot, no draining, and no cleanup — making it the fastest cooking method for 1–2 ears of corn (EatingWell’s method comparison, 2026).
Now that you know your options, use the Decision Matrix below to pick your method — then jump straight to that step.
The Corn Cooking Decision Matrix
The Corn Cooking Decision Matrix uses three questions to find your best method: (1) How much time do you have? (2) How many ears are you cooking? (3) What flavor matters to you? Match your row and jump to that step — no second-guessing required.
| Time Available | Ears to Cook | Flavor Goal | Best Method |
|---|---|---|---|
| Under 5 minutes | 1–2 | Any | Microwave (Step 2) |
| 10–15 minutes | 3–8 | Classic, tender | Boiling (Step 3) |
| 10–15 minutes | 1–4 | Smoky, charred | Grilling (Step 4) |
| 5–10 minutes | 1–4 | Fresh, bright | Steaming (Step 4) |
| 25–30 minutes | 1–6 | Sweet, caramelized | Oven Roasting (Step 4) |
| Under 5 minutes | 1–4 | Fresh, no microwave | Skillet-Steam (Step 4) |
Find the row that matches your situation and jump to that step. If two methods fit, check the Flavor Goal column — that’s usually the deciding factor. We’ll reference this matrix throughout the guide so you always know where you stand.
The quick way to cook corn on the cob is almost always the microwave for weeknights, but the Decision Matrix makes the case for every other method too. A summer cookout for eight? That’s a boiling situation. Sunday roasting for the family? Oven roasting wins on flavor.
Let’s start with the fastest method in the matrix — the microwave.
Step 2: Cook Corn on the Cob in the Microwave (3–4 Minutes)
Microwaving corn in the husk is the fastest way to cook corn on the cob — just 3–4 minutes per ear with no pot, no draining, and zero silk mess. MSU Extension confirms that wrapping corn in moisture during microwaving preserves juiciness and flavor. The result is tender, juicy kernels without washing a single extra dish.
****
“Great way to make some quick corn on the cob! Also saves you from washing an extra pot 🙌”
— Home cook review
That review captures exactly why so many beginner cooks reach for the microwave first. It’s not just fast — it’s genuinely foolproof.
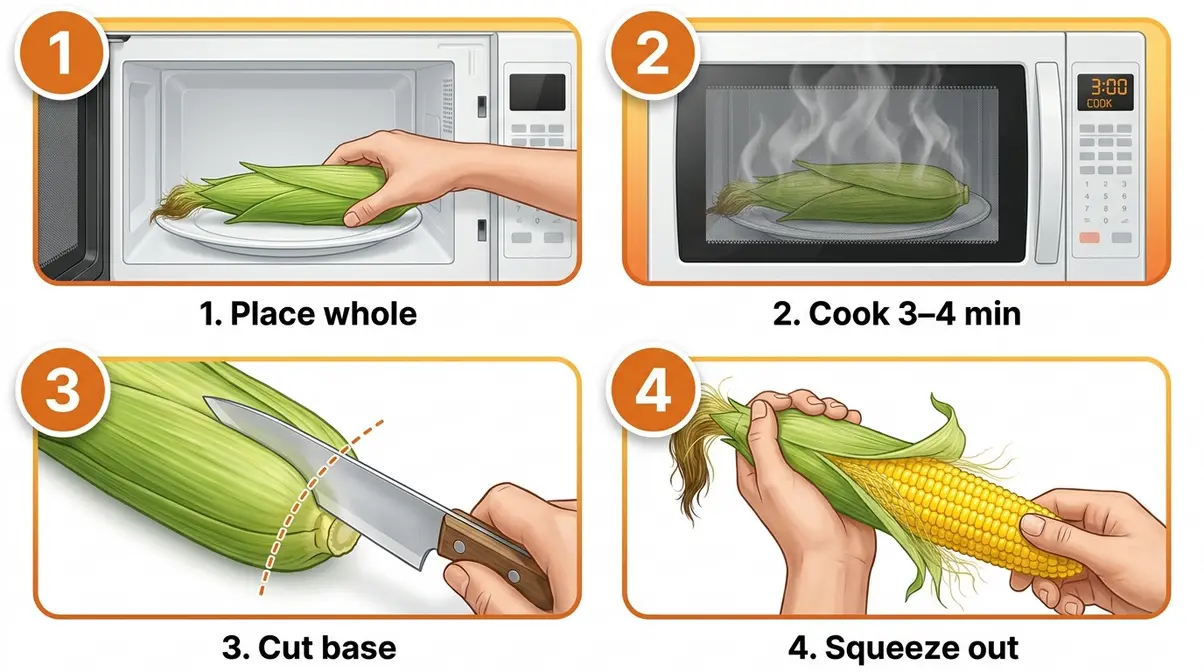
How to Microwave Corn on the Cob with the Husk On
The husk acts like a natural steam bag. As the corn heats up, moisture from the kernels turns to steam and stays trapped inside, cooking the corn evenly from the outside in. This is why the husk-on method produces juicier, more flavorful corn than boiling — the moisture stays with the corn instead of leaching into the water.
University of Maine’s flavor-saving microwave tip: for the best flavor, remove the outer husks but leave the inner husks on during microwaving. After cooking, pull the husks downward to remove them along with the silk. (University of Maine Extension, Bulletin #4253, 2026)
Step-by-step — husk-on method:
- Place the whole, unshucked ear of corn on a microwave-safe plate.
- Microwave on HIGH for 3–4 minutes for one ear. (See the Time-Scaling Chart in the next section for multiple ears.)
- Remove carefully — the husk will be very hot. Use oven mitts.
- Using a sharp knife, cut off the bottom stem end about 1 inch above the last row of kernels.
- Hold the corn from the tassel end and squeeze firmly downward — the ear will slide out clean, with all silk left behind in the husk.
What is the trick for microwaving corn on the cob? The trick is to cook the corn in its husk and then cut the bottom and squeeze it out. The silk stays inside the husk — you get perfectly clean, silk-free corn in under 5 minutes. No picking out silk strands, no soggy mess.
Checkpoint: You should now have a clean, steaming ear of corn with no silk attached. The kernels should look bright yellow and feel tender when pressed lightly with a fingertip. If the kernels still feel firm, return to the microwave for 30-second intervals until done.
You can also try the damp paper towel variation from MSU Extension — peel back the husks, remove the silks, then wrap the ear in a damp paper towel before microwaving. This bridges neatly to the no-husk method below.
No husk? No problem — here’s how to microwave corn without it.
How to Microwave Corn on the Cob Without the Husk
To microwave corn without the husk, wrap the shucked ear in a damp paper towel and microwave on HIGH for 2–4 minutes per ear. This is the answer to the frequently asked question: “How long do you microwave an ear of corn without the husk?” — 2–4 minutes, with the damp towel doing the moisture work the husk normally handles.
Step-by-step — no-husk method:
- Remove the husk and silk from the corn completely.
- Wet a paper towel and wring it out — it should be damp, not dripping.
- Wrap the corn tightly in the damp paper towel.
- Place on a microwave-safe plate and microwave on HIGH for 2–4 minutes per ear. (See the Time-Scaling Chart for multiple ears.)
- Carefully unwrap — steam will escape. Let sit for 1 minute before handling.
According to MSU Extension’s microwave method, microwaving corn wrapped in a damp paper towel on high for two to six minutes is an effective method that preserves moisture. The husk-on method is slightly preferred for flavor, but the paper-towel method delivers nearly identical results — it’s the right choice when your corn is already shucked.
Iowa State variation: For 2–4 shucked ears, Iowa State University Extension recommends placing corn in a microwave-safe dish with 1/3 cup water, covering with vented plastic wrap, and microwaving on high for 3 minutes per ear until tender. This water-in-dish method works well when cooking multiple ears at once.
Checkpoint: The corn should feel tender when you press a kernel firmly. If it still feels firm after 4 minutes, microwave in 30-second intervals until done. It’s better to slightly undercook and add time than to overcook and end up with rubbery kernels.
Now for the question everyone asks: exactly how long do you microwave more than one ear? The answer is in this chart.
Microwave Time-Scaling Chart
How to cook corn on the cob in the microwave gets more complicated the moment you add a second ear — and most guides simply ignore this. The chart below gives you exact minutes for 1 to 4 ears across four common wattage levels, based on university extension data and standard cooking guidelines.
Not sure of your microwave’s wattage? Check the sticker on the inside of the door or the back of the unit. Most modern microwaves are 1,000–1,200W. Older models are often 700–800W.
| Ears | 700W | 900W | 1100W | 1200W |
|---|---|---|---|---|
| 1 ear | 5–6 min | 4–5 min | 3–4 min | 3 min |
| 2 ears | 8–9 min | 7–8 min | 5–6 min | 4–5 min |
| 3 ears | 11–12 min | 9–10 min | 7–8 min | 6–7 min |
| 4 ears | 13–15 min | 11–13 min | 9–10 min | 8–9 min |
All times are for the husk-on method on HIGH (100%) power. Subtract approximately 1 minute per ear for the husk-off damp paper towel method. Add 30 seconds per ear for especially large or dense ears.
UNL Extension’s recommended microwave timing advises microwaving corn for 4 minutes, then letting it sit for 5 minutes before removing the husk and silk. That 5-minute rest is important — it allows carry-over cooking, where the corn continues to steam inside the husk even after the microwave stops. You’ll get more evenly cooked kernels without any rubbery spots.
Pro tip: If in doubt, start at the lower end of the range and add 30-second intervals. Slightly undercooked corn is easy to fix. Overcooked corn is not.
Checkpoint: After the recommended time, the corn should feel tender when you press through the husk. The kernels should look plump and bright, not wrinkled.
Step 3: Boil Corn on the Cob (10-15 Minutes)
Boiling is the classic method for a reason — it’s beginner-friendly, scales effortlessly to large batches, and delivers consistently tender, crisp, juicy kernels. The key distinction the Decision Matrix highlights is time: boiling takes 10–15 minutes total once you account for the rolling boil, making it a deliberate choice rather than the fastest option. While boiling isn’t the absolute quick way to cook corn on the cob, it is the most reliable method for large batches.
How Long to Boil Corn on the Cob
According to Iowa State University Extension, the correct boiling method is: bring a large pot of water to a rolling boil, drop in the husked corn, and boil for 5–6 minutes. Penn State Cooperative Extension recommends boiling husked corn in unsalted water for 4–7 minutes until tender. Utah State University Extension offers a slightly different approach that many cooks prefer — add husked ears to already-boiling water, cover, let the water return to a boil, then turn off the heat and let stand for 5 minutes. The corn can stay in the hot water for up to 10 minutes before serving (Utah State University Extension, 2026).
The Utah State method is particularly forgiving for beginners. There’s no risk of overcooking if you get distracted — the residual heat does the work gently.
Step-by-step — boiling method:
- Fill a large pot with enough water to fully submerge the ears.
- Bring the water to a rolling boil — not just a simmer, but a vigorous, full boil.
- Remove the husks and silk from each ear.
- Drop the ears into the boiling water carefully using tongs.
- Boil for 3–5 minutes for fresh sweet corn, or 5–7 minutes for older or larger ears.
- Remove with tongs. Let cool for 1–2 minutes before handling.
Should you add salt to the water? Both Penn State and Utah State Extension guidance advises against adding salt — it can toughen the kernels. Instead, add salt after cooking, directly to the corn.
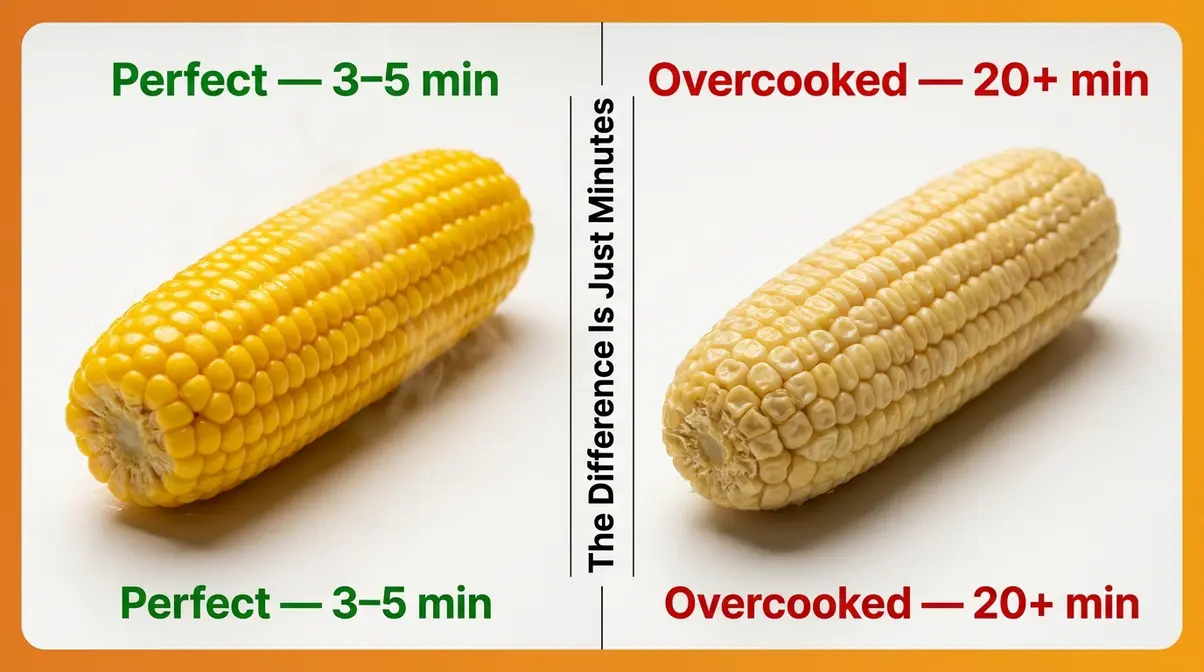
Is 20 minutes too long to boil corn? Yes, significantly. Fresh sweet corn only needs 3–7 minutes in boiling water. Boiling for 20 minutes will produce mushy, flavorless kernels as the natural sugars break down and the texture collapses. If you’re cooking older corn (bought days ago rather than same-day), 7–9 minutes is the upper limit.
What to Add to Boiling Water for Better Corn
Plain water works perfectly for fresh, in-season sweet corn. However, a technique from Penn State food research suggests adding 3 tablespoons of sugar and a teaspoon of skim milk to the boiling water. The sugar helps the corn retain its own natural sweetness, and the milk is said to enhance color and reduce mineral leaching into the water (Penn State Agricultural Sciences). This is particularly useful if your corn was picked more than a day ago and has already started converting its sugars to starch.
Other Flavor Enhancers:
- Butter and Milk Bath: For an incredibly creamy texture, add a cup of milk and half a stick of butter directly to the boiling water. This creates a rich poaching liquid that infuses the kernels with dairy sweetness.
- Aromatics: Throwing a bay leaf, a few garlic cloves, or half an onion into the boiling water can subtly perfume the corn, making it an excellent base for savory dishes.
- Lemon Juice: A squeeze of fresh lemon juice in the water can brighten the final flavor, especially for older ears that have lost their natural zing.
What About Salt? Both Penn State and Utah State Extension guidance advises against adding salt to the boiling water—it can toughen the kernels and make them chewy. Instead, always add salt after cooking, directly to the corn just before serving.
Water-to-corn ratio: Use at least 1 gallon of water for every 4 ears. This keeps the water temperature from dropping too dramatically when you add the corn, which maintains a consistent cooking environment.
How to Tell When Boiled Corn Is Done
The doneness test is where most beginners go wrong. Forget the clock — use these cues instead.
Visual cue: The kernels should look bright, deep yellow (or white for white corn varieties) — not pale or translucent. Overcooked corn turns dull and slightly wrinkled.
Texture cue: Pierce a kernel with a fork. It should offer slight resistance before giving way — tender but not mushy. If the fork slides in with zero resistance, it’s overcooked.
The MSU Extension fork test: According to MSU Extension, corn is done when you can pierce a kernel with a fork and liquid squirts out. That’s your signal — juicy, not dry.
Checkpoint: Bright color + slight resistance + liquid when pierced = perfectly cooked corn. If your corn is pale and soft, it’s overcooked. Add it to a salad or soup rather than serving it on the cob.
Step 4: Steam, Grill, and Roast Corn (Alternative Methods)
The microwave and boiling cover most weeknight scenarios in the Decision Matrix. But steaming, grilling, and oven roasting each have a clear use case — and knowing when to reach for them is the difference between good corn and great corn.
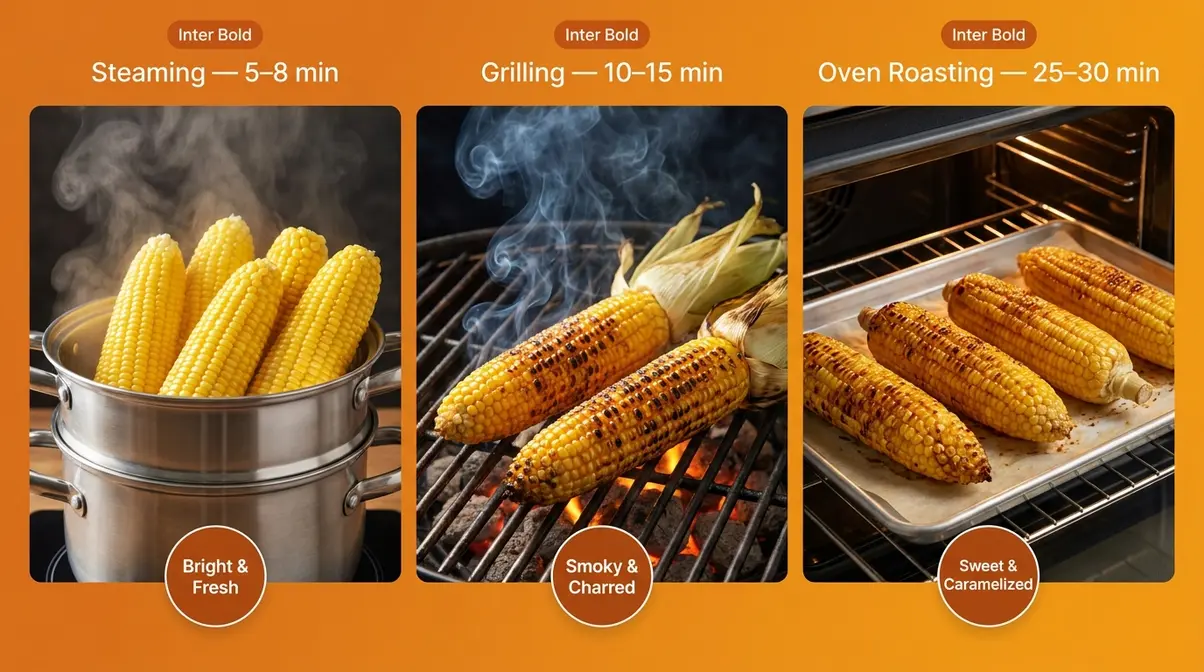
How to Steam Corn on the Cob (5–8 Minutes)
Steaming is the method the Decision Matrix recommends when you want fresh, bright flavor without boiling away the natural sweetness. It uses less water than boiling and keeps more of the corn’s natural taste intact.
Step-by-step — steaming method:
- Add 1–2 inches of water to a large pot with a steamer basket. The water should not touch the bottom of the basket.
- Cover and bring the water to a full boil over high heat.
- Husk the corn and remove the silk.
- Place the ears in the steamer basket. Cover tightly.
- Steam for 5–8 minutes for crisp-tender kernels, or up to 10 minutes for softer corn.
Checkpoint: Kernels should look bright and feel tender when pressed. Steam cooking is forgiving — a minute or two extra won’t ruin the corn the way boiling can.
How to Grill Corn on the Cob (10–15 Minutes)
Grilling is the Decision Matrix’s answer when you have 10–15 minutes and want smoky, charred kernels with real depth. It’s the only method that adds flavor the corn doesn’t already have.
Husked (direct grill): Preheat the grill to medium-high (400–450°F). Brush shucked ears lightly with oil or butter. Grill for 8–12 minutes, turning every 2–3 minutes, until charred in spots and tender throughout.
Husk-on (steam-roast): Leave the husks on — they act like a natural foil wrap, trapping steam and producing incredibly tender, juicy kernels. Grill over medium heat for 15–20 minutes, turning occasionally, until the husks are charred and the kernels are tender. Pull back the husks carefully (they’ll be very hot) before serving.
Checkpoint: The kernels should have some visible char marks and feel tender when pressed through the husk. The husk-on method produces noticeably juicier corn than the direct-grill method.
How to Roast Corn in the Oven (25–30 Minutes)
Oven roasting is the Decision Matrix’s recommendation for sweet, caramelized corn when you have time to spare. It’s a completely hands-off method — ideal when you’re already using the oven for other dishes.
Step-by-step — oven roasting:
- Preheat the oven to 400°F (204°C).
- Leave the husks on (they protect the kernels and trap steam), or wrap husked ears individually in foil.
- Place directly on the oven rack or on a baking sheet.
- Roast for 25–30 minutes, turning once at the halfway point.
- Remove and let cool for 2–3 minutes before shucking.
Checkpoint: The husks will be lightly browned and slightly dried. The kernels inside should be tender and slightly caramelized — sweet and golden, with none of the pale, watery quality that boiling can produce.
Skillet-steam method: For a fast stovetop alternative when you don’t own a microwave, add 1/4 inch of water to a large skillet with a lid. Bring to a boil, add husked ears, cover, and steam for 3–5 minutes. This delivers fresh, tender corn in nearly the same time as the microwave.
Step 5: Pro Tips and Special Cases
These are the scenarios that go beyond basic cooking — frozen corn, Mexican street corn, and the husk-on technique that university food science confirms produces the best results. Each one uses the fastest way to cook corn on the cob as a starting point and builds on it.
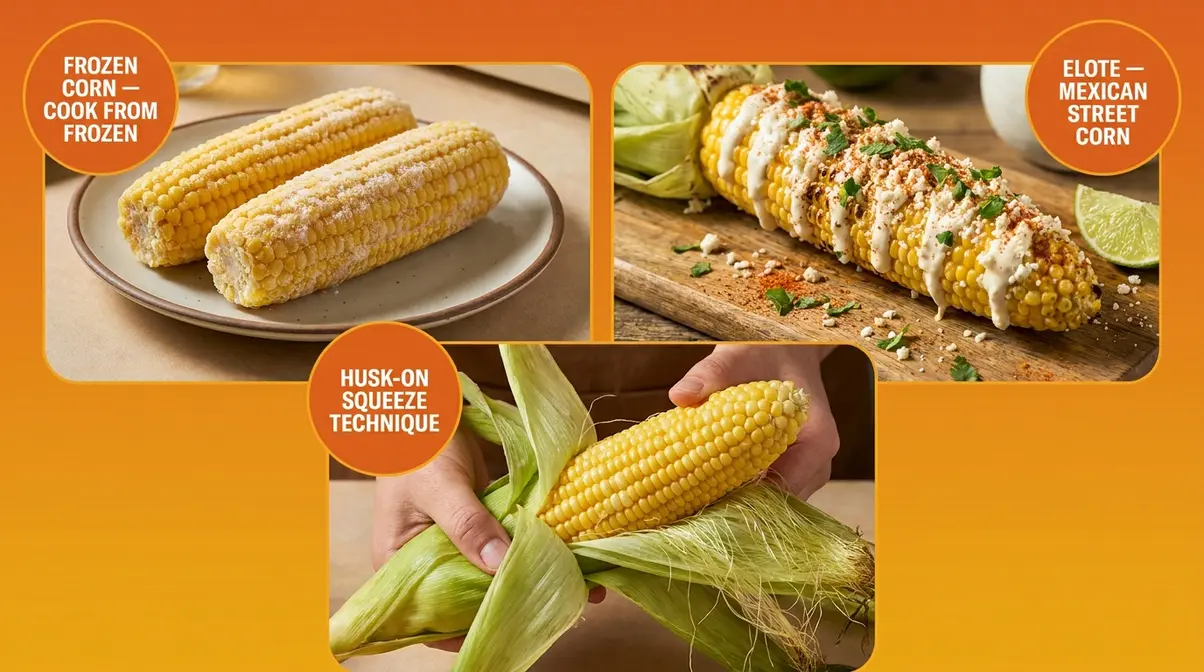
How to Cook Frozen Corn on the Cob
Frozen corn on the cob is already blanched — briefly boiled and flash-frozen to lock in flavor and texture. That means it cooks faster than fresh corn, not slower. Because the freezing process alters the cellular structure slightly, choosing the right reheating method is crucial to avoid a soggy texture.
Microwave method (fastest):
- Place the frozen ear on a microwave-safe plate.
- Add 1 tablespoon of water to the plate.
- Cover with plastic wrap or a microwave-safe cover.
- Microwave on HIGH for 3–5 minutes, depending on size and wattage.
- Rest for 1 minute before serving.
Boiling method: Drop frozen ears directly into a rolling boil. Cook for 5–8 minutes — slightly longer than fresh corn since the frozen core takes extra time to heat through. Avoid simmering, as slow heating can make frozen corn waterlogged.
Oven Roasting method: For a firmer texture, brush frozen ears with butter and roast at 400°F (204°C) for 25-30 minutes. This evaporates excess surface moisture.
Storage note: According to Purdue Extension’s Food Storage Guide, fresh corn on the cob keeps in the refrigerator for 1–2 days. Frozen corn maintains quality for up to 8 months at 0°F or below (Purdue Extension). Always check the package instructions for commercially frozen corn, as times vary by brand and ear size.
How to Make Mexican Street Corn (Elote)
Mexican street corn — elote — is the most popular corn upgrade in home cooking right now, and it takes under 5 minutes to assemble once your corn is cooked. Any cooking method works, but grilling or roasting produces the best flavor base for elote because the slight char pairs perfectly with the creamy, tangy toppings.
What you need (serves 4):
- 4 ears cooked corn on the cob
- 2 tablespoons mayonnaise
- 2 tablespoons Mexican crema or sour cream (Greek yogurt works as a lighter substitute)
- 1 tablespoon fresh lime juice
- ½ cup crumbled cotija cheese — cotija is a firm, salty Mexican cheese; queso fresco or finely grated parmesan works as a substitute
- 1 teaspoon chili powder (ancho or regular), plus more to taste
- ¼ cup fresh cilantro, finely chopped
- Lime wedges for serving
Assembly:
- Mix the mayonnaise, crema, and lime juice in a small bowl until smooth.
- Brush or spread the mixture generously over each hot ear of corn.
- Roll or sprinkle the corn in crumbled cotija cheese until evenly coated.
- Dust with chili powder and chopped cilantro.
- Serve immediately with extra lime wedges.
Pro tip: The corn must be hot when you apply the sauce — it helps everything adhere. Cold corn causes the sauce to slide off. For a spicier version, add a pinch of cayenne or substitute Tajín (a chili-lime seasoning available at most grocery stores) for the chili powder. If you prefer eating off the cob, slice the kernels off into a bowl and mix all the ingredients together to make esquites (corn salad).
The Husk-On Method: Why University Food Science Backs It
The husk-on method deserves its own section because the science behind it is genuinely useful for beginners. When you microwave or grill corn with the husk on, the husk acts as a sealed steam chamber. Moisture from the kernels turns to steam and circulates inside, cooking the corn from all directions simultaneously.
University of Maine’s flavor-saving microwave tip specifically recommends leaving the inner husks on during microwaving to preserve the best flavor — the husks slow moisture loss and prevent the kernels from drying out during cooking. This is why husk-on corn consistently tastes juicier than corn cooked after shucking.
The practical takeaway: When you have the option, always cook corn in its husk. Whether you’re microwaving (the no-shuck squeeze technique from Step 2) or grilling (the husk-on steam-roast from Step 4), the husk is doing real flavor work — not just keeping your hands clean.
Husk-on grilling produces the juiciest grilled corn. The kernels steam inside the husk rather than drying out over direct heat. The result is corn that’s simultaneously tender inside and slightly smoky outside — the best of both methods.
Step 6: Store, Freeze, and Reheat Corn on the Cob
Cooking corn perfectly is only half the job. Knowing how to store, freeze, and reheat it keeps your corn tasting fresh — and prevents waste after a big batch.
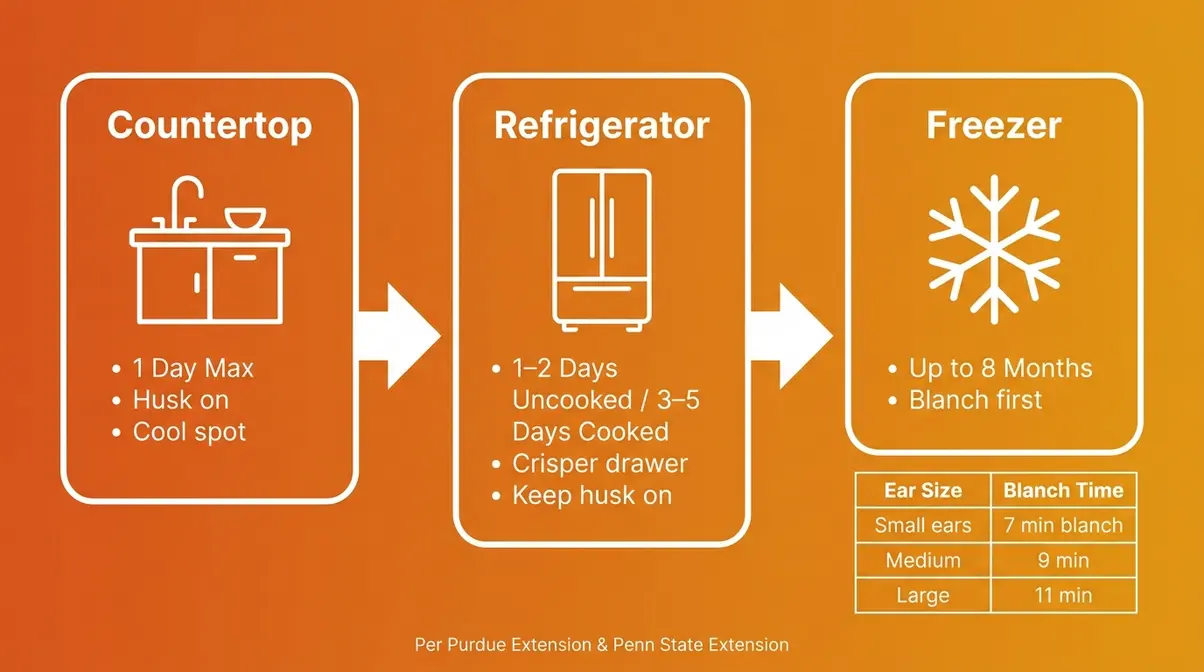
How to Store Cooked Corn on the Cob
Cooked corn on the cob should be refrigerated within 2 hours of cooking. Wrap each ear loosely in foil or place in an airtight container. It keeps well in the refrigerator for 3–5 days.
For fresh, uncooked corn, Purdue Extension’s Food Storage Guide lists corn in husks at 1–2 days refrigerated. Store fresh corn in the crisper drawer in its husk — the husk slows moisture loss and delays the sugar-to-starch conversion that makes corn taste starchy. According to the University of Maine Extension, corn should be used as soon as possible after purchase for the best flavor, as the sugar-to-starch conversion accelerates at room temperature (2026).
How to Freeze Corn on the Cob
Freezing corn requires blanching — briefly boiling and then rapidly cooling the ears before freezing. Blanching (briefly boiling before freezing) is a mandatory step that stops enzyme activity, which would otherwise cause the corn to lose flavor, color, and texture even in the freezer.
Blanching times by ear size (Purdue Extension and Penn State Extension):
| Ear Size | Blanching Time | Ice Bath |
|---|---|---|
| Small ears | 7 minutes | 7 minutes |
| Medium ears | 9 minutes | 9 minutes |
| Large ears | 11 minutes | 11 minutes |
Blanching time starts when the water returns to a full boil after adding the corn. Use at least 1 gallon of boiling water per pound of corn. Ice bath time should match blanching time exactly (Purdue Extension; Penn State Extension).
Step-by-step — freezing:
- Husk the corn and remove all silk.
- Bring a large pot of water (at least 1 gallon) to a vigorous boil.
- Add the ears and blanch for the time matching your ear size (see table above).
- Transfer immediately to an ice water bath for the same length of time.
- Drain thoroughly and pat dry with paper towels.
- Wrap each ear individually in plastic wrap, then place in a freezer-safe bag.
- Label with the date and freeze at 0°F or below.
Frozen corn maintains best quality for up to 8 months. After that, it’s still safe to eat but flavor and texture begin to decline.
How to Reheat Corn on the Cob
Microwave (fastest, best for juicy results):
- Place the cooked ear on a microwave-safe plate.
- Add 2 tablespoons of water to the plate and cover with a second plate or a damp kitchen towel.
- Microwave on HIGH in 20-second intervals, turning the corn after each burst.
- Continue until the corn is hot throughout — usually 40–90 seconds total for a single ear.
According to Southern Living’s guide on reheating corn (2026), the damp covering and short bursts prevent the kernels from splitting or drying out — the most common reheating mistake. For multiple ears, use 50% power for about 2 minutes for gentler, more even heating.
Skillet method (best for slight caramelization): Lightly butter a skillet over medium heat. Add the corn, splash in a tablespoon of water, and cover for 2 minutes. Then uncover and turn frequently for 3–5 more minutes until heated through and lightly browned.
Checkpoint: Reheated corn should feel warm throughout, not just on the surface. Press the thickest part of the cob — if it’s still cool, return it for another 20-second burst.
Troubleshooting: Common Corn Cooking Mistakes
Even simple recipes go wrong. Here are the most common problems beginners encounter — and exactly how to fix them.
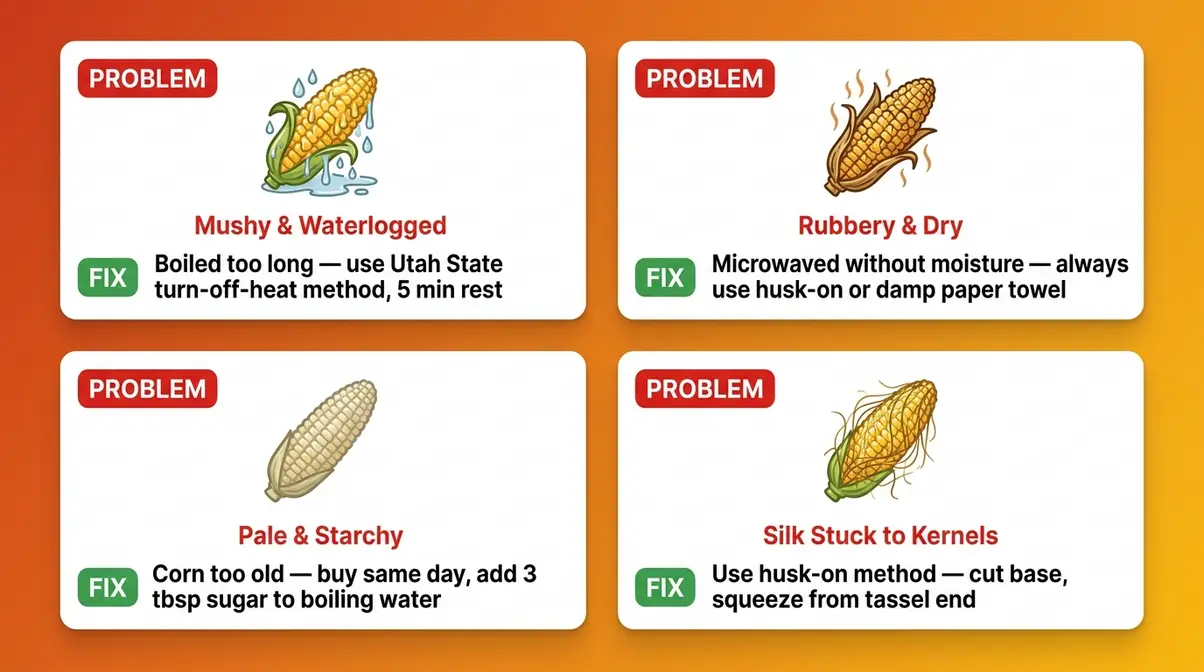
Common Pitfalls
1. Mushy, waterlogged corn from boiling too long
What goes wrong: Boiling for more than 7–8 minutes breaks down the cell walls in the kernels, releasing water and producing a soft, flavorless texture.
How to fix it: Set a timer the moment the corn goes into the rolling boil. Use the Utah State Extension method — bring to a boil, turn off the heat, and let stand for 5 minutes. The residual heat finishes the job without overcooking.
2. Rubbery, dry corn from microwaving without moisture
What goes wrong: Microwaving husked corn without a damp paper towel or husk causes rapid moisture loss. The kernels shrink and toughen.
How to fix it: Always use the husk-on method or wrap husked corn in a damp paper towel before microwaving. Never microwave bare, unwrapped corn.
3. Pale, starchy corn that doesn’t taste sweet
What goes wrong: The corn was old — picked more than 2–3 days before cooking. Sugars convert to starch rapidly after harvest.
How to fix it: Buy corn the day you plan to cook it. If you can’t, refrigerate in the husk immediately and cook within 24 hours. The Penn State water-and-sugar boiling technique (3 tablespoons sugar in the boiling water) can partially compensate for older corn.
4. Silk stuck to the kernels after microwaving
What goes wrong: You removed the husk before microwaving, or you didn’t use the cut-and-squeeze technique.
How to fix it: Use the husk-on method from Step 2. After microwaving, cut 1 inch above the base and squeeze from the tassel end — every strand of silk stays in the husk.
5. Uneven cooking with some kernels hard, others soft
What goes wrong: Multiple ears were stacked or touching in the microwave, blocking even heat distribution.
How to fix it: Cook ears in a single layer in the microwave. For 2+ ears, arrange in a spoke pattern on the plate with ends facing outward. Add 1–2 minutes per additional ear as shown in the Time-Scaling Chart.
When to Choose Alternatives
FAQ: Your Top Corn Cooking Questions Answered
Is it better to boil or microwave corn on the cob?
For most home cooks, microwaving is better — it’s faster, requires no cleanup, and produces juicier corn. The husk-on microwave method traps steam around the kernels, preserving moisture and flavor that boiling water can leach away. University of Maine Extension recommends leaving husks on during microwaving specifically for best flavor (Bulletin #4253, 2026). Boiling is the better choice for large batches of 4+ ears, where the microwave becomes less practical and inconsistent.
What is the trick for microwaving corn on the cob?
The trick is to microwave corn in its husk, then cut the base and squeeze it out. Place the whole, unshucked ear on a microwave-safe plate and cook on HIGH for 3–4 minutes. Then cut the bottom stem end off about 1 inch above the last row of kernels. Hold from the tassel end, squeeze firmly downward — the ear slides out completely clean, with all silk left inside the husk. You get silk-free corn in under 5 minutes with no picking or scrubbing required.
How many minutes should I microwave an ear of corn?
At 1100W (most modern microwaves), microwave 1 ear for 3–4 minutes on HIGH. At 900W, use 4–5 minutes. At 700W (older microwaves), use 5–6 minutes. For 2 ears at 1100W, cook 5–6 minutes. UNL Extension advises microwaving for 4 minutes, then resting for 5 minutes before removing the husk — the rest period allows carry-over steam cooking for more evenly cooked kernels (UNL Extension). Always add 30-second intervals if the corn still feels firm after the recommended time.
How do you make corn cook faster?
The fastest way to cook corn is the husk-on microwave method — 3–4 minutes per ear at 1100W, no prep required. For stovetop cooking, start with already-boiling water rather than cold water (saves 7–10 minutes), and use the skillet-steam method (3–5 minutes) instead of a full pot of boiling water. Keeping ears smaller also speeds up all methods. Iowa State University Extension confirms that corn in boiling water needs only 5–6 minutes — not the 15–20 minutes many recipes suggest, which guarantees overcooked, mushy corn (Iowa State University Extension).
The Corn Cooking Decision Matrix Works – Here’s Your Next Step
Every method in this guide delivers crisp, juicy kernels when you follow the timing. The Corn Cooking Decision Matrix is the tool that removes the guesswork — match your time, ear count, and flavor goal to the right method, and you’ll never overcook corn again. For most weeknight situations, that means the microwave: 3–4 minutes, husk on, cut the base, squeeze it out.
The science backs this up. MSU Extension, Iowa State, University of Maine, and UNL Extension all confirm that moisture-retaining methods — husk-on microwaving, steaming, and covered boiling — consistently produce better texture and flavor than open boiling. The difference isn’t subtle once you’ve tried both.
Your next step is simple: pick the row from the Decision Matrix that matches tonight’s situation and cook one batch using this guide’s exact times. Check the doneness cues, not just the clock. Once you’ve used the husk-on microwave method and squeezed out silk-free corn in under 5 minutes, you’ll understand why home cooks call it a fool-proof method. Start there — then work your way to elote on the grill this weekend. If you’re looking for a quick way to cook corn on the cob, the microwave is your best bet.
⚠️ LOW INTERNAL LINK AVAILABILITY: The internal_linking_plan for this article contains 0 URLs. No internal links have been placed. Editors at quickdishcookbook.com should add internal links to related articles (corn recipes, summer side dishes, vegetable cooking guides) when those pages are published.

Dave King
Recipe developer and writer at Quick Dish Cookbook.
![How Long to Cook Pork Shoulder at 250°F [Chart]](https://quickdishcookbook.com/wp-content/uploads/2026/07/pork-shoulder-cook-time-250f-720x450.webp "How Long To Cook Pork Shoulder At 250°F [Chart] 10")