
What’s in this guide
- What You'll Need Before You Start
- Step 1: Score and Dry Your Pork Belly
- Step 2: Season the Meat Side and Prepare the Salt Crust
- Step 3: First Cook at Low Temperature to Render Fat
- Step 4: Blast at High Heat for Ultra-Crispy Crackling
- Step 5: Check the Temperature, Rest, and Slice
- Pork Belly Bites and Strips: Quick Variation Guide
- How to Reheat Pork Belly in the Air Fryer
- Troubleshooting Common Problems
- Frequently Asked Questions
- Getting Crispy Pork Belly Right, Every Time
You followed every tip you could find. You scored the skin, you seasoned it, you cooked it for what felt like the right amount of time — and you still pulled rubbery, chewy pork belly out of the air fryer. Meanwhile, every video you watch shows that skin bubbling up into shatteringly crispy crackling on the very first attempt.
The difference isn’t luck. It’s a specific two-temperature process that most recipes skip right over — and once you understand it, perfect crackling becomes predictable. Cooking pork belly in air fryer is genuinely achievable for a first-time cook, with a standard basket-style air fryer, in under 90 minutes.
“OMG this was perfectly cooked and the crackle was out of this world!”
By the end of this guide, you’ll know exactly how to cook pork belly in an air fryer so you get shatteringly crispy skin every single time. You’ll follow 5 numbered steps built around The Two-Stage Thermal Method, plus a variation guide for bites and strips, a reheat section, a troubleshooting guide, and a health FAQ with cited sources.
What You’ll Need Before You Start
Before you touch the air fryer, gather everything below. Having it all ready means you won’t lose momentum mid-prep — which matters because once the salt crust goes on, you want to move straight to cooking.
Ingredients:
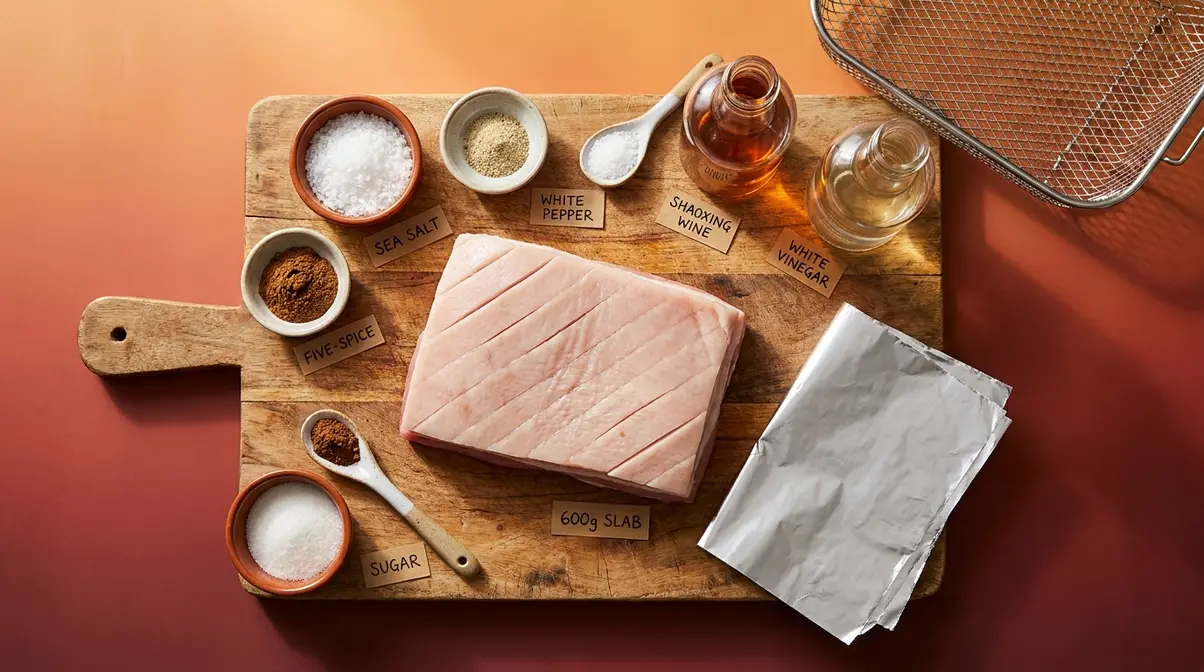
- 600g (approximately 1.3 lb) skin-on pork belly slab — skin-on is essential: the skin is what becomes crackling (the crispy, blistered pork skin)
- 1 tbsp coarse sea salt — coarse salt draws moisture out of the skin more effectively than fine-grain salt; this is the key to crackling
- 1 tsp white pepper
- 1 tsp five-spice powder (optional; adds a KBBQ Pork Belly / Samgyupsal-style depth to the meat)
- ½ tsp sugar
- 1 tsp Shaoxing wine (Chinese cooking wine — substitute dry sherry; tenderises the meat side)
- 1 tsp white vinegar — applied to skin only; opens the pores for better salt adhesion and crackling
- Aluminium foil — for the foil boat that protects the meat while the skin crisps
Equipment:
- Air fryer — basket-style is strongly preferred for this recipe. Basket models circulate hot air more evenly around the skin, producing consistent crackling. Oven-style air fryers work too, but may need 5–10 extra minutes on the high-heat stage due to less concentrated airflow.
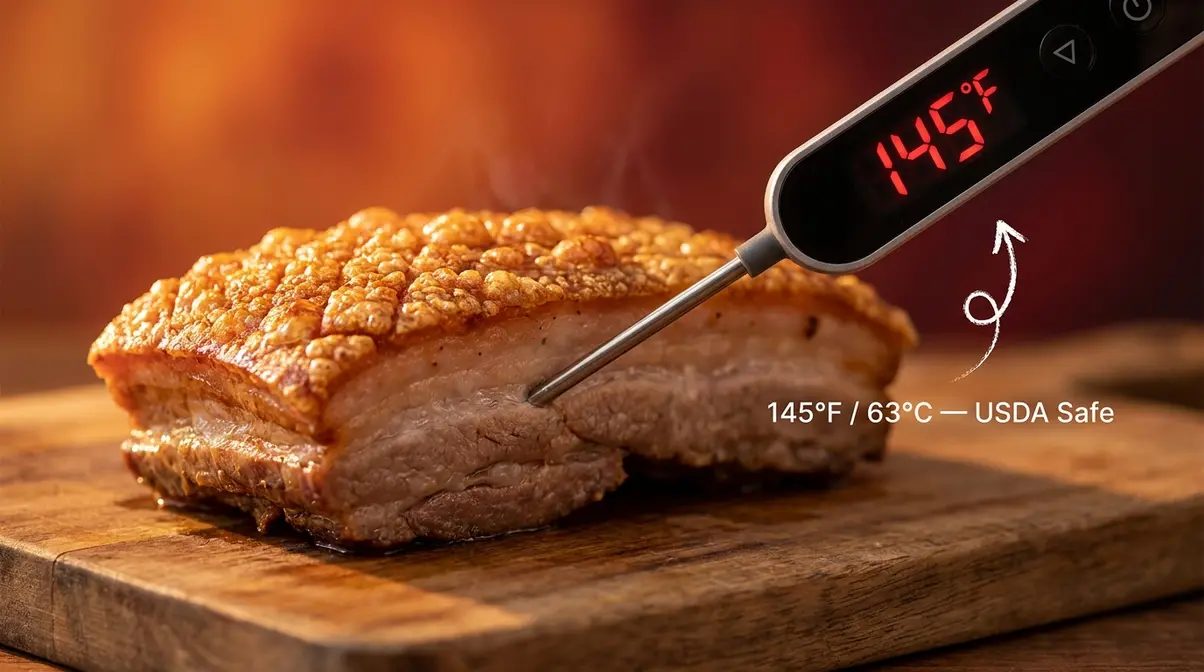
- Meat thermometer — non-negotiable for food safety. It confirms the 145°F (63°C) internal temperature that the USDA requires for whole cuts of pork.
- Sharp knife or metal skewer — for scoring the skin and poking additional holes
- Paper towels — you’ll use more than you expect
Time estimate: ~75 minutes total (30 min low-heat cook + 30–40 min high-heat cook + 5 min rest). Active prep takes about 15 minutes. Once you have everything ready, the first step is the most important one — and the one most beginners skip entirely.
Step 1: Score and Dry Your Pork Belly
Before your pork belly in an air fryer sees a single degree of heat, the skin needs two things: cuts and complete dryness. Think of scoring as opening windows in the skin — it lets the fat escape during cooking so the skin can crisp up instead of steaming from the inside. Without those cuts, and without dry skin, steam builds under the surface and you end up with rubber, not crackling. This is the foundation of The Two-Stage Thermal Method: proper skin preparation creates the conditions that both temperature stages depend on.
How to Score the Skin
Our team found that depth and pattern are what separate good crackling from great crackling — and most guides skip this level of detail entirely when explaining how to cook crispy pork belly in an air fryer.
- Pat the pork belly completely dry with paper towels — press firmly on the skin side. Any surface moisture will create steam during cooking, which is the enemy of crispy crackling.
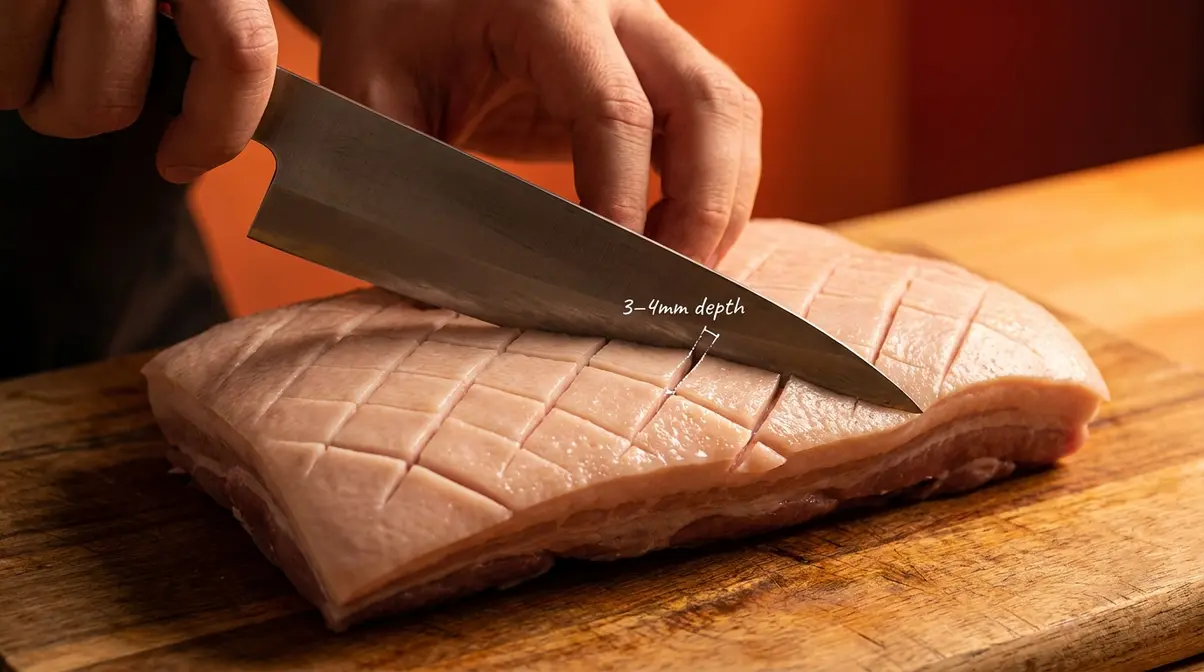
- Score the skin in a crosshatch pattern using a sharp knife (or a metal skewer for speed): cuts approximately 1cm apart, 3–4mm deep. You should feel slight resistance when you reach the fat layer beneath the skin.
- Do not cut into the meat. Shallow cuts (under 2mm) don’t allow fat to render out. Cuts that go too deep into the meat cause it to dry out during the long low-heat cook.
“Scoring the skin in a crosshatch pattern 3–4mm deep is the single most important preparation step for achieving crispy crackling in an air fryer.”
If you’re making KBBQ-style pork belly (Samgyupsal), you can score slightly more deeply for a more dramatic bubble effect on the skin during the high-heat stage. For a full walkthrough of preparation variations, see the ultimate air fryer pork belly recipe at Quick Dish Cookbook.
Dry the Skin Completely
After scoring, pat the skin aggressively dry — use 3–4 sheets of paper towel, pressing firmly across the entire surface. Moist skin steams rather than crisps, no matter how high you set the temperature.
If time allows, place the scored pork belly skin-side up, uncovered, in the refrigerator for at least 1 hour (overnight is ideal). The cold, dry air removes residual surface moisture that paper towels alone can’t reach. Recipe testing shows this optional refrigeration step produces noticeably more consistent crackling — it’s the step most competitor guides skip and then wonder why results vary.
Checkpoint: You should now have a pork belly with a crosshatch pattern scored into the skin and a surface that looks visibly dry and matte — not shiny or wet. If the skin still looks damp, pat it dry again before moving to Step 2.
With your skin scored and dry, you’re ready for the most flavour-packed part of the process — seasoning the meat side while leaving the skin bare for the salt crust in Step 2.
Step 2: Season the Meat Side and Prepare the Salt Crust
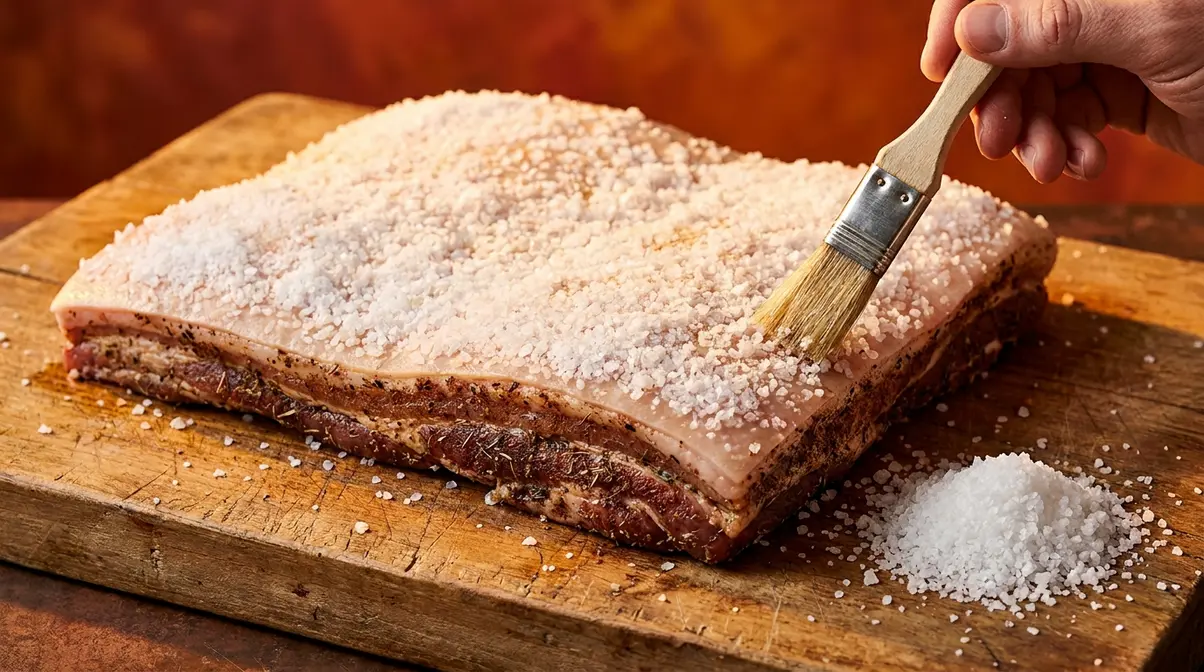
Pork belly has two completely different surfaces that need completely different treatment. The meat side gets all the flavour. The skin side gets only salt — and that’s entirely intentional. The salt on the skin is not a seasoning; it’s a tool. It pulls moisture out of the skin so the crackling can form. Applying spices or oil to the skin blocks the salt’s moisture-drawing action — which is why applying vinegar to pork belly skin before salting opens the pores and accelerates moisture extraction, resulting in more consistent crackling than salt alone.
Season the Meat Side
Flip the pork belly meat-side up. Apply the following spice blend directly into the meat, pressing firmly into the scored cuts:
- ½ tsp white pepper
- 1 tsp five-spice powder (a Chinese spice blend of star anise, cloves, cinnamon, Sichuan pepper, and fennel — substitute allspice if unavailable)
- ½ tsp sugar
- 1 tsp Shaoxing wine (or dry sherry)
If time allows, let the seasoned meat rest at room temperature for 15 minutes. This gives the spices a chance to penetrate the surface slightly before cooking.
- Marinade variations for maximum flavour:
- BBQ pork belly in air fryer: Replace five-spice with smoked paprika + garlic powder + brown sugar
- Simple herb rub: Rosemary, garlic, and cracked black pepper
- Chinese pork belly strips air fryer style: Add a teaspoon of hoisin sauce and a dash of soy to the standard blend
- Trader Joe’s pork belly shortcut: Trader Joe’s pre-seasoned pork belly already has seasoning applied — skip the meat-side spice step entirely and go straight to the salt crust on the skin
Prepare the Salt Crust on the Skin
- Flip the pork belly skin-side up.
- Using your fingers or a pastry brush, rub 1 tsp white vinegar across the entire skin surface. This opens the pores and helps the coarse salt adhere evenly.
- Pour 1–2 tablespoons of coarse sea salt over the skin and press it into a thick, even layer. The salt should cover the skin completely — it should look almost like a white coating. That is exactly right.
Critical reminder: Do NOT apply spices, oil, or any flavouring to the skin side at this stage. Anything other than salt on the skin will block the moisture-drawing action and produce chewy, not crispy, crackling. This is the detail absent from most pork belly in air fryer recipe guides.
Checkpoint: You should now have a pork belly with a fragrant, seasoned meat side facing down, and a skin side covered in a thick white salt crust. The coating will look almost like a plaster — that’s exactly right.
Your pork belly is seasoned and ready. Now comes Stage 1 of The Two-Stage Thermal Method — the low-temperature cook that renders the fat and prepares the skin for its transformation.
Step 3: First Cook at Low Temperature to Render Fat
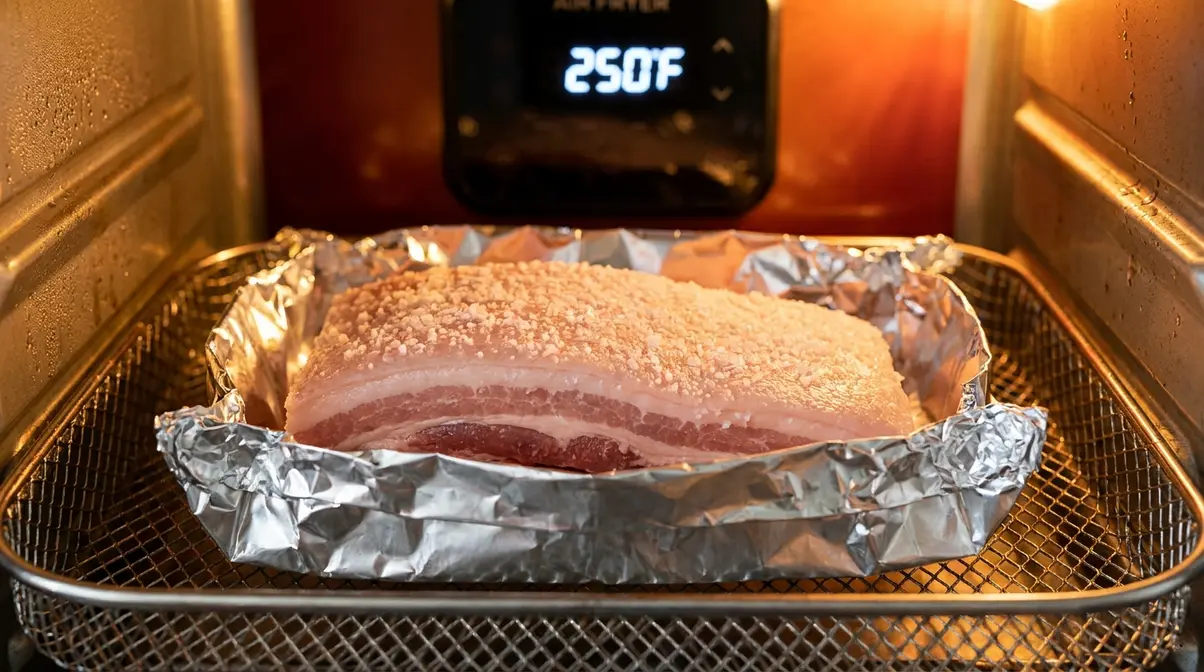
Set your air fryer to 250°F (120°C). This is Stage 1 of The Two-Stage Thermal Method — and it’s the stage most beginner recipes skip entirely. At this low temperature, the fat beneath the skin slowly renders (melts out), creating the air pockets that crackling needs to bubble up during the high-heat stage. Skipping this and going straight to high heat produces half-bubbled, uneven skin with burnt patches. According to Cleveland Clinic insights on air frying, air frying eliminates added oils compared to conventional frying methods — and the two-stage approach maximises that advantage by managing the fat internally rather than relying on added oil (Cleveland Clinic, 2024).
Build the Foil Boat and Set Up the Air Fryer
- Preheat your air fryer to 250°F (120°C) for 3–5 minutes. Preheating ensures even cooking from the very first minute — skipping this leads to uneven fat rendering.
- Tear a sheet of aluminium foil large enough to wrap around the sides of the pork belly. Fold the edges up to form a shallow boat. This cradle catches the fat that drips during rendering and prevents it from burning on the air fryer basket, which causes smoke.
- Place the pork belly skin-side UP in the foil boat. This is critical — the salt crust must face upward so it draws moisture away from the meat and toward the surface.
- Cook at 250°F (120°C) for the time appropriate to your slab weight (see chart below).
Note for oven-style air fryer users: Due to less concentrated airflow, add 5 minutes to the low-heat stage and monitor closely. Basket-style models are more reliable for this recipe.
Air Fryer Pork Belly Time and Temperature Chart
How long to cook pork belly in an air fryer depends on the weight of your slab. Use this chart as your reference — times are calibrated for basket-style air fryers at sea level. Always verify doneness with a meat thermometer.
| Slab Weight | Low-Heat Cook (250°F / 120°C) | High-Heat Cook (400°F / 200°C) | Total Time |
|---|---|---|---|
| 400g (0.9 lb) | 25 minutes | 25–30 minutes | ~50–55 min |
| 500g (1.1 lb) | 28 minutes | 28–33 minutes | ~56–61 min |
| 600g (1.3 lb) | 30 minutes | 30–35 minutes | ~60–65 min |
| 700g (1.5 lb) | 35 minutes | 35–40 minutes | ~70–75 min |
Times are guidelines for basket-style air fryers. Always verify with a meat thermometer — the USDA minimum safe internal temperature for whole cuts of pork is 145°F (63°C) with a 3-minute rest. See the USDA safe minimum internal temperature chart (USDA FSIS, updated 2025) for full guidance.
According to medical perspectives on reducing fat with air fryers, air-fried food can have up to 80% less fat than deep-fried counterparts (Hartford Hospital, 2025) — and the low-heat rendering stage is where that fat reduction actually happens for pork belly, as the fat melts and drips away into the foil boat rather than being reabsorbed.
Checkpoint: After 30 minutes at 250°F, open the air fryer. The salt crust should look slightly grey and damp — this is the moisture it has drawn out of the skin. The meat should be cooked through but not yet crispy. That transformation happens in Step 4.
The fat has rendered and the skin is primed. Now it’s time for the moment every home cook waits for — the high-heat blast that turns that prepared skin into shatteringly crispy crackling.
Step 4: Blast at High Heat for Ultra-Crispy Crackling
When you open the air fryer after Step 3, the skin will look grey and damp. That’s perfect. You’re about to transform it. In the next 30–40 minutes, The Two-Stage Thermal Method reaches its payoff — the skin will bubble up, pop, and turn into the crackling that makes people say the crackle was out of this world. The two-stage air fryer method — 250°F to render fat, then 400°F to crisp the skin — consistently produces crackling that bubbles and shatters, without the risk of burning the meat that comes from high-heat-only cooking.
Remove the Salt, Dry the Skin, and Oil Lightly
This transition between Stage 1 and Stage 2 is the #2 most missed step in air fryer pork belly guides — and leaving the salt on during the high-heat phase causes uneven crisping and hot spots.
- Remove the pork belly from the air fryer and place it on a chopping board.
- Scrape off every bit of the salt crust using a knife or spoon. Any remaining salt will create uneven hot spots and prevent full crisping across the skin.
- Pat the skin dry again with fresh paper towels. The salt has drawn out significant moisture, so there will be visible dampness on the surface — dry it completely.
- Apply a very light brush of neutral oil (or white vinegar) across the skin surface. This promotes even browning and helps the skin colour uniformly at 400°F. If any section of the skin looks thicker or more uneven, poke it a few more times with your skewer before returning it to the air fryer.
According to the USDA safe minimum internal temperature chart, pork must reach 145°F (62.8°C) minimum with a 3-minute rest (USDA FSIS, updated 2025) — your meat thermometer is essential in the next stage.
Monitor for Burn Spots and Achieve Perfect Crackling
- Increase the air fryer temperature to 400°F (200°C). Place the pork belly back in the basket, skin-side up, without the foil boat this time — direct airflow on the skin is what creates the crackling.
- Cook for 30–35 minutes for a 600g slab (refer to the weight chart in Step 3 for other sizes).
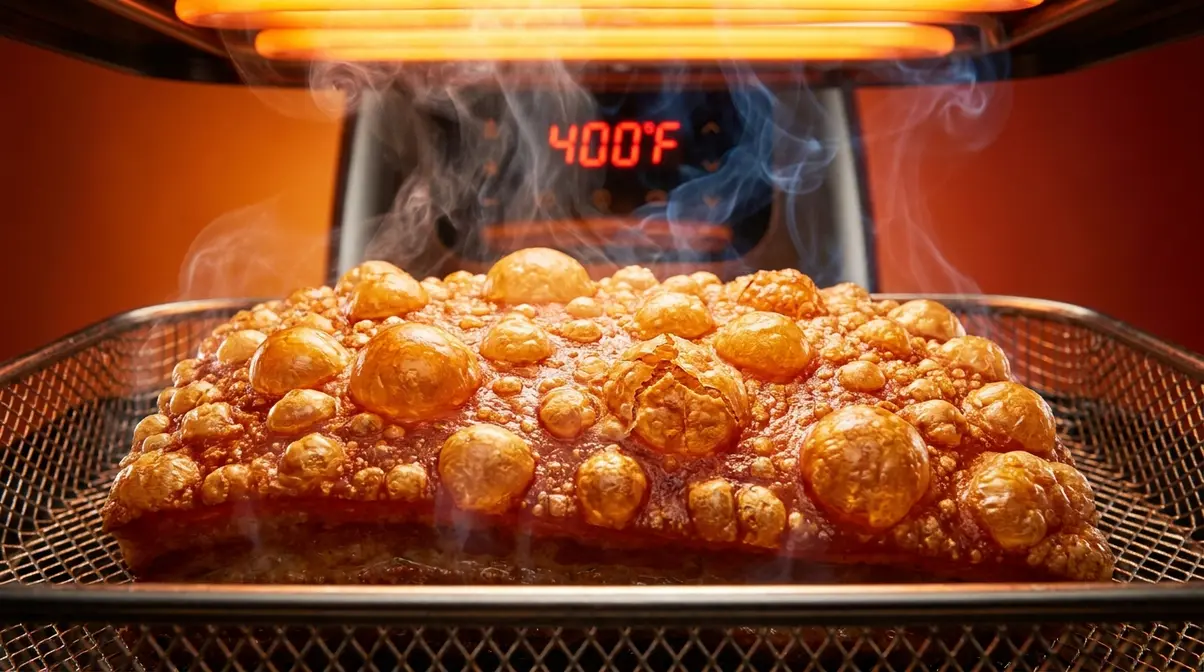
- At the 15-minute mark, open the air fryer and check the skin. You should see the skin beginning to bubble and blister. This is the pork belly popping in air fryer — it’s a success signal, not a problem.
- If any section is browning too fast, tear a small piece of foil and lay it loosely over that area only. This slows the browning on that spot while the rest of the skin continues to crisp.
- Listen for the popping sound as the skin blisters and expands. This is the crackling forming. The skin should look golden-amber and blistered across its entire surface when done.
What you should see at the end of Step 4: The skin is uniformly blistered, golden to deep amber in colour, and dry to the touch. Pressing a finger against it should feel hard and hollow — not soft or spongy. If sections still feel soft, cook for an additional 5 minutes and check again. This is how to make crispy pork belly in air fryer with confidence: trust the visual and tactile cues, not just the timer.
Checkpoint: The skin should be uniformly blistered and golden-amber across its entire surface. It should feel hard and hollow when you press it — not soft. Any soft patches need 5 more minutes at 400°F.
The crackling is set. The last step is confirming it’s safe to eat, letting the meat rest, and slicing for a perfect bite every time.
Step 5: Check the Temperature, Rest, and Slice
You’ve done the hard work. Step 5 is about confirming safety, locking in juiciness, and slicing for maximum flavour — all in under 10 minutes.
Check the Internal Temperature
Insert a meat thermometer into the thickest part of the meat (not the fat layer, not the skin — the meat itself). The reading must reach 145°F (63°C) minimum, per USDA FSIS guidelines for whole cuts of pork. If the reading is below 145°F, return the pork belly to the air fryer at 400°F for 5-minute increments, checking the temperature after each.
Our team found that pork belly cooked with the weight chart in Step 3 reliably hits 145°F by the end of the high-heat stage — but always verify, because air fryer models vary in actual output temperature.
Rest and Slice for the Perfect Bite
- Remove the pork belly from the air fryer and place it on a chopping board, skin-side up.
- Rest for 5 minutes without covering it. Covering the meat traps steam, which softens the crackling you just worked to achieve. The resting period allows the juices to redistribute through the meat.
- Slice across the grain — perpendicular to the striations in the meat — for the most tender bite. For Samgyupsal-style slices, cut into 1-cm strips. For pub-style crackling squares, cut into 3cm x 3cm portions.
Checkpoint: The crackling should shatter audibly when you press the back of a knife against it. The meat should be juicy, not dry. If the crackling softens during the rest, place the pork belly back in the air fryer at 400°F for 3–5 minutes — uncovered.
Pork Belly Bites and Strips: Quick Variation Guide
The five-step slab method above is the foundation. However, cooking pork belly in air fryer as bites or strips follows different timing because surface-area-to-mass ratio changes dramatically when you cut the meat smaller.
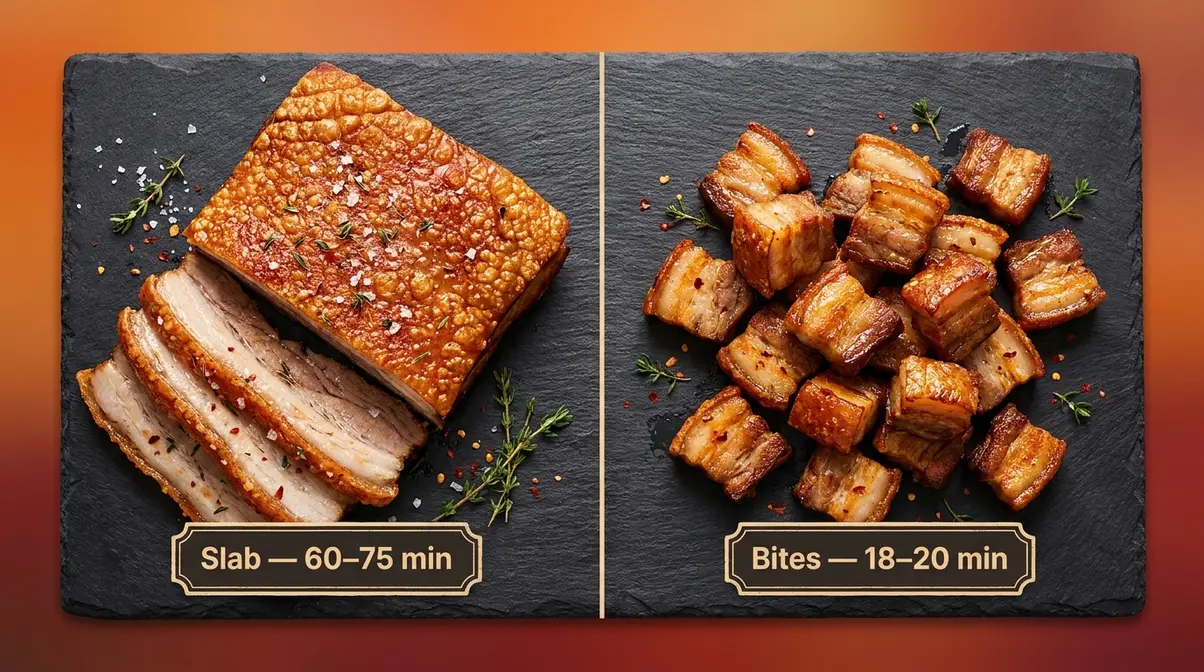
Slab vs. Bites: Side-by-Side Comparison
| Feature | Pork Belly Slab | Pork Belly Bites (1-inch cubes) |
|---|---|---|
| Prep method | Score skin, salt crust | Score or leave unscored; pat dry |
| Low-heat stage | 250°F for 25–35 min (weight-dependent) | Skip — not needed for small pieces |
| High-heat stage | 400°F for 30–40 min | 400°F for 18–20 min |
| Total time | ~60–75 min | ~25–30 min |
| Crackling style | Full skin sheet, dramatic blistering | Crispy edges and fat cap on each bite |
| Best for | Centrepiece dish, Samgyupsal style | Snacks, appetisers, fried rice add-ins |
For pork belly bites:
- Cut the slab into 1-inch cubes. Pat each piece completely dry.
- Season all sides with your spice blend — there’s no dedicated skin side, so season evenly.
- Place in the air fryer basket in a single layer (do not stack — overlapping prevents even crisping).
- Cook at 400°F (200°C) for 18–20 minutes, shaking the basket at the 10-minute mark.
- Check internal temperature (145°F minimum) before serving.
For strips (Chinese pork belly strips air fryer style): Cut the slab into 2cm-wide strips lengthwise. Follow the same two-stage method as the slab, reducing the low-heat stage to 20 minutes and the high-heat stage to 20–25 minutes.
How to Reheat Pork Belly in the Air Fryer
The air fryer is the best tool for reheating pork belly because it restores crackling that an oven or microwave would destroy. Microwaving creates steam that immediately softens the skin. Ovens take too long and often dry out the meat before the crackling recovers.
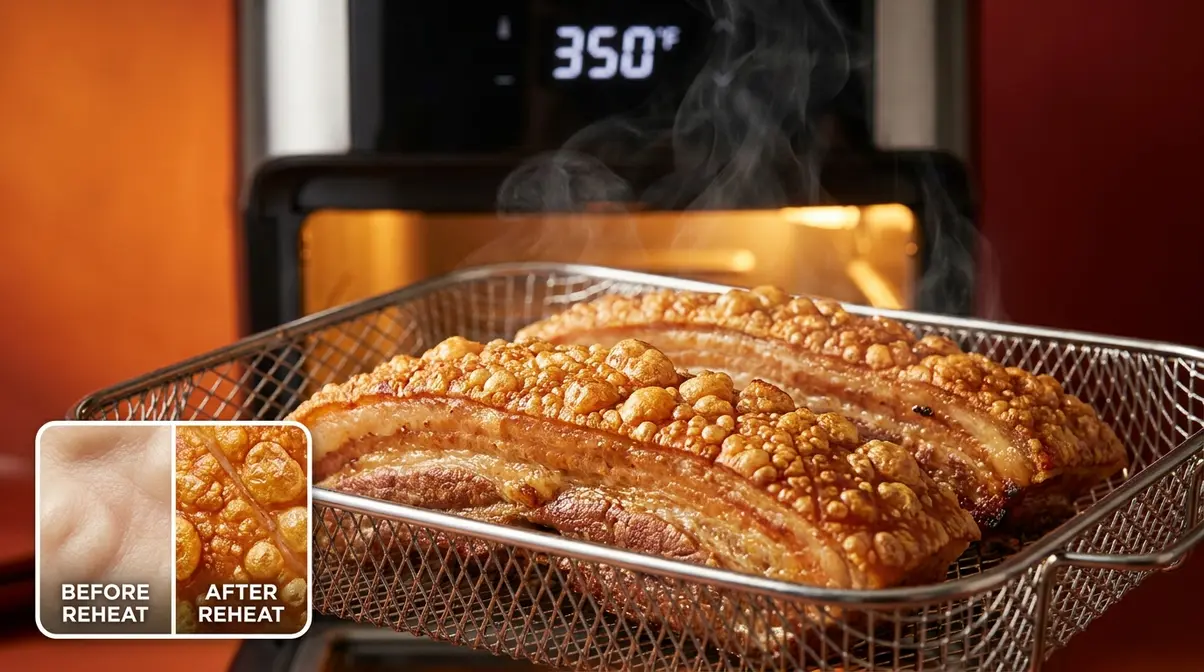
To reheat pork belly in the air fryer:
- Remove pork belly from the refrigerator and let it sit at room temperature for 10 minutes.
- Preheat the air fryer to 350°F (175°C) for 3 minutes.
- Place the pork belly skin-side up in the basket.
- Heat for 6–8 minutes for slices, or 8–10 minutes for a larger portion, until the skin is crispy again.
- If the crackling still feels soft after 10 minutes, increase to 400°F for a final 3-minute blast.
Storage tip: Store leftover pork belly in an airtight container in the refrigerator for up to 3 days. Keep the crackling separate from any sauce or moisture — even condensation inside the container will soften it overnight. For longer storage, freeze the pork belly without the crackling skin (remove it before freezing) and re-crisp in the air fryer from frozen at 350°F for 12–15 minutes.
Troubleshooting Common Problems
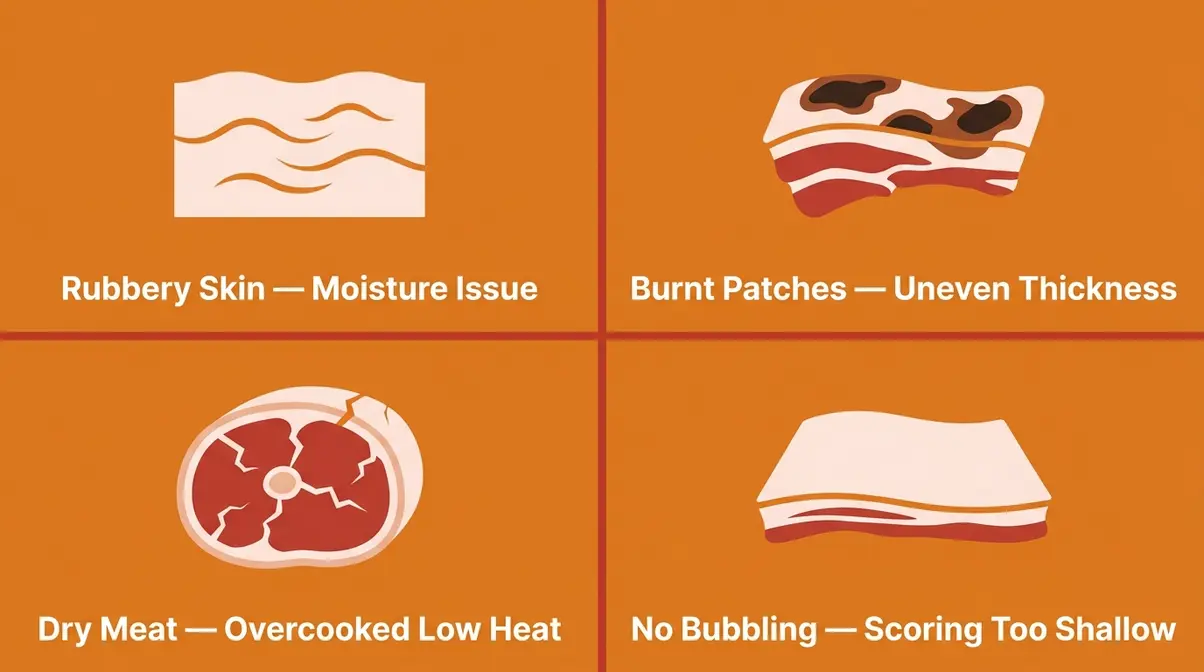
Recipe testing shows that rubbery skin, burnt patches, and undercooked meat each trace back to one specific mistake. Here’s how to diagnose and fix the most common issues.
The Skin Is Still Rubbery After Cooking
Most likely cause: Moisture. Either the skin wasn’t dried thoroughly before cooking, the salt crust wasn’t applied properly, or the salt was left on during the high-heat stage and blocked full crisping.
Fix: Return the pork belly to the air fryer at 400°F for 5-minute increments, checking after each. Before you do, pat the skin dry one more time with paper towels and scrape off any remaining salt residue. Across home cook communities, the consensus is that an extra 5–10 minutes at 400°F rescues approximately 90% of soft-skin situations.
Prevention for next time: Follow the optional overnight refrigeration in Step 1 and confirm the salt crust is completely removed before the high-heat stage.
The Crackling Has Burnt Patches
Most likely cause: Uneven thickness in the skin, or the air fryer runs hot (some models exceed their stated temperature by 10–15°F). Burnt patches are common if the foil boat was removed too early, allowing fat to drip directly onto the heating element.
Fix: Use the foil coverage technique from Step 4 — lay a small piece of foil loosely over any section that is browning too fast. Reduce the temperature by 10°F (to 390°F) for the remainder of the cook.
Prevention for next time: Check the skin thickness when scoring. If any section is noticeably thinner, apply slightly less oil to that area before the high-heat stage.
The Meat Is Dry or Overcooked
Most likely cause: The low-heat stage ran too long, or the slab weight was lighter than estimated and you followed the 600g timing. Meat dries out when overcooked at low heat before the high-heat stage even begins.
Fix: Use the weight chart in Step 3 precisely. Weigh your pork belly before cooking. For slabs under 500g, reduce the low-heat stage to 25 minutes.
The Skin Isn’t Bubbling at All
Most likely cause: The scoring was too shallow (under 2mm), or the skin had residual moisture that wasn’t fully removed. Without adequate scoring depth, fat cannot escape, and without fat escaping, the air pockets that create the bubble effect cannot form.
Fix: Score more deeply next time — aim for 3–4mm, feeling for the slight resistance of the fat layer. Combine with the overnight refrigeration drying step for maximum moisture removal.
Frequently Asked Questions
How many minutes to cook pork belly in an air fryer?
Cooking pork belly in an air fryer takes 55–75 minutes total using The Two-Stage Thermal Method: 25–35 minutes at 250°F (120°C) for the fat-rendering stage, followed by 25–40 minutes at 400°F (200°C) for the crisping stage. The exact time depends on slab weight — a 400g slab takes roughly 50–55 minutes total, while a 700g slab needs up to 75 minutes. Pork belly bites are significantly faster at 18–20 minutes at 400°F. Always verify with a meat thermometer: the USDA requires whole cuts of pork to reach 145°F (63°C) with a 3-minute rest (USDA FSIS, 2025).
Is pork belly better in an air fryer or oven?
For crackling, the air fryer consistently outperforms a standard oven. Multiple recipe tests confirm the air fryer produces more even, reliably blistered crackling in less time. A TechRadar cooking test described the air fryer as “far more effective than an oven at crisping the skin” and “far more consistent” (TechRadar, 2026). Oven-roasted pork belly can be slightly juicier in very large cuts, but requires blanching, overnight skin-drying, and longer cook times to achieve comparable crackling. For a home cook wanting reliable results without extra day-before prep, the air fryer wins.
How long should pork cook in an air fryer at 400 degrees?
At 400°F (200°C), the high-heat crisping stage takes 25–40 minutes depending on slab weight (see the weight chart in Step 3). For a 600g slab, allow 30–35 minutes. For pork belly bites, 18–20 minutes at 400°F is sufficient. These times assume the low-heat rendering stage was completed first — going straight to 400°F without the 250°F stage will produce uneven results. The USDA safe minimum internal temperature chart confirms pork must reach 145°F (63°C) internally regardless of surface appearance (USDA FSIS, 2025).
Is pork belly healthier than bacon?
Unprocessed pork belly is generally considered preferable to bacon from a processing and sodium standpoint, though both are high-fat cuts. Per 100g, raw pork belly contains approximately 518 calories and 53g of fat, while raw cured bacon contains around 393 calories and 37g of fat — but with dramatically more sodium (751–1,500mg vs approximately 32mg for pork belly). Bacon is a processed meat with added curing agents, nitrites, and salt; pork belly is typically unprocessed. Many nutrition sources note that pork belly’s lower sodium and lack of preservatives make it relatively preferable for people limiting processed meat intake, though both should be eaten in moderation due to their high saturated fat content.
This is not medical or dietary advice. Consult your doctor or a registered dietitian before making significant changes to your diet.
Is pork belly good for diabetics?
Plain pork belly has a glycemic index (GI) of 0 and contains no carbohydrates, so it does not directly spike blood sugar the way carbohydrate-rich foods do (FoodStruct, 2025). Short-term clinical studies show that pork intake does not significantly worsen glucose-insulin responses compared to other protein sources (Dove Press systematic review, 2024). However, pork belly is a high-fat red meat, and large population studies published in 2024 found that consuming 100g of unprocessed red meat daily was associated with a 10% higher risk of developing type 2 diabetes over 10 years (The Guardian / ScienceDaily, 2024). For people with diabetes, occasional small portions of pork belly can fit within a balanced diet, but it should not be a daily staple. Research suggests limiting red and processed meat to approximately 70g per day or less (Diabetes UK, 2026).
This is not medical or dietary advice. Consult your doctor or a registered dietitian before making significant changes to your diet.
Can an air fryer lower cholesterol?
An air fryer does not lower cholesterol, but it can reduce the amount of added fat compared to deep frying. According to Cleveland Clinic insights on air frying, air fryers “won’t magically remove the saturated fat from bacon” or other fatty meats — they are only as healthy as the food you put inside (Cleveland Clinic, 2024). Air-fried food can have up to 80% less fat than deep-fried counterparts (Hartford Hospital, 2025), but this refers to the removal of added frying oil, not the intrinsic saturated fat and cholesterol in the meat itself. Pork belly is inherently high in saturated fat, which research consistently links to elevated LDL (“bad”) cholesterol (PMC Clinician’s Guide, 2026). Switching from deep-frying to air frying reduces added fat, but does not make pork belly a heart-healthy food.
This is not medical or dietary advice. Consult your doctor or a registered dietitian before making significant changes to your diet.
Getting Crispy Pork Belly Right, Every Time
For home cooks who want restaurant-quality crackling without guesswork, cooking pork belly in an air fryer with The Two-Stage Thermal Method delivers shatteringly crispy skin and juicy meat in under 75 minutes. Air-fried food contains up to 80% less fat than deep-fried equivalents (Hartford Hospital, 2025), and the two-stage approach maximises that advantage by rendering fat at 250°F before crisping at 400°F — the combination that makes crackling predictable rather than lucky.
The Two-Stage Thermal Method works because it separates two distinct jobs: fat removal and skin crisping. The low-heat stage creates the air pockets that crackling needs to bubble up. The high-heat stage dehydrates and blisters those pockets into the shatteringly crispy skin that makes every bite worth the effort. Skip either stage, and you lose the outcome that the other stage was preparing for.
Your next step: gather your 600g skin-on pork belly slab, set aside 90 minutes, and follow the five steps above from start to finish. Score the skin to 3–4mm, apply the salt crust, trust the low-heat stage even when it looks underwhelming, and remove every trace of salt before the 400°F blast. Do those four things, and the crackling takes care of itself. At Quick Dish Cookbook, we recommend cooking it once with the full two-stage method before experimenting with marinade variations — the baseline result will show you exactly what the technique is capable of.

Dave King
Recipe developer and writer at Quick Dish Cookbook.
![How Long to Cook Pork Shoulder at 250°F [Chart]](https://quickdishcookbook.com/wp-content/uploads/2026/07/pork-shoulder-cook-time-250f-720x450.webp "How Long To Cook Pork Shoulder At 250°F [Chart] 11")