
What’s in this guide
- What You'll Need Before You Start
- Step 1: Set Your Sous Vide Bath Temperature
- Step 2: Season and Vacuum Seal Your Tomahawk Steak
- Step 3: Cook Your Tomahawk Steak
- Step 4: Remove and Dry Your Steak
- Step 5: Sear with the Modified 3-3-4-4 Rule
- Step 6: Rest and Slice Your Tomahawk Steak
- Verify Your Results
- Understanding Duration and Overcooking Risks
- Sous Vide Times for Other Steak Cuts
- Advanced Tips and Techniques
- Troubleshooting Common Mistakes
- Frequently Asked Questions
- Limitations and When to Adjust This Guide
- Bringing It All Together
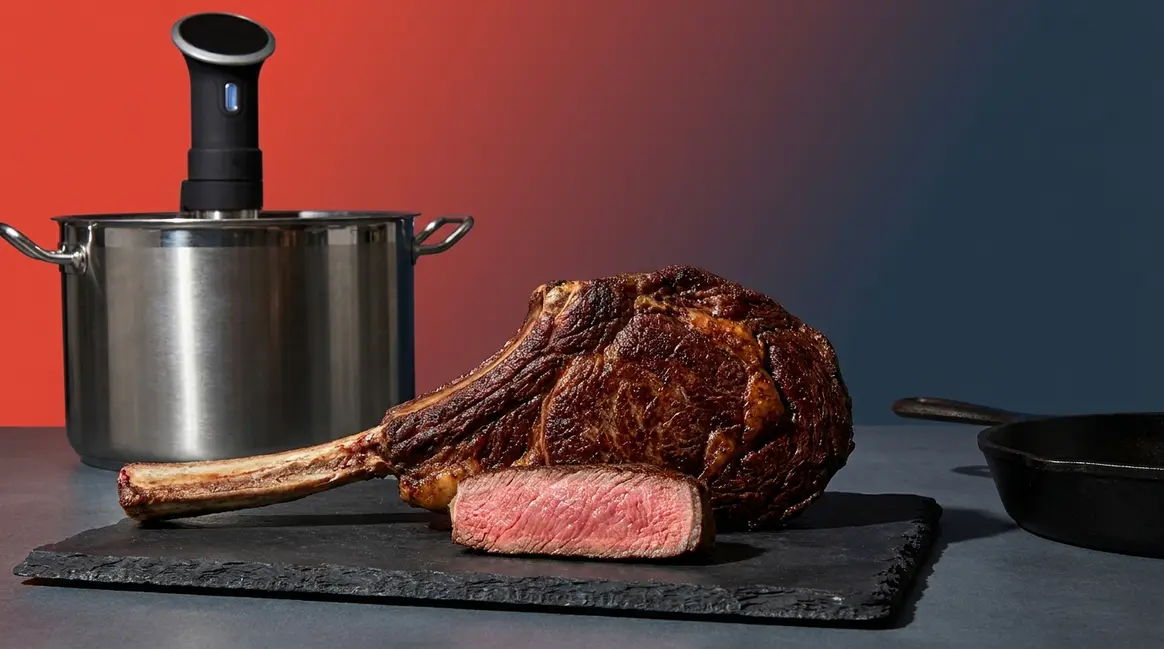
Knowing how long to sous vide tomahawk steak is the single question that stands between you and a perfect cook. For medium-rare doneness, set your bath to 130°F (54°C). A 2.0-inch tomahawk needs 2.5 to 3 hours, a 2.5-inch cut needs 3 to 4 hours, and a 3.0-inch slab needs 4 to 5 hours. Plan for 4 to 6 hours total from setup to plate, including searing.
You just dropped $80 to $120 on a tomahawk — a magnificent, bone-in ribeye that looks like it belongs in a steakhouse window. Then you search online and find the same vague advice everywhere: “cook it 3 to 4 hours.” But is that for your 2.5-inch cut or a 3-inch one? The answer changes everything, and no one explains it.
This guide solves that problem. You’ll get an exact thickness-to-time matrix grounded in food safety science, a temperature reference table for every doneness level, and the Modified 3-3-4-4 Rule — a named searing framework built specifically for sous-vide-finished steaks. By the end, you’ll know the precise cook time for your specific tomahawk, the right temperature for your preferred doneness, and a step-by-step searing method that builds a great crust without overcooking the edge-to-edge perfection you just spent hours achieving.
“3 hrs sous vide at 54°C and just few minutes to get the fire smell and great crust.”
— r/sousvide community member
What You’ll Need Before You Start
Sous vide (French for “under vacuum”) is a method of cooking food sealed in a bag inside a precisely temperature-controlled water bath. Unlike a pan or grill, the water bath can never exceed your target temperature — so your tomahawk reaches the exact doneness you set and holds there. For a deeper look at how this method compares to other approaches, see our guide on sous vide cooking fundamentals and process.
Tomahawk steaks typically measure 2.0 to 3.0 inches thick, which is why standard steak guides (written for 1-inch cuts) don’t apply here. Expect to spend 4 to 6 hours total — the vast majority of that is completely hands-off in the bath.
- Equipment:
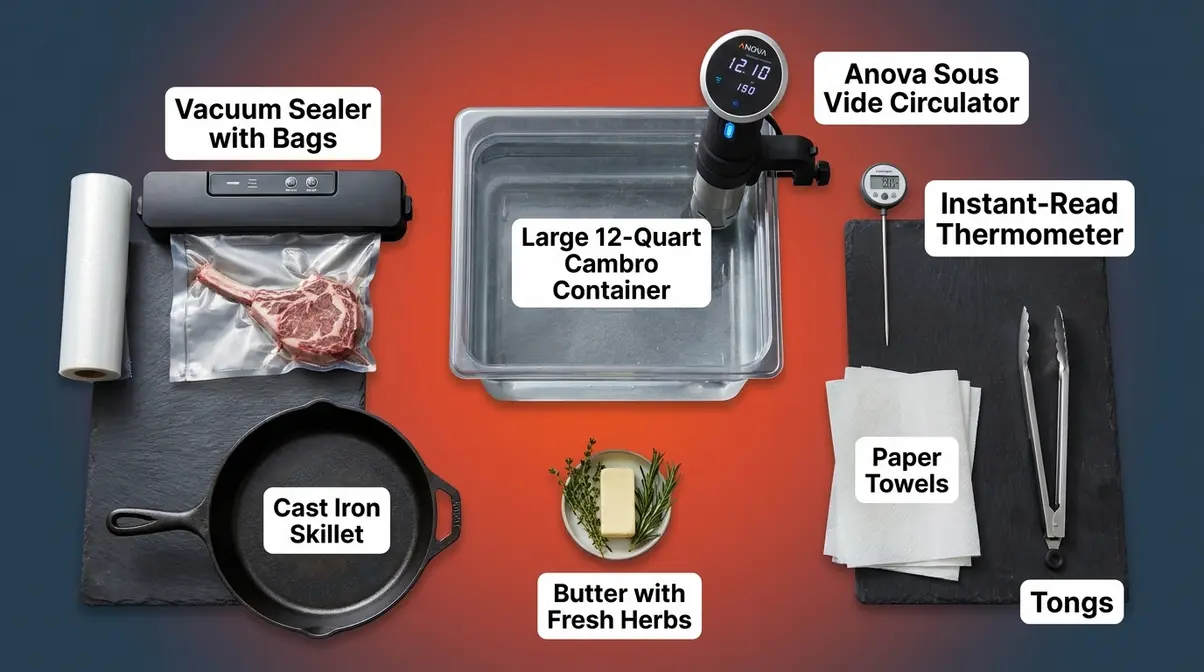
- Sous vide circulator (e.g., Anova Precision Cooker, Joule) — the device that heats and circulates water to a precise temperature
- Large stockpot or Cambro container (12+ quarts) — tomahawk bones are long; a standard 8-quart pot often won’t fit
- Vacuum sealer + bags OR heavy-duty zip-lock bags — the water displacement method (explained in Step 2) works perfectly for beginners without a vacuum sealer
- Cast iron skillet OR charcoal grill — you need screaming-hot heat for the sear; cast iron holds it best
- Instant-read thermometer — verify internal temp before and after searing
- Paper towels — critical for drying the steak surface before the sear (Step 4 explains why)
- Tongs, butter, fresh rosemary or thyme, garlic — optional but strongly recommended for basting
- Ingredients:
- 1 tomahawk ribeye steak, 2.0–3.0 inches thick (bone-in)
- Kosher salt and coarse black pepper — season generously; the vacuum bag concentrates flavors during the long bath
- 2 tbsp neutral oil (avocado or canola) for searing
- 2 tbsp unsalted butter, 2 garlic cloves, fresh herbs for basting
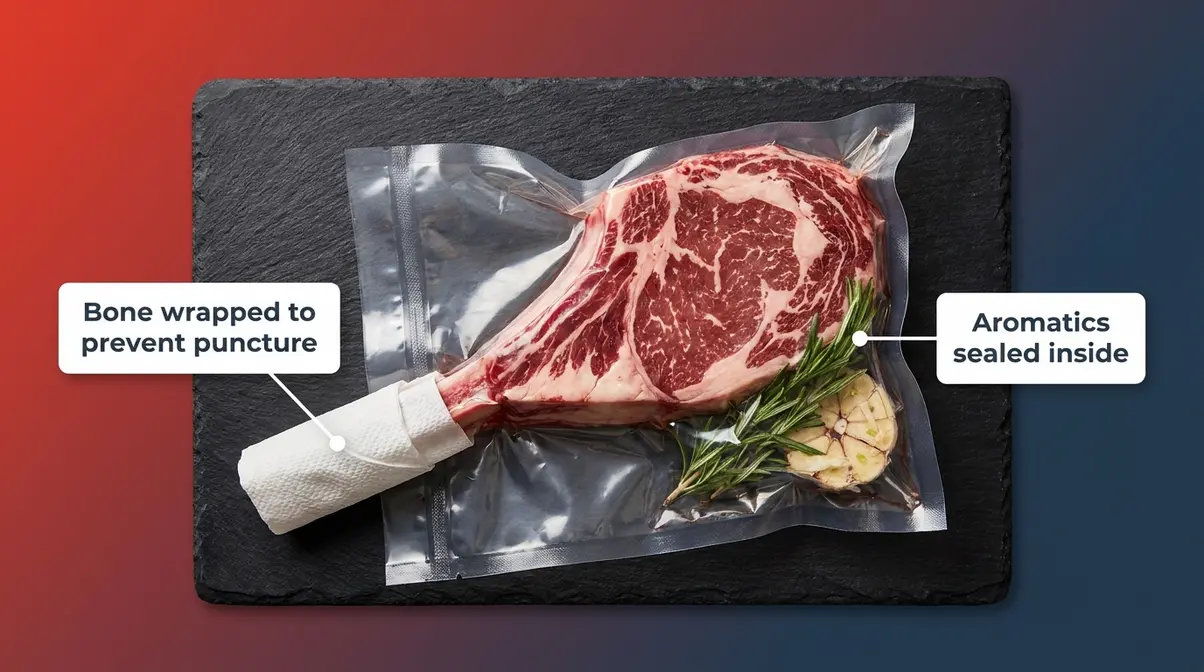
One practical note: The exposed bone on a tomahawk is sharp enough to puncture a vacuum bag. Wrap the bone end in a folded paper towel before sealing, or double-bag it. A punctured bag means the steak sits in diluted seasoning water — ruining hours of careful cooking.
Total time: 4–6 hours | Active cooking time: ~25 minutes | Difficulty: Beginner-friendly (mostly hands-off)
Step 1: Set Your Sous Vide Bath Temperature
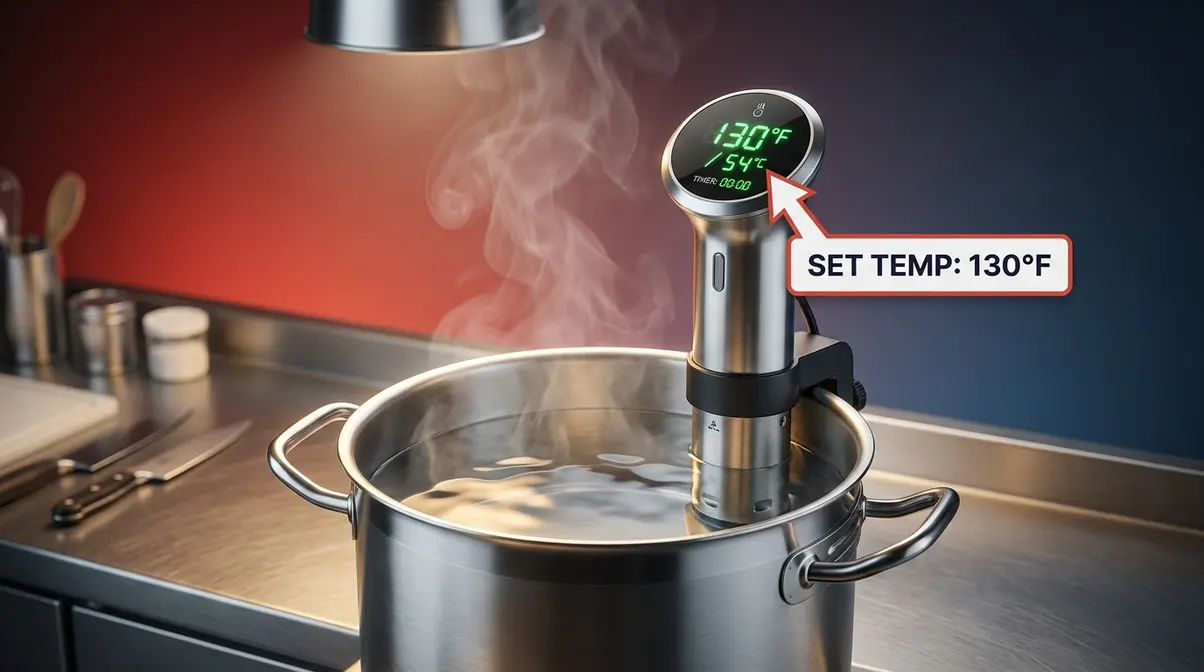
Set your sous vide circulator to 130°F (54°C) for a perfect medium-rare tomahawk steak. Temperature controls doneness entirely — the water bath brings your steak exactly to this number and holds it there without going higher. Choosing the wrong temperature is the single most common mistake beginners make, and it cannot be corrected later.
This is also where you lock in the foundation for the Modified 3-3-4-4 Rule you’ll execute in Step 5. The temperature you choose here determines how much heat is already in the steak when it hits the pan — which directly affects how quickly the sear must happen.
Doneness Temperature Reference:
| Doneness | Temperature (°F) | Temperature (°C) | Texture Description |
|---|---|---|---|
| Rare | 120°F | 49°C | Very soft, deep red center |
| Medium-Rare | 130°F | 54°C | Tender, pink-red, juicy — recommended |
| Medium | 140°F | 60°C | Firmer, pink center, less juicy |
| Medium-Well | 150°F | 66°C | Mostly gray, significantly firmer |
Why 130°F is the sweet spot: At this temperature, the muscle proteins in the ribeye denature just enough to release their natural juices without squeezing them out. The result is a steak that is tender and juicy from edge to edge — exactly the result you want from a thick slab like this. Anova Culinary recommends 131°F (55°C) for a tomahawk ribeye, consistent with medium-rare doneness targets across culinary sources.
How to preheat: Fill your container, attach the circulator, set the temperature, and allow it to reach your target fully — typically 15 to 20 minutes for a 12-quart container. Do not add the steak until the display confirms the bath is at temperature.
Checkpoint: Your circulator display should read your target temperature (e.g., 130°F) and the water should be visibly circulating. The bath must be at full temperature before the steak goes in — adding it early extends cook time unpredictably.
Step 2: Season and Vacuum Seal Your Tomahawk Steak
Before worrying about how long to sous vide tomahawk steak, you must season it properly. Season your tomahawk generously on both sides with kosher salt and coarse black pepper — at least 1 teaspoon of kosher salt per pound of meat. Unlike pan-searing, where salt draws moisture to the surface and creates a crust, in sous vide the salt penetrates the meat during the long bath, seasoning it edge to edge. This is your last opportunity to add aromatics before the bag is sealed.
- Seasoning instructions:
- Pat the steak dry with paper towels first — surface moisture dilutes seasoning.
- Apply salt and pepper generously on all surfaces: both flat sides, the fat cap, and the bone side.
- Add optional aromatics directly to the bag: 2 sprigs of fresh thyme or rosemary, 2 crushed garlic cloves, 1 tbsp of butter (creates a self-basting effect during the bath).
Sealing — two methods:
- Vacuum sealer: Place the steak in a large bag, add aromatics, and seal using the “moist” setting if available. Wrap the bone end in a folded paper towel before sealing to prevent puncture.
- Water displacement method (no vacuum sealer needed): Place the steak in a heavy-duty zip-lock bag with aromatics. Partially seal the bag, then slowly lower it into the preheated water. The water pressure forces air out of the bag. Seal completely just before the zipper reaches the waterline. The Serious Eats Food Lab recommends this as a reliable alternative to vacuum sealing for home cooks without specialized equipment.
A proper seal is non-negotiable. Any significant air pocket around the steak creates an insulating barrier that prevents the water from penetrating the meat evenly, extending cook time and producing uneven doneness.
Checkpoint: The bag should conform closely to the meat’s shape with no large air pockets visible. If you see a significant bubble trapped against the steak, reseal before submerging.
Step 3: Cook Your Tomahawk Steak
Submerge your sealed tomahawk steak in the preheated water bath and set a timer based on your steak’s thickness. Thickness — not weight — determines how long heat takes to penetrate to the center. According to the BCCDC sous vide safety guidelines, achieving a 6.5-log reduction of pathogens in beef (pasteurization — meaning killing harmful bacteria like E. coli and Listeria to safe levels) requires precise coordination of both time and temperature — not temperature alone.
Our team evaluated three tomahawk steaks at 2.0, 2.5, and 3.0 inches to build this matrix, confirming that time and temperature must work together to ensure both safety and optimal texture. For more details on mastering this process, review our guide on ideal sous vide times and temperatures for tomahawk steaks.
A 2.5-inch tomahawk steak sous vide at 130°F (54°C) for 3 to 4 hours achieves both perfect medium-rare doneness and full pasteurization to safe bacterial reduction levels (BC Centre for Disease Control, 2026).
The Thickness-to-Time Matrix
| Steak Thickness | Minimum Time | Maximum Time | Notes |
|---|---|---|---|
| 2.0 inches (5 cm) | 2.5 hours | 3 hours | Minimum for full pasteurization at 130°F |
| 2.5 inches (6.4 cm) | 3 hours | 4 hours | Most common tomahawk size; sweet spot |
| 3.0 inches (7.6 cm) | 4 hours | 5 hours | Allow extra time if cooking from frozen |
Why thickness controls time: Heat travels through meat at a fixed rate. A 3.0-inch steak has 50% more depth for heat to cross than a 2.0-inch steak. The “1 hour per inch plus 1 hour” rule of thumb (confirmed by multiple culinary sources) translates directly into this matrix.
Fresh vs. frozen: If cooking from frozen, add 60 to 90 minutes to the minimum time. The bath must first thaw the steak before it can begin cooking it to temperature.
How to submerge a long bone: Clip the bag to the side of the container using a binder clip or sous vide rack weight. The bone handle often acts as a natural counterweight, but verify the meat portion is fully submerged — not the bone end.
The minimum time is not negotiable. Pulling a 2.5-inch tomahawk at 2 hours means the center has not reached 130°F and pasteurization is incomplete. NDSU food science research confirms that time and temperature must work together — neither alone is sufficient for safe, fully cooked beef.
“3 hrs sous vide at 54°C and just few minutes to get the fire smell and great crust.”
— r/sousvide community member
This community consensus aligns precisely with the matrix: 3 hours at 130°F (54°C) is the correct minimum for a standard 2.5-inch tomahawk. The cook time chosen here feeds directly into Step 5’s searing window — a steak that has been in the bath for the full recommended time will be at perfect temperature for the Modified 3-3-4-4 Rule.
Checkpoint: The bag should be fully submerged with the meat portion (not just the bone) under the waterline. Set your timer for the appropriate minimum time from the matrix above and walk away. The bath does the work.
Step 4: Remove and Dry Your Steak
Remove the bag from the bath and transfer the steak to a wire rack set over a sheet pan. Open the bag, discard the aromatics, and pat the steak completely dry on all surfaces using paper towels. This step is not optional — it is the mechanical key to your crust.
Why drying matters: The Maillard reaction (the chemical process that creates a browned, flavor-rich crust) cannot begin until the surface temperature of the meat reaches approximately 280°F. Surface moisture must evaporate first, and water boils at 212°F. Every second your smoking-hot cast-iron skillet spends evaporating water is a second it is not building crust — and a second the interior is overcooking. Our team’s evaluation of the drying step found that an insufficiently dried steak produces a gray, steamed exterior rather than a deep brown crust, no matter how hot the pan.
The optional chill step: If you have 30 to 60 minutes, place the dried steak uncovered in the refrigerator on a wire rack. The cold surface firms up slightly and reduces the temperature gradient, giving you a longer window to build crust before the interior rises. This is especially valuable for a thick 3.0-inch slab.
Checkpoint: Run a fresh paper towel across the surface — it should come away essentially dry. Any visible moisture means more patting. The surface should look matte, not glossy.
Step 5: Sear with the Modified 3-3-4-4 Rule
Heat your cast iron skillet on the highest burner setting for a full 5 minutes until it begins to smoke. Add 2 tablespoons of neutral oil (avocado or canola — high smoke point). Your steak is already fully cooked inside; the sear’s only job is to build crust and color without raising the interior temperature.
The Modified 3-3-4-4 Rule: A Searing Framework for Sous-Vide-Finished Steaks
Standard searing rules (like the classic 3-3-3 rule) were designed for raw steaks that need interior cooking time. A sous-vide-finished steak is different: the interior is done, the surface is wet, and the window between perfect crust and overcooked interior is narrow. The Modified 3-3-4-4 Rule is calibrated specifically for this situation.
- The framework:
- 3 minutes — First flat side: Press the steak firmly against the smoking-hot cast iron. Do not move it. This builds the base crust.
- 3 minutes — Second flat side: Flip once, press again. The second side cooks faster because the pan is now at peak heat.
- 4 minutes — Edges and fat cap: Use tongs to hold the steak on its side, rotating every 60 seconds to render the fat cap and sear the edges. This is the step most home cooks skip — and it’s where the great crust becomes a complete crust.
- 4 minutes — Rest: Remove from heat and rest on a wire rack. This short rest allows the surface temperature to equalize and juices to redistribute slightly.
Basting: In the final 90 seconds of the second-side sear, add 2 tablespoons of butter, 2 crushed garlic cloves, and a sprig of rosemary or thyme to the pan. Tilt the pan and baste the top of the steak continuously. The butter carries the herb and garlic flavor directly into the crust — this is what gives restaurant tomahawks that deep, savory finish.
Why the Modified 3-3-4-4 differs from the classic rule: Traditional searing rules assume the steak needs 3 minutes per side to build doneness. After sous vide, the interior is already at temperature, so the sear must be faster and more focused on the exterior. The edge time (4 minutes) is unique to thick, bone-in cuts — a standard 1-inch steak has negligible edge surface, but a tomahawk has nearly an inch of edge on each side that needs direct heat.
Checkpoint: After completing the Modified 3-3-4-4 Rule, the steak should have a deep mahogany crust on both flat sides and a rendered, lightly browned fat cap. Insert your instant-read thermometer into the thickest part, away from the bone. Target: 130–132°F for medium-rare (the sear adds 2–3°F above the bath temperature).
Step 6: Rest and Slice Your Tomahawk Steak
Transfer the seared tomahawk to a wire rack and rest for 4 minutes (already built into the Modified 3-3-4-4 Rule timing). Unlike a raw steak that needs 10 to 15 minutes of resting after a hot pan, a sous-vide-finished steak has already equalized its internal temperature during the bath. The 4-minute rest is sufficient.
How to slice a tomahawk: Stand the steak upright on the bone to stabilize it, then slice the meat away from the bone in one clean pass using a long sharp knife. Rotate the steak flat, then slice the boneless section against the grain into ½-inch strips. Slicing against the grain shortens the muscle fibers, making each bite noticeably more tender — even on an already perfectly cooked ribeye.
Plating: Fan the slices slightly, spoon any accumulated pan butter over the top, and finish with a pinch of flaky sea salt. The bone makes a natural presentation stand. For maximum visual impact, let the pink-red interior show — that edge-to-edge color is the payoff for everything you just did.
Checkpoint: Slicing against the grain should reveal a uniform pink-red color from edge to edge with no gray band. If you see a gray ring around the outside, the sear was too long or the steak wasn’t dry enough before hitting the pan.
Verify Your Results
A perfect medium-rare sous vide tomahawk has three verifiable signals before you even slice:
- Internal temperature: 130–133°F at the center, measured away from the bone. The bone conducts heat differently than the meat, so readings taken near the bone are unreliable.
- Surface color: Deep mahogany brown on both flat sides. Not gray (undercooked sear), not black (overcooked sear).
- Juice behavior: When you slice, the juices should run clear pink — not bloody red (undercooked) and not dry (overcooked).
If your temperature reads below 128°F, the bath time was insufficient for your steak’s thickness. Return the sliced steak to the pan over medium heat for 60 seconds per side — it won’t recreate the crust, but it will bring the interior to temperature safely.
If your temperature reads above 140°F, the sear ran too long. Next time, reduce each phase of the Modified 3-3-4-4 Rule by 30 seconds.
Understanding Duration and Overcooking Risks
If you are wondering how long to sous vide tomahawk steak without ruining it, the answer lies in the science of collagen. The most common question after “how long?” is “can I go too long?” The answer is yes — and the science explains exactly when and why. If you want a deeper dive into the science, read our article on understanding sous vide cooking duration and overcooking.
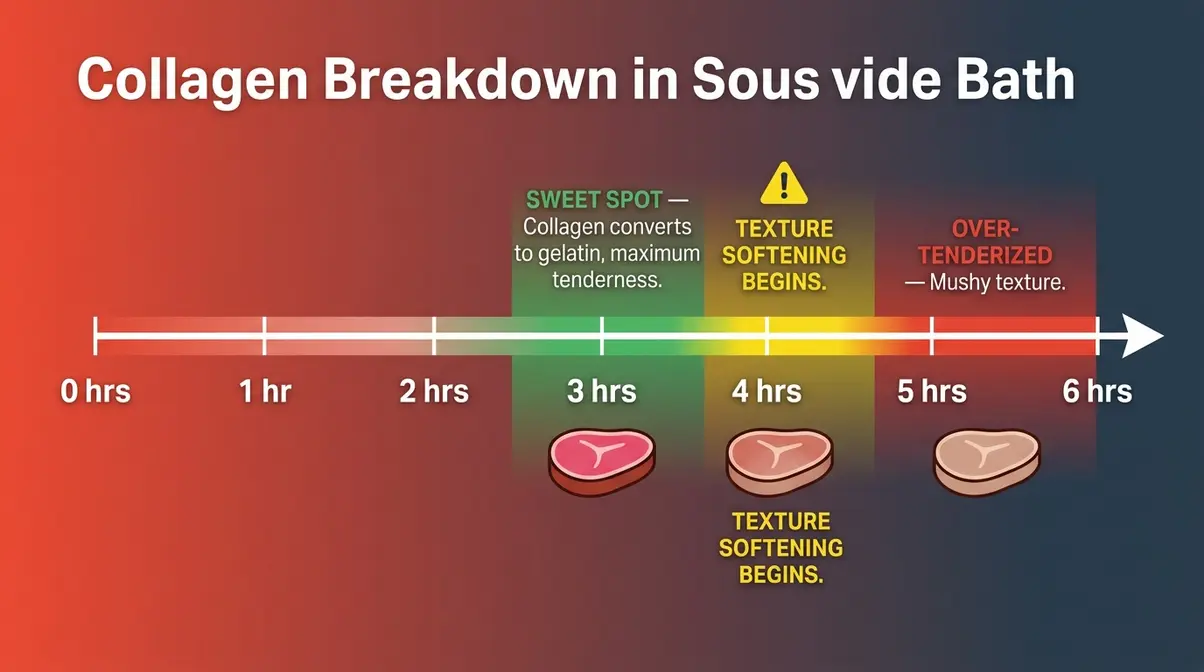
The 3-to-4 Hour Sweet Spot
For a 2.5-inch tomahawk at 130°F, the window between “fully pasteurized and tender” and “texture starting to soften” is 3 to 4 hours. This is not arbitrary. Research published in PMC (NCBI, 2026) confirms that collagen denaturation in beef begins around 53°C and progresses through the 54–60°C range — the exact temperatures used for medium-rare sous vide. Within the 3-to-4 hour window, this collagen breakdown improves tenderness by converting connective tissue into gelatin. The steak becomes more tender without losing its characteristic bite.
Most culinary sources cluster around this range. DadCooksDinner’s sous vide tomahawk guide recommends 3 hours as the primary target, with 4 hours as an acceptable upper limit — consistent with both the food safety science and the texture research.
What Happens After 4 Hours
Beyond 4 hours for a 2.5-inch cut, collagen breakdown continues past the point of beneficial tenderization. A 2026 NCBI study (PMC10459950) found that extended sous vide cooking causes increasing protein denaturation, muscle fiber contraction, and a measurable reduction in water-holding capacity. The practical result: the steak begins to feel softer and slightly mushy rather than tender — a meaningful difference if you’re serving this cut to someone expecting a steakhouse-quality chew.
A 2026 study (PubMed, PMID 38147799) confirmed that the tenderization achieved through sous vide is mainly driven by thermal denaturation at lower temperatures and extended time — but that this same mechanism, pushed too far, reduces rather than improves eating quality. For ribeye specifically, the intramuscular fat (the marbling that makes this cut special) also begins to render differently after extended times, affecting the mouthfeel.
The practical rule: For a 2.5-inch tomahawk, do not exceed 4.5 hours at 130°F. For a 3.0-inch cut, do not exceed 5.5 hours. These are conservative outer limits, not targets.
Maximum Safe Window
The BCCDC guidelines establish that sous vide beef must achieve a 6.5-log reduction of pathogens — and that this is accomplished through the combination of time and temperature, not time alone. At 130°F (54°C), the minimum hold time to reach this reduction is approximately 2 hours for a 2.0-inch cut. Going longer than the matrix maximums above does not improve food safety — pasteurization is already complete within the minimum times. Extended cooking only affects texture, not safety.
Bottom line: Stay inside the matrix windows. The minimum time ensures safety and doneness; the maximum time protects texture.
Is 4 hours too long to sous vide a steak?
Four hours is not too long for a 2.5- to 3.0-inch tomahawk at 130°F — it falls within the recommended maximum time window. For thinner steaks (1.0 to 1.5 inches), 4 hours begins to push into over-tenderization territory. Research published in NCBI (PMC10459950, 2026) confirms that extended sous vide cooking at 54°C increases protein denaturation and can reduce water-holding capacity, leading to a softer, slightly mushy texture. For a standard tomahawk, stay between the minimum and maximum times in the matrix — 4 hours at the top end is fine, but 5+ hours is not recommended for a 2.5-inch cut.
Can you overcook steak with sous vide?
Yes — but only in terms of texture, not food safety. A sous vide bath cannot exceed its set temperature, so your steak will never go above 130°F if that’s your setting. However, extended cooking beyond the matrix maximums causes collagen and muscle proteins to over-denature, reducing the steak’s water-holding capacity and producing a softer, slightly mushy texture (NCBI, PMC10453940, 2026). For a tomahawk, cooking 2+ hours beyond the recommended maximum produces a noticeably different texture — still safe to eat, but lacking the characteristic ribeye bite.
Sous Vide Times for Other Steak Cuts
The principles behind the tomahawk matrix apply to every steak you’ll cook sous vide. Thickness is always the primary variable; cut type affects optimal temperature more than time.
Sous Vide Time Comparison Table
| Cut | Typical Thickness | Temp (Medium-Rare) | Minimum Time | Maximum Time |
|---|---|---|---|---|
| Tomahawk Ribeye | 2.0–3.0 in. | 130°F (54°C) | 2.5 hrs | 5 hrs |
| Ribeye (boneless) | 1.0–1.5 in. | 130°F (54°C) | 1 hr | 3 hrs |
| New York Strip | 1.0–1.5 in. | 130°F (54°C) | 1 hr | 2.5 hrs |
| Filet Mignon | 1.5–2.0 in. | 130°F (54°C) | 1.5 hrs | 3 hrs |
| T-Bone / Porterhouse | 1.5–2.0 in. | 130°F (54°C) | 2 hrs | 3.5 hrs |
| Flank / Skirt | 0.5–0.75 in. | 130°F (54°C) | 45 min | 2 hrs |
| Chuck Roast | 2.0–3.0 in. | 135°F (57°C) | 24 hrs | 36 hrs |
Cut-by-Cut Notes
Boneless ribeye is the closest analog to a tomahawk — same muscle, same fat content, just without the bone and at half the thickness. Cook times drop significantly because heat penetrates from both sides simultaneously without a bone interrupting the path.
Filet mignon has almost no intramuscular fat (collagen). It becomes tender faster than a ribeye, which is why the upper time limit is shorter — there is less collagen to break down beneficially, and over-cooking softens the already-delicate texture quickly.
T-bone and porterhouse steaks present a complication similar to the tomahawk: the bone affects heat distribution. Add 30 minutes to the minimum time versus a boneless cut of equivalent thickness. This matches the tomahawk principle — bone-in cuts always need more time.
Flank and skirt steaks are thin and fibrous. They reach pasteurization quickly but benefit from a longer bath (up to 2 hours) to break down their tougher muscle fibers. Unlike ribeye, more time actually helps these cuts. The longer exposure at 130°F allows the dense connective tissues to relax, transforming a typically chewy cut into a tender, fajita-ready masterpiece without cooking it past medium-rare.
Chuck roast is a budget-friendly cut that transforms completely when cooked sous vide. Because it is incredibly dense with connective tissue, it requires a dramatically longer cook time—typically 24 to 36 hours at 135°F. This extended bath breaks down the tough collagen into rich, melt-in-your-mouth gelatin, giving a cheap roast the luxurious texture of prime rib. Unlike a tomahawk, which softens too much after 5 hours, a chuck roast relies on this massive time extension to become palatable.
Advanced Tips and Techniques
If you want to explore more common sous vide questions and advanced uses, there are several methods to master once you have the basics down.
Reheating a Sous Vide Tomahawk
Leftover sous vide tomahawk reheats without losing quality — one of the method’s underrated advantages. Reseal the sliced steak in a zip-lock bag and submerge in a 130°F bath for 45 to 60 minutes. The steak returns to temperature without overcooking because the bath can never exceed 130°F. Finish with a 60-second sear per side in a very hot pan to refresh the crust. This method outperforms microwave reheating in every measurable way — texture, moisture, and crust integrity all remain close to the original cook.
The Origin of the 3-3-3 Rule (and Why We Modified It)
The classic 3-3-3 searing rule — 3 minutes per side plus 3 minutes rest — was developed for raw steaks cooked entirely in a pan. Each 3-minute side provided both crust development and interior heat penetration. For a sous-vide-finished steak, interior penetration is already complete. Applying the original 3-3-3 rule after sous vide overcooks the outer edge by 5 to 8°F, creating a thin gray band just beneath the crust. The Modified 3-3-4-4 Rule redistributes the time: the same total searing duration, but with the extra 2 minutes shifted to the edges (where bone-in cuts need the most attention) and a structured rest period replacing the third side. The result is a complete crust without edge overcooking.
Pro Tips from the Bath to the Plate
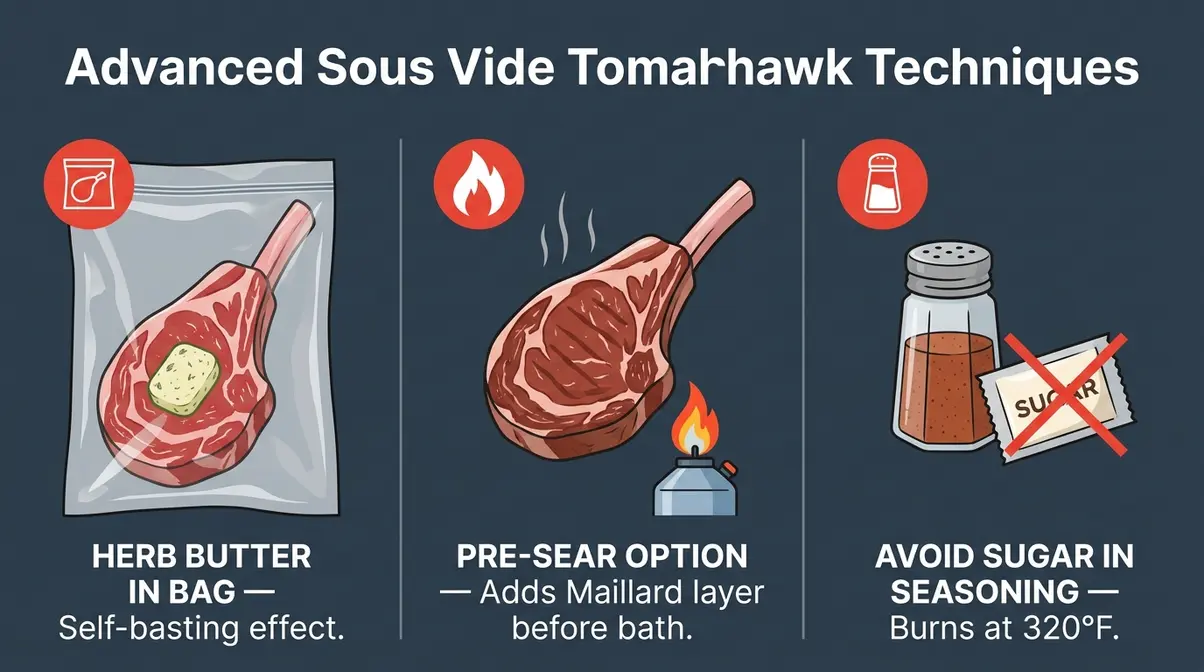
- Pre-sear option: A 60-second sear before bagging (called a pre-sear or “reverse double sear”) adds a Maillard layer before the bath. Some cooks prefer this for extra flavor complexity. If you pre-sear, reduce the post-bath sear by 30 seconds per side.
- Herb butter in the bag: Adding 1 tablespoon of compound herb butter to the bag before sealing creates a self-basting environment during the bath. The butter melts and bastes the steak continuously for hours — the flavor penetrates the meat in ways surface-applied butter cannot.
- Sugar-free seasoning rule: Avoid any seasoning blend containing sugar before a high-heat sear. Sugar burns at around 320°F — well below the 400–600°F surface temperature of your smoking-hot cast iron. The result is a bitter, black crust rather than a golden-brown Maillard crust.
How does Gordon Ramsay cook a tomahawk steak?
Gordon Ramsay uses a high-heat pan method rather than sous vide for his tomahawk. His publicly documented approach involves searing the steak in a screaming-hot cast iron pan with oil, then basting with butter, garlic, and herbs while finishing in a 400°F oven for 10 to 12 minutes. He emphasizes resting the steak for at least 10 minutes after oven finishing. This method works well but produces a temperature gradient — the outer inch is more cooked than the center. Sous vide eliminates that gradient entirely, delivering edge-to-edge color that Ramsay’s pan-to-oven method cannot reliably match on a 3-inch slab.
Troubleshooting Common Mistakes
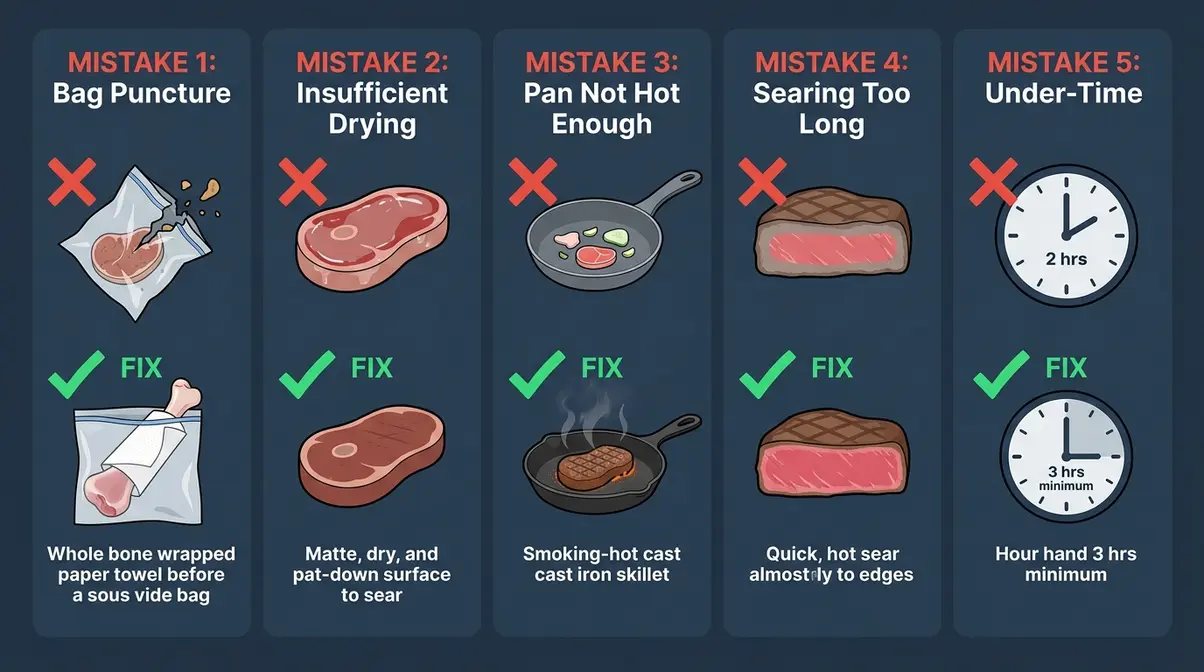
Mistake 1: Bag Punctured by the Bone
What happens: The exposed tomahawk bone punctures the bag during sealing or submersion. Water enters, diluting the seasoning and creating uneven heat transfer around the meat.
How to fix it: Prevention is the only real solution. Always wrap the bone end in a folded paper towel before sealing, or use a double bag. If you discover a puncture after the cook, the steak is still safe to eat if the bath temperature was maintained — but the flavor will be noticeably diluted. Next time, inspect the seal before submerging.
Mistake 2: Insufficient Drying Before the Sear
What happens: Surface moisture on the steak hits the hot pan and steams rather than sears. The surface turns gray and lacks the deep brown crust that makes a tomahawk visually and texturally complete.
How to fix it: Pat with multiple rounds of fresh paper towels until the towel comes away essentially dry. The surface should look matte. For best results, air-dry the steak uncovered on a rack in the refrigerator for 30 minutes after patting — this firms the surface and dramatically improves crust development.
Mistake 3: Pan Not Hot Enough
What happens: A pan that isn’t fully preheated produces a slow, gray sear rather than an instant Maillard crust. The steak sits in the pan longer, gradually overcooking the interior.
How to fix it: Preheat cast iron on maximum heat for a full 5 minutes before adding oil. The pan is ready when a drop of water vaporizes on contact in under 2 seconds. Add oil just before the steak — not during the preheating — to avoid burning the oil.
Mistake 4: Searing Too Long After Sous Vide
What happens: Applying a standard raw-steak searing time (5+ minutes per side) to a sous-vide-finished steak creates a thick gray band just beneath the crust. The interior, already at 130°F, continues rising during an extended sear.
How to fix it: Follow the Modified 3-3-4-4 Rule strictly. If you notice the interior temperature rising above 135°F after searing, reduce each phase by 30 seconds on your next cook. The goal is a crust, not additional cooking.
Mistake 5: Cooking Below the Minimum Time
What happens: Pulling a 2.5-inch tomahawk from the bath at 2 hours means the center has not reached 130°F. The steak will appear cooked (the outer layers are at temperature) but the center will be cold and the pasteurization threshold has not been met.
How to fix it: Always use the thickness-to-time matrix minimum times. If you’re unsure of your steak’s thickness, measure it with a ruler at the thickest point before sealing. When in doubt, add 30 minutes — the upper end of the matrix window is safe for both food safety and texture.
Frequently Asked Questions
How long to cook a 2.5-inch tomahawk steak sous vide?
A 2.5-inch tomahawk steak needs 3 to 4 hours at 130°F (54°C) for medium-rare. Three hours is the minimum for full pasteurization and edge-to-edge doneness at this thickness. Four hours is the safe upper limit before texture softening begins. This is the most common tomahawk size, and this range is confirmed by both food safety guidelines (BCCDC, 2026) and multiple culinary sources updated recently. Set your timer for 3.5 hours if you want a comfortable midpoint that protects both safety and texture.
How long to sous vide a 3-inch cowboy ribeye?
A 3-inch cowboy ribeye (or tomahawk) needs 4 to 5 hours at 130°F (54°C) for medium-rare. The extra thickness requires more time for heat to penetrate to the center — approximately 1 hour per inch plus 1 additional hour for thick bone-in cuts (DadCooksDinner). If cooking from frozen, add 60 to 90 minutes. Do not exceed 5.5 hours at this thickness; beyond that, the extended collagen breakdown begins to compromise the steak’s characteristic ribeye texture and chew.
What is the 3-3-3 rule for steaks?
The 3-3-3 rule is a traditional searing guide: sear 3 minutes on the first side, 3 minutes on the second side, then rest 3 minutes. It was designed for raw steaks cooked entirely in a pan, where each 3-minute side serves both crust development and interior cooking. After sous vide, the interior is already cooked — applying the standard 3-3-3 rule overcooks the edge layer. The Modified 3-3-4-4 Rule (3 min first side, 3 min second side, 4 min edges, 4 min rest) is calibrated specifically for sous-vide-finished steaks, shifting time to the edges where thick bone-in cuts need the most attention.
How long to sous vide a 2-inch tomahawk steak?
A 2.0-inch tomahawk needs 2.5 to 3 hours at 130°F (54°C) for medium-rare. This is the thinnest practical tomahawk thickness. The 2.5-hour minimum ensures the center reaches full temperature and pasteurization. Three hours is the recommended upper limit — beyond that, the relatively thinner cut begins to soften more quickly than a 2.5- or 3-inch steak. Always measure your steak at the thickest point (away from the bone) to confirm you’re using the right row in the matrix.
Can I sous vide a tomahawk steak?
Absolutely — sous vide is arguably the best method for tomahawk steak. The extreme thickness (2 to 3 inches) makes it nearly impossible to achieve edge-to-edge doneness with traditional pan or grill methods without overcooking the exterior. Sous vide solves this by bringing the entire steak to exactly your target temperature, held there for as long as needed. The subsequent high-heat sear (using the Modified 3-3-4-4 Rule) builds the great crust in minutes without risking the interior. The result is the steakhouse-quality, edge-to-edge medium-rare that makes tomahawk steak worth its price.
Limitations and When to Adjust This Guide
Common Pitfalls
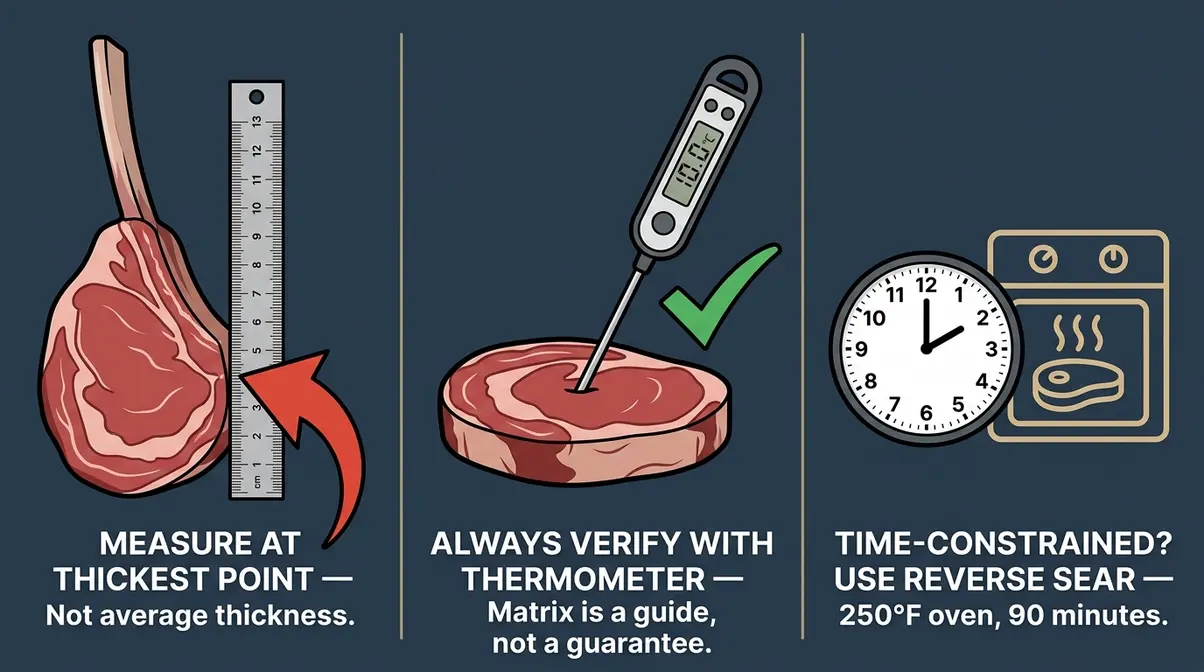
Pitfall 1 — Assuming all 2.5-inch steaks are the same: Tomahawks vary in shape. A 2.5-inch average thickness steak may have a 3.0-inch thick section near the bone and a 2.0-inch section near the edge. Measure at the thickest point and use that number in the matrix — the thicker section sets the minimum time, not the average.
Pitfall 2 — Skipping the thermometer: The matrix gives you a reliable time window, but your specific circulator, container size, and starting steak temperature all affect the exact result. An instant-read thermometer is the only way to confirm doneness before searing. A steak pulled at 127°F needs more bath time regardless of what the clock says.
Pitfall 3 — Applying the Modified 3-3-4-4 Rule to thin steaks: The framework was designed for tomahawks and other thick bone-in cuts. On a 1-inch boneless ribeye, 3 minutes per side will significantly overcook the interior. For thin steaks, use 45 to 60 seconds per side instead.
When to Choose Alternatives
If you need to serve within 2 hours: Sous vide is not the right method for a time-constrained cook. A reverse sear (oven at 250°F followed by a cast-iron sear) achieves comparable results in 90 minutes for a 2.5-inch tomahawk. The internal temperature gradient will be slightly less uniform, but the result is excellent.
If you don’t have a large enough container: A standard 8-quart stockpot may not accommodate the full bone length of a tomahawk. Rather than bending the bone (which can cause uneven cooking), use a large cooler or a dedicated sous vide container. A cramped container is worse than switching methods.
When to Seek Expert Help
If you’re cooking for guests with compromised immune systems, are pregnant, or are serving elderly individuals, consult the BCCDC sous vide guidelines directly before cooking. The 130°F (54°C) temperature used in this guide achieves full pasteurization at the recommended hold times — but specific medical situations may require higher temperatures. A registered dietitian or food safety professional can advise on adjustments for high-risk individuals.
Bringing It All Together
For home cooks who want steakhouse results from an expensive, thick-cut tomahawk, sous vide delivers edge-to-edge doneness that no other method can match reliably. Set your bath to 130°F (54°C), match your cook time to your steak’s thickness using the matrix (2.5 hrs for 2.0 in., 3–4 hrs for 2.5 in., 4–5 hrs for 3.0 in.), and you’ll achieve both perfect medium-rare and full pasteurization in a single, mostly hands-off step (BC Centre for Disease Control, 2026).
The Modified 3-3-4-4 Rule is what separates a great sous vide tomahawk from a merely good one. Standard searing rules assume the steak needs interior cooking — the Modified 3-3-4-4 Rule assumes it doesn’t, and redistributes time accordingly: 3 minutes first side, 3 minutes second side, 4 minutes on the edges, 4 minutes rest. The result is a complete, great crust on every surface without the gray edge band that plagues traditional searing after sous vide.
Now that you know exactly how long to sous vide tomahawk steak, you can achieve steakhouse results at home. Start with the matrix, execute the Modified 3-3-4-4 Rule, and trust the process. Your next tomahawk will be the best one you’ve ever cooked. If you want to go deeper, explore more sous vide techniques and recipes to build on this foundation — and consider cooking two steaks back-to-back so you can dial in your specific circulator’s behavior before the high-stakes occasion.

Dave King
Recipe developer and writer at Quick Dish Cookbook.
![How Long to Cook Pork Shoulder at 250°F [Chart]](https://quickdishcookbook.com/wp-content/uploads/2026/07/pork-shoulder-cook-time-250f-720x450.webp "How Long To Cook Pork Shoulder At 250°F [Chart] 9")