“HELP! What temp / how long are you cooking your spatchcocked bird? I see everything from 275–450 degrees and 90min–4 hours.”
That quote comes from a real home cook — and if it sounds familiar, you’re not alone. The internet is genuinely full of contradictory advice on this topic, and when you’re working with a $15 chicken, the stakes feel real.
For anyone wondering how long to cook spatchcock chicken, the straightforward answer depends on two things — your oven temperature and your bird’s weight. A 4–5 lb bird at 400°F takes 45–55 minutes. But the full picture is more nuanced, and that’s exactly what this guide covers.
You’ll learn the exact technique for spatchcocking, a complete time-and-temperature matrix for every common bird size, grilling and alternative methods, and a troubleshooting guide for the five most common failures. By the end, you won’t need to search this topic again.

Key Takeaways: How Long to Cook Spatchcock Chicken
When determining how long to cook spatchcock chicken, a 4–5 lb bird takes 45–55 minutes at 400°F (204°C) — roughly 25% faster than a whole roast bird, according to Iowa State University Extension (2017).
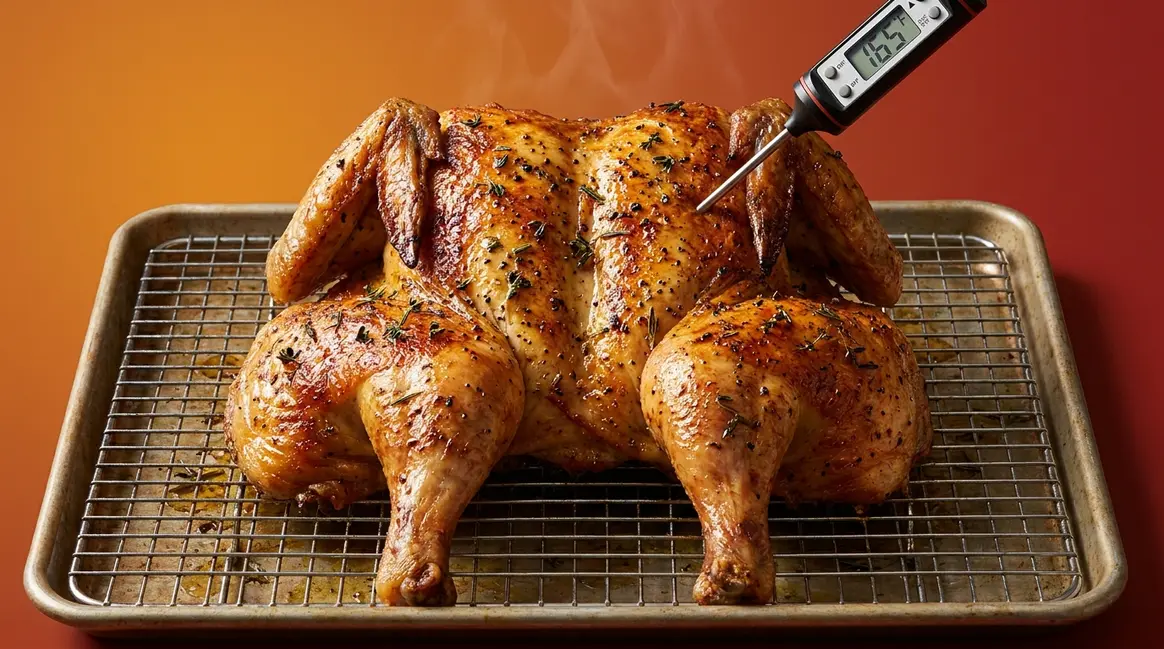
- Safe internal temp: Always verify 165°F (74°C) in the thickest part of the breast with a thermometer — the USDA minimum for all poultry (USDA FSIS, 2026).
- The Spatchcock Temperature Matrix: Times range from 55–75 min at 350°F to 28–35 min at 450°F, depending on bird weight (3–7 lbs) — use the table in Step 3 to find your exact window.
- Do not flip: Roast skin-side up the entire time in the oven for maximum crispiness.
- Key tool: A digital instant-read thermometer is non-negotiable — color alone cannot tell you if a spatchcock chicken is safe to eat.
What You’ll Need Before You Start
The entire process — from prep to resting — takes about 1.5 to 2 hours, with roughly 15 minutes of active prep and 45–75 minutes of hands-off cooking time. Getting everything on your counter before you begin prevents the mid-recipe scramble that trips up most beginners.
Equipment:
- Poultry shears — heavy-duty kitchen scissors designed for cutting through bone; regular kitchen shears won’t have enough leverage for the spine and are the #1 beginner failure point
- Large, non-slip cutting board — you need room to maneuver the whole bird
- Rimmed baking sheet or roasting tin with a wire rack — the rack lifts the bird so hot air circulates underneath, which is what creates crispy skin; without it, the underside steams in its own juices
- Digital instant-read meat thermometer — the single most important tool; do not skip this
- Paper towels — for drying the skin before cooking (moisture is the enemy of crispiness)
- Sharp chef’s knife (optional, for trimming loose fat)
Ingredients:
- 1 whole chicken (3–7 lbs; a 4–5 lb bird is ideal for most households)
- Olive oil or softened butter
- Kosher salt and black pepper
- Dry rub of choice (garlic powder, smoked paprika, dried herbs)
- Optional: fresh herbs, lemon zest, softened butter for under-skin seasoning
Checkpoint: You should have all tools on your counter and your chicken out of the refrigerator. Let it sit at room temperature for 20–30 minutes before cooking for more even results.
Step 1: Spatchcock Your Chicken
Spatchcocking — also called butterflying — means removing the backbone so the whole chicken lies completely flat. A flat bird cooks faster and more evenly because every part of the meat sits at the same distance from the heat source. According to university extension roasting guidelines, this technique cuts roasting time by roughly 15 minutes compared to roasting a whole intact bird (Iowa State University Extension, 2017). Removing the backbone reduces oven roasting time by approximately 25–30% compared to a whole, intact bird — a meaningful difference on a weeknight.
Once your bird is flat and ready, you’ll use The Spatchcock Temperature Matrix in Step 3 to find your exact cook time based on weight. For now, let’s focus on mastering the spatchcocking technique.

How to Remove the Backbone
Learning how to cook a spatchcock chicken starts with this one cut. It feels intimidating the first time, but the technique is straightforward once you know the path.
- Place the chicken breast-side down on your cutting board so the backbone faces up. Pat the entire outside completely dry with paper towels first — this is not optional. Moisture is the #1 enemy of crispy skin, and the sooner you remove it, the better.
- Position your poultry shears at the tail end of the bird, alongside one edge of the backbone (not through the center of it — you’re cutting beside the spine, not through it).
- Cut upward from tail to neck along one side of the backbone. Apply steady, firm pressure rather than quick snips — you’ll feel resistance at the rib joints, which is normal. If the shears feel impossible to close, you may be on a joint; reposition slightly toward the spine’s edge.
- Repeat on the other side to free the backbone completely. Remove it and save it in a zip-lock bag in the freezer — it makes excellent chicken stock.
You’ll hear or feel a crack at certain points during cutting. That’s completely normal — you’re cutting through small rib bones, not doing anything wrong.
Checkpoint: You should now have a backbone-free chicken with two sides of exposed ribcage visible.
Transition: With the backbone removed, your next move is the most satisfying part — pressing the bird completely flat.
How to Flatten and Dry the Bird
Flip the chicken breast-side up. Place both palms on the center of the breastbone — the hard ridge running down the middle of the breast, also called the keel bone. Push down firmly until you hear or feel a crack. This is the breastbone cartilage giving way, and it’s supposed to happen. The bird should now lie completely flat, roughly twice as wide as it is long.
Why this matters: A flat bird means the breast and thigh reach the same internal temperature at roughly the same time. This eliminates the most common complaint — dry breast meat from waiting for the thighs to finish. Culinary consensus across cooking communities confirms that even flattening is the single structural change that most improves cook consistency.
Dry the skin immediately. Pat the entire surface — both top and bottom — aggressively dry with fresh paper towels. If time allows, place the bird uncovered on a wire rack in the refrigerator for 1–24 hours before cooking. This air-drying step creates noticeably crispier skin because any remaining surface moisture turns to steam in the oven, which softens the skin instead of crisping it.
A properly prepared bird looks like a flattened, wide oval on your cutting board. The legs splay outward and the breast sits flat.

Checkpoint: You should now have a completely flat chicken with dry, paper-towel-patted skin.
Transition: Now that your bird is flat and dry, it’s time to add flavor — and the right seasoning strategy makes a significant difference in both taste and skin texture.
Step 2: Season the Bird
Seasoning a spatchcock chicken isn’t just about flavor — the method you use directly affects crispiness and moisture retention. The key principle: anything wet applied to the skin surface creates steam in the oven, which works against the crispy skin you’re after. Keep wet ingredients under the skin, and dry ingredients on top.

Dry Rub and Under-Skin Seasoning
Under-skin seasoning is the technique that separates a genuinely juicy result from a dry one. Gently slide your fingers between the skin and the meat over the breast and thighs — the membrane loosens easily. Push softened butter or olive oil mixed with your chosen seasonings directly onto the flesh. This protects the meat from drying out during cooking and adds flavor from the inside.
Surface dry rub goes on after the under-skin step. Brush a thin layer of olive oil over the entire skin surface, then apply your dry rub. A reliable starting formula:
- 1 tsp kosher salt per pound of bird
- ½ tsp black pepper per pound
- 1 tsp garlic powder per pound
- ½ tsp smoked paprika per pound
Kosher salt — coarser than table salt — draws surface moisture out of the skin before cooking, which is what creates that golden brown, crispy finish. Applying it 1–24 hours ahead (dry brining) is the single most impactful prep step for crispy skin, per culinary consensus across sources including The Kitchn and Serious Eats.
What to avoid: Wet marinades with citrus juice, vinegar, or yogurt applied to the skin create steam in the oven and prevent crisping. Use wet marinades only under the skin, or reserve them for grilled preparations where the open flame handles moisture differently.
Transition: With your seasoned bird ready, the next decision is your cooking method — and for most home cooks, the oven is where the best results happen.
Seasoning Adaptations for Sensitive Stomachs
Standard spatchcock recipes rely heavily on garlic, onion, and lemon — common irritants for people managing gastritis, IBS, or acid-sensitive digestion. A gentler seasoning approach can deliver excellent flavor without the irritation.
- Low-irritant dry rub (per pound of bird):
- 1 tsp kosher salt
- ½ tsp black pepper
- ½ tsp ground turmeric
- ½ tsp dried thyme
- ¼ tsp ginger powder
Skip garlic and onion entirely. Use a drizzle of olive oil rather than butter (olive oil has anti-inflammatory properties). Avoid citrus-based marinades, chili flakes, large quantities of paprika, and acidic sauces during cooking.
Safe basting option: Plain low-sodium chicken stock applied with a pastry brush every 20 minutes keeps the meat moist without common irritants. This approach keeps the skin from drying out while respecting a sensitive digestive system.
Note: This is a practical seasoning adjustment, not a medical recommendation. Consult your healthcare provider if you have specific dietary restrictions.
Checkpoint: You should now have a seasoned bird, fully coated under the skin and on the surface, ready for the oven, grill, or your chosen cooking method.
Step 3: Roast in the Oven (Primary Method)
If you are wondering how long to cook spatchcock chicken in the oven, preheat to 400°F (204°C) and place the bird skin-side up on a wire rack set over a rimmed baking sheet. A 4–5 lb bird takes 45–55 minutes at this temperature. According to university extension roasting guidelines, spatchcocking cuts roasting time by roughly 15 minutes compared to roasting the bird whole (Iowa State University Extension, 2017). A 4–5 lb spatchcock chicken roasted at 400°F takes 45–55 minutes — roughly 15–20 minutes faster than roasting the same bird whole.
Place the rack in the middle position of your oven. This is also where you’ll apply optimal oven cooking times and temperatures from The Spatchcock Temperature Matrix below.
Is 400 or 425 Better for Chicken?
The temperature you choose determines both your timing and your skin texture. Here’s the practical trade-off at each common setting.
350°F (175°C): Lower and slower — more forgiving for beginners, but skin is less crispy and you’ll need 55–75 minutes depending on weight. Best for very large birds (6–7 lbs) where you want more even heat penetration throughout the thickest parts. According to spatchcock roasting time comparisons, a spatchcocked chicken takes approximately 35 minutes at 350°F compared to roughly 60 minutes for a traditional whole roast (Bowdoin College, 2026).
400°F (204°C): The recommended sweet spot for most home cooks — crispy skin, juicy meat, and predictable timing. Multiple tested recipe sources converge on this temperature as the best balance of results and forgiveness.
425°F (218°C): Faster browning, slightly more aggressive heat — excellent for smaller birds (3–4 lbs). Watch the wing tips carefully at this temperature. They’re thinner than the breast and thigh, so they color quickly. After 30 minutes, check them and tuck them behind the breast or shield loosely with foil if they’re darkening too fast.
450°F (232°C): Maximum crispiness, shortest time — use only for smaller birds (3–4 lbs) and monitor closely after the 25-minute mark. The skin goes golden brown all over very quickly at this heat.
Convection oven adjustment: Reduce any temperature by 25°F when using a fan-assisted convection oven, or reduce your total cook time by approximately 20%. A 400°F conventional recipe becomes 375°F on convection.
Transition: The temperature choice affects your timing — and timing depends heavily on your bird’s weight. Use this reference chart to find your exact window.
The Spatchcock Temperature Matrix
This is The Spatchcock Temperature Matrix: a weight-by-temperature reference grid that replaces the conflicting advice you’ve seen online with one clear, testable chart. Find your bird’s weight in the left column. Find your chosen oven temperature across the top row. The intersection gives your estimated cooking time range. Always verify with a thermometer — these are estimates, not guarantees.

| Bird Weight | 350°F (175°C) | 375°F (190°C) | 400°F (204°C) | 425°F (218°C) | 450°F (232°C) |
|---|---|---|---|---|---|
| 3 lbs | 45–55 min | 40–48 min | 35–42 min | 30–38 min | 28–35 min |
| 4 lbs | 52–62 min | 46–55 min | 42–50 min | 36–44 min | 32–40 min |
| 5 lbs | 60–72 min | 54–64 min | 48–58 min | 42–50 min | 38–46 min |
| 6 lbs | 68–80 min | 60–72 min | 54–65 min | 48–57 min | 44–52 min |
| 7 lbs | 75–90 min | 68–80 min | 62–74 min | 55–65 min | 50–60 min |
Sources: Iowa State University Extension (2017); Bowdoin College (2026); culinary consensus across tested recipe sources including Fifteen Spatulas, Cooking for My Soul, and Ahead of Thyme. Always use a thermometer — internal temperature (165°F) is the only reliable doneness indicator.
How to use this table: A 4.5 lb bird at 400°F falls between the 4 lb row (42–50 min) and the 5 lb row (48–58 min) — plan for approximately 45–55 minutes and start checking at the lower end of the range.
Bake Covered or Uncovered?
Always roast spatchcock chicken uncovered. This is non-negotiable for crispy skin. Covering the bird traps steam, which softens the skin and prevents the fat underneath from rendering properly. The flat, open shape of a spatchcock chicken means it doesn’t need the moisture-retention help that a covered roast provides — it cooks quickly enough on its own.
Place the bird skin-side up for the entire cook. Do not flip it. The skin-up position allows the fat to render downward through the meat, basting it from the inside while the exposed skin crisps from above. User consensus across cooking communities confirms that flipping a spatchcock chicken in the oven produces uneven results and tears the skin.
Step 4: Grill the Spatchcock Chicken
When it comes to grilling spatchcock chicken to perfection, the flat shape allows even contact with the grates and delivers smoky flavor the oven can’t replicate. A 3–4 lb spatchcock chicken grilled over indirect heat at 375–400°F takes 40–50 minutes until the breast reaches 165°F (74°C), based on consensus across multiple tested grill recipes.

Grill Setup
Regardless of whether you’re using gas or charcoal, the setup principle is the same: cook over indirect heat for the majority of the cook, with an optional short finish over direct heat for extra skin crispiness.
Gas grill: Preheat to 400°F with all burners on. Once hot, turn off the center burner(s). Place the spatchcocked chicken skin-side up in the center — over the unlit burner — with the lit burners on the sides. Close the lid.
Charcoal grill: Arrange lit coals on both sides of the grill, leaving the center clear. Place the chicken in the center, skin-side up. Close the lid and maintain a temperature of approximately 375–400°F by adjusting the vents.
Keep the lid closed as much as possible. Every time you open it, you lose heat and add minutes to your cook.
Grill Times and Techniques
Cook the chicken over indirect heat, lid closed, for the majority of the time. For a 3–4 lb bird at 375–400°F, that means approximately 40–50 minutes. For a 5–6 lb bird, budget 50–65 minutes. Check internal temperature — not color — at the lower end of the range.
Optional skin-crisping finish: When the breast reaches approximately 145°F internally, move the chicken directly over the heat source for 5–7 minutes, skin-side down, to char the skin slightly and add grill marks. This finish step is optional but delivers noticeably crisper skin (Hey Grill Hey, 2026).
Basting on the grill: Apply sauce or basting liquid (chicken stock, herb butter) only in the last 10–15 minutes. Applying it earlier causes flare-ups and uneven browning. If you’re using a sauce with sugar, apply it only in the final 5 minutes to prevent burning.
Where grilling differs from the oven: Wind, outdoor temperature, and the specific grill all affect timing. Use your thermometer as the true reference point — the times above are starting estimates, not fixed rules.
Step 5: Alternative Cooking Methods

The oven and grill cover most situations, but two other methods are worth knowing: the smoker for weekend low-and-slow cooks, and the air fryer for a faster weeknight option. Just remember to adjust your spatchcock chicken cooking times by weight regardless of the method you choose.

Smoker Method
Smoking a spatchcock chicken produces deeply flavored, smoke-ringed meat with a texture you can’t achieve in an oven. There are two approaches depending on how much time you have.
Low-and-slow (225°F): Set your smoker to 225°F (107°C). Place the spatchcocked chicken skin-side up on the grates and smoke for approximately 4–5 hours until the internal temperature of the thigh reaches 165°F. The Bearded Butchers recommend placing a probe thermometer in the thigh before the bird goes in, so you can monitor without opening the smoker (Bearded Butchers, 2026). This method produces the most smoke penetration and the most tender meat.
Hot-and-fast (275–350°F): On a pellet smoker, set the temperature to 275–350°F. A spatchcocked chicken at 350°F takes approximately 60–75 minutes, while a 4.5–5 lb bird at 275°F takes about 2 hours. This approach balances smoke flavor with a more practical time commitment for weeknights.
For crispy skin on the smoker, avoid water pans directly under the bird and skip foil tenting — both trap moisture that works against skin texture.
Air Fryer Method
The air fryer is the fastest option for a weeknight spatchcock chicken, and it produces genuinely crispy skin thanks to the concentrated circulating heat. The main constraint is basket size — most standard air fryers fit birds up to 3.5–4 lbs. A 5 lb bird typically won’t fit flat.
Temperature: 360–380°F (182–193°C)
Time: 35–45 minutes for a 3–4 lb bird; up to 50–55 minutes for larger birds
Place the chicken skin-side up in the basket, ensuring it lies flat. Cook for 25 minutes, then carefully flip skin-side down for 15–20 minutes, then flip back skin-side up for the final 3–5 minutes to re-crisp the top. Always confirm 165°F at the breast before serving. Per multiple tested air fryer recipes, 360°F for 35–40 minutes reliably produces safe, crispy results for a standard 3–4 lb bird (My Forking Life, 2026; CooksCrafter, 2026).
Step 6: Check Doneness and Rest the Bird
A spatchcock chicken is done when the thickest part of the breast reaches an internal temperature of 165°F (74°C) — the USDA minimum safe temperature for all poultry (USDA FSIS, 2026). Color, juices running clear, and “feels done” are all unreliable indicators. A thermometer is the only method that works.

Thermometer Placement
Insert your instant-read thermometer into the thickest part of the breast, angling the probe slightly toward the center of the meat. Avoid touching bone — bone conducts heat differently than meat and will give you a falsely high reading.
Check the thigh as a secondary verification: insert the probe into the thickest part of the thigh muscle, again avoiding the bone. The thigh should read at least 165°F as well. On a properly flattened spatchcock chicken, the breast and thigh typically reach safe temperature within a few minutes of each other — one of the key advantages of the flat cooking position.
Food Safety Callout: The USDA requires all poultry to reach a minimum internal temperature of 165°F (74°C) at its thickest point, verified with a food thermometer, before it is considered safe to eat. This applies to every cooking method — oven, grill, smoker, and air fryer (USDA FSIS, 2026; FoodSafety.gov).
Carryover Cooking and Resting
Carryover cooking is the continued rise in internal temperature that occurs after food is removed from the heat source, as retained heat moves inward from the outer layers. For chicken, this effect exists but is modest and variable.
ThermoWorks explicitly notes that carryover cooking “will not always necessarily get you to 165°F” — meaning you cannot rely on it as a safety buffer if your thermometer reads below the USDA minimum (ThermoWorks, 2026). Always verify 165°F before removing the bird from heat. Any additional rise during rest is a bonus for texture and juiciness, not a substitute for hitting the safe temperature first.
Once the bird hits 165°F, transfer it to a cutting board and rest it uncovered for 10–15 minutes before carving. Resting allows the juices to redistribute through the breast meat — carving immediately after cooking causes those juices to run out onto the board instead of staying in the meat.
Troubleshooting Common Mistakes

Our team’s evaluation of the most common spatchcock chicken failures — drawn from tested recipe analysis and cooking community consensus — consistently points to the same five problems. Each one has a clear cause and a specific fix.
Problem 1: Soggy or Rubbery Skin
Cause: Surface moisture on the skin. When water is present on the skin surface, it turns to steam in the oven, which softens the skin instead of crisping it. This happens when the bird isn’t dried thoroughly before cooking, when it’s roasted directly on a flat pan with no rack, or when vegetables are placed under the bird (they release moisture that steams the underside).
Fix: Pat the bird completely dry with paper towels immediately after spatchcocking. For the best results, place it uncovered on a wire rack in the refrigerator for at least 4 hours — overnight is better. Always use a wire rack over a sheet pan, never a flat baking dish. Keep vegetables at the edges of the pan, never directly under the bird (Well Seasoned Studio, 2026).
Problem 2: Burnt Wing Tips
Cause: Wing tips are thinner than the breast and thigh, so they cook significantly faster. At temperatures of 425°F and above, they can char before the rest of the bird is done.
Fix: After 25–30 minutes of cooking, check the wing tips. If they’re darkening faster than the breast, tuck them behind the breast or fold them under the bird. Alternatively, shield them loosely with a small piece of foil. On the grill, move the bird slightly away from direct heat if the tips start to burn.
Problem 3: Dry Breast Meat
Cause: Overcooking — specifically, cooking past 165°F in the breast because you’re waiting for the thighs to “seem done” by time or appearance. A thermometer eliminates this problem entirely.
Fix: Start checking the breast temperature at the lower end of the time range in The Spatchcock Temperature Matrix. Pull the bird the moment the breast hits 165°F. Rest it for 10–15 minutes before carving — this step is essential for juicy meat. Dry brining 12–24 hours in advance also significantly improves moisture retention (culinary consensus; Bradley Smoker, 2026).
Problem 4: Undercooked Joints
Cause: The thigh-drumstick joint is the last part of the bird to reach safe temperature. If the bird isn’t fully flat, or if the thighs are tucked under rather than splayed outward, the joint area can lag behind the rest of the bird.
Fix: Ensure the bird is pressed completely flat with legs splayed outward before cooking. After checking the breast temperature, insert your thermometer into the thigh joint — it should read at least 165°F. If the breast is done but the thigh joint isn’t, tent the breast loosely with foil and return the bird to the oven for 5–8 more minutes.
Problem 5: Uneven Flattening
Cause: The breastbone wasn’t fully cracked during the flattening step, leaving the bird slightly arched rather than truly flat. This causes the breast to sit higher than the thighs, creating uneven heat exposure.
Fix: After pressing down on the breastbone, run your hand along the center of the bird. It should feel level, with no visible arch. If you feel resistance, press again with both palms using more force. The crack you hear is cartilage, not bone — it’s the right sound. A properly flattened bird should stay flat on the pan without any propping.
Advanced Tips for Crispy Skin and Juicy Meat
These tips for crispy skin and juicy meat separate a good spatchcock chicken from a genuinely exceptional one. None of them are required, but each addresses a specific variable that affects the final result.
Dry brine 24 hours ahead. Salt the bird, place it uncovered on a wire rack, and refrigerate overnight. The salt draws moisture to the surface, which then gets reabsorbed, seasoning the meat deeply. The surface dries significantly during this time, which is exactly what you want for crispy skin. This single step is described by culinary consensus across sources including Serious Eats and The Kitchn as the most impactful thing you can do before cooking.
Add baking powder to your dry rub. A small amount — roughly ¼ tsp per pound mixed into the salt and spice rub — raises the skin’s pH, which accelerates the Maillard reaction (the browning process). The result is noticeably more golden, crackly skin. Use aluminum-free baking powder to avoid any metallic aftertaste.
Start with a cold oven or a very hot one — not in between. The sweet spot for crispy skin is either starting in a cold oven (which renders fat slowly as heat builds) or in a fully preheated oven at 400°F+. A partially preheated oven at moderate temperature is the worst of both worlds — not hot enough to crisp quickly, not slow enough to render fat properly.
Rest uncovered, not under foil. Tenting the bird with foil during rest traps steam and softens the skin you worked hard to crisp. Rest it uncovered on a cutting board. The temperature drop during a 10–15 minute rest is minimal and does not affect food safety.
Basting: If you baste — brushing the bird with pan drippings or butter during cooking — do it quickly, no more than once or twice. Every time you open the oven, you lose heat and add time. If crispy skin is the priority, skip basting entirely and let the oven do the work.
Limitations and When to Adjust
Common Pitfalls
Time estimates are starting points, not fixed rules. Oven calibration varies significantly between models — an oven that reads 400°F may actually run 25°F hotter or cooler. If your chicken is consistently done earlier or later than the matrix suggests, consider an oven thermometer to verify your actual temperature.
Larger birds require more attention at the joints. A 7 lb bird at 400°F may need up to 70+ minutes, and the thigh joint can lag significantly behind the breast. Check both locations with your thermometer and don’t rely on the breast reading alone.
The first time is always the longest. Spatchcocking feels slow and uncertain the first time. Most cooks report that the second attempt takes roughly half as long as the first.
When to Choose Alternatives
Whole roast chicken: If you’re cooking for a formal occasion where presentation matters, a whole roast chicken looks more impressive on the table. The spatchcock method is purely functional — it delivers better results, but the bird doesn’t arrive looking “classic.”
Rotisserie or Dutch oven: If you want extremely moist meat and don’t care about crispy skin, a covered Dutch oven braise or rotisserie method produces juicier results at the cost of texture.
When to Seek Expert Help
For anyone managing a food allergy, a compromised immune system, or cooking for vulnerable populations (young children, elderly, pregnant individuals), err on the side of caution: always verify 165°F with a calibrated thermometer and never rely on visual cues or timing alone. If you’re unsure about food safety practices, the USDA Meat and Poultry Hotline (1-888-MPHotline) provides free guidance.
Frequently Asked Questions
Cook Time at 400 Degrees?
A flattened (spatchcock) chicken at 400°F takes approximately 35–65 minutes, depending on weight. A 3 lb bird needs 35–42 minutes; a 5 lb bird needs 48–58 minutes; a 7 lb bird needs 62–74 minutes. These ranges come from The Spatchcock Temperature Matrix, which cross-references bird weight against oven temperature. Always verify doneness with a thermometer at 165°F in the thickest part of the breast — timing alone is not reliable enough for food safety, as noted by Iowa State University Extension (2017).
Roast at 350°F or 400°F?
400°F is generally better for spatchcock chicken than 350°F for most home cooks. At 400°F, the fat under the skin renders fully and the surface crisps without overcooking the interior. At 350°F, the lower heat produces softer skin and requires 15–20 additional minutes of cook time. The exception is a very large bird (6–7 lbs) where 350°F provides more forgiving, even heat penetration. For crispy skin and juicy meat in the shortest time, 400°F is the sweet spot.
Common Spatchcocking Mistakes?
The five most common spatchcock chicken mistakes are: (1) not drying the skin thoroughly before cooking, which causes soggy results; (2) skipping the wire rack, which traps steam under the bird; (3) using regular kitchen scissors instead of dedicated poultry shears; (4) not fully cracking the breastbone during flattening; and (5) cooking by time alone instead of using a thermometer. Of these, insufficient drying and skipping the rack account for the majority of crispy-skin failures reported across cooking communities.
Bake at 350°F or 400°F?
For spatchcock chicken specifically, 400°F outperforms 350°F in skin crispiness and overall texture. At 400°F, the Maillard reaction (the browning process responsible for golden brown all over color and flavor) occurs more efficiently, and the cook time is short enough that the breast doesn’t dry out. At 350°F, you’re trading crispiness for forgiveness — it’s a better choice if you’re nervous about timing, but the skin will be noticeably softer.
Best Cooking Temperature?
The recommended temperature for spatchcock chicken is 400–425°F (204–218°C) for most home ovens. This range delivers crispy skin, juicy meat, and a manageable cook time of 35–65 minutes depending on bird weight. Higher temperatures (450°F) work well for smaller birds under 4 lbs but require close monitoring. Lower temperatures (350°F) are best reserved for very large birds or when you need more flexibility in timing. Regardless of oven temperature, the doneness target is always 165°F internal at the breast (USDA FSIS, 2026).
Do You Flip a Spatchcocked Chicken?
No, you should not flip a spatchcocked chicken during roasting. Keeping the bird skin-side up the entire time allows the fat to render downward, basting the meat from the inside while the exposed skin crisps perfectly in the dry oven heat. Flipping the bird often tears the delicate skin and leads to uneven cooking results.
What is the Downside of Spatchcocking?
The main downside of spatchcocking is the loss of traditional presentation. A flattened bird does not look like a classic whole roast chicken on a holiday table. Additionally, it requires heavy-duty poultry shears and some physical effort to cut through the backbone, which can be intimidating for first-time cooks.
Conclusion
For home cooks frustrated by conflicting online advice, figuring out exactly how long to cook spatchcock chicken comes down to two variables: your bird’s weight and your oven temperature. A 3–7 lb spatchcock chicken takes 28–90 minutes depending on those two factors — and The Spatchcock Temperature Matrix in Step 3 gives you the exact range for your specific bird. The USDA minimum of 165°F (74°C) at the breast is the only reliable doneness indicator, regardless of which time range you’re working from (USDA FSIS, 2026).
The Spatchcock Temperature Matrix exists because no single temperature and time applies to every bird. Once you understand that cook time scales predictably with weight — and that a flat bird always cooks faster than a whole one — the anxiety around this technique disappears. The wire rack, the dry skin, the thermometer: these three elements are what separate a crispy-skinned, juicy result from a disappointing one.
Your next step is straightforward: spatchcock one chicken this week using the steps in this guide. The technique takes about 10 minutes of active work and produces noticeably better results than whole-bird roasting in less time. Most cooks find that after two attempts, it becomes their default method — not because it’s fancy, but because it reliably works.
